第一讲 开源规范
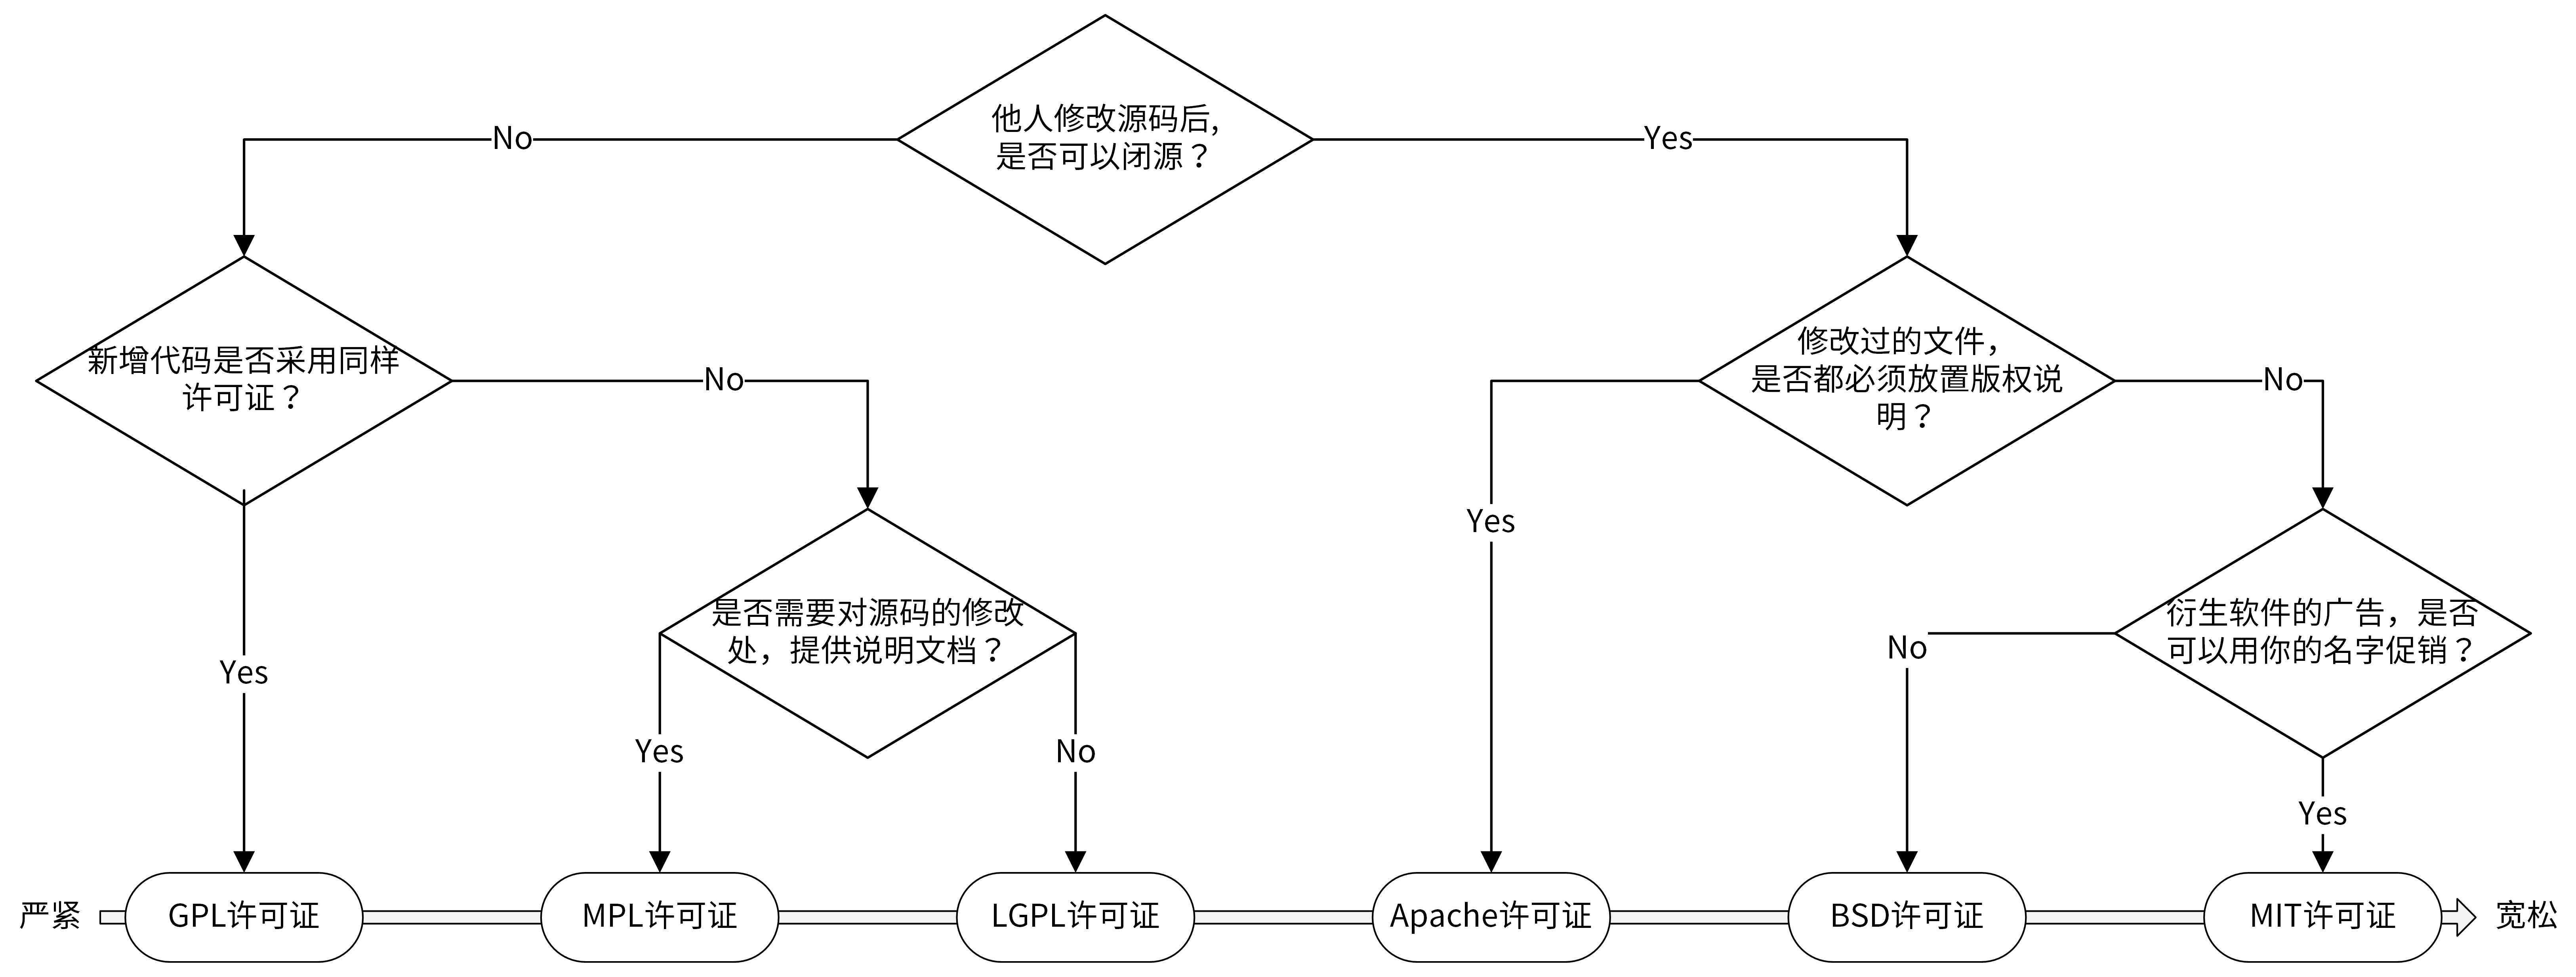
开源协议概述
MIT是相对自由开发的协议
第二讲 文档规范
最重要的三类文档:README文档、项目文档和API文档
README规范
主要用来介绍项目的功能、安装、部署和使用
 1
 2
 3
 4
 5
 6
 7
 8
 9
10
11
12
13
14
15
16
17
18
19
20
21
22
23
24
25
26
27
28
29
30
31
32
33
34
35
36
37
38
39
40
41
42
43
44
45
46
47
48
49
|
# 项目名称

<!-- 写一段简短的话描述项目 -->

# 功能特性

<!-- 描述该项目的核心功能点 -->

# 软件架构(可选)

<!-- 可以描述下项目的架构 -->

# 快速开始

# 依赖检查

<!-- 描述该项目的依赖,比如依赖的包、工具或者其他任何依赖项 -->

# 构建

<!-- 描述如何构建该项目 -->

# 运行

<!-- 描述如何运行该项目 -->

# 使用指南

<!-- 描述如何使用该项目 -->

# 如何贡献

<!-- 告诉其他开发者如果给该项目贡献源码 -->

# 社区(可选)

<!-- 如果有需要可以介绍一些社区相关的内容 -->

# 关于作者

<!-- 这里写上项目作者 -->

# 谁在用(可选)

<!-- 可以列出使用本项目的其他有影响力的项目,算是给项目打个广告吧 -->

# 许可证

<!-- 这里链接上该项目的开源许可证 -->
|
项目文档规范
通常放在/docs目录下,包含开发文档和用户文档
 1
 2
 3
 4
 5
 6
 7
 8
 9
10
11
12
13
14
15
16
17
18
19
20
21
22
23
24
25
26
27
28
|
docs
├── devel                            # 开发文档,可以提前规划好,英文版文档和中文版文档
│   ├── en-US/                       # 英文版文档,可以根据需要组织文件结构
│   └── zh-CN                        # 中文版文档,可以根据需要组织文件结构
│       └── development.md           # 开发手册,可以说明如何编译、构建、运行项目
├── guide                            # 用户文档
│   ├── en-US/                       # 英文版文档,可以根据需要组织文件结构
│   └── zh-CN                        # 中文版文档,可以根据需要组织文件结构
│       ├── api/                     # API文档
│       ├── best-practice            # 最佳实践,存放一些比较重要的实践文章
│       │   └── authorization.md
│       ├── faq                      # 常见问题
│       │   ├── iam-apiserver
│       │   └── installation
│       ├── installation             # 安装文档
│       │   └── installation.md
│       ├── introduction/            # 产品介绍文档
│       ├── operation-guide          # 操作指南,里面可以根据RESTful资源再划分为更细的子目录,用来存放系统核心/全部功能的操作手册
│       │   ├── policy.md
│       │   ├── secret.md
│       │   └── user.md
│       ├── quickstart               # 快速入门
│       │   └── quickstart.md
│       ├── README.md                # 用户文档入口文件
│       └── sdk                      # SDK文档
│           └── golang.md
└── images                           # 图片存放目录
    └── 部署架构v1.png
|
API接口规范
API文档生成方式包括通过注释生成、编写Markdown格式文档, 通常拆分为多个文件
- README: API介绍整体文档
- CHANGELOG: PAI变更历史
- generic: 通用的请求参数、返回参数、认证方法、响应状态码等说明
- struct: 接口使用的数据结构
- error_code: 业务错误码说明
- 按资源划分API文档: API详细说明
第三讲 版本规范
版本格式为:主版本号.次版本号.修订号(X.Y.Z)
版本号递增规则
- 主版本(major): 不兼容API修改
- 次版本(minor): 新增功能(一般偶数为稳定版,奇数为开发版本)
- 修订版本:问题修正
版本号建议
- 开始开发时,以0.1.0作为第一个开发版本号,后续发行时递增次版本号
- 发布第一个稳定版时定为1.0.0
- 后续迭代
- fix commit将修订版本+1
- feat commit将次版本号+1
- BREAKING CHANGE commit将主版本号+1
第四讲 Commit规范
采用Angular风格的Commit Message, 其包含三个部分:Header、Body和Footer,具体格式如下:
1
2
3
4
5
|
<type>[optional scope]: <description>
// blank line
[optional body]
// blink line
[optional footer]
|
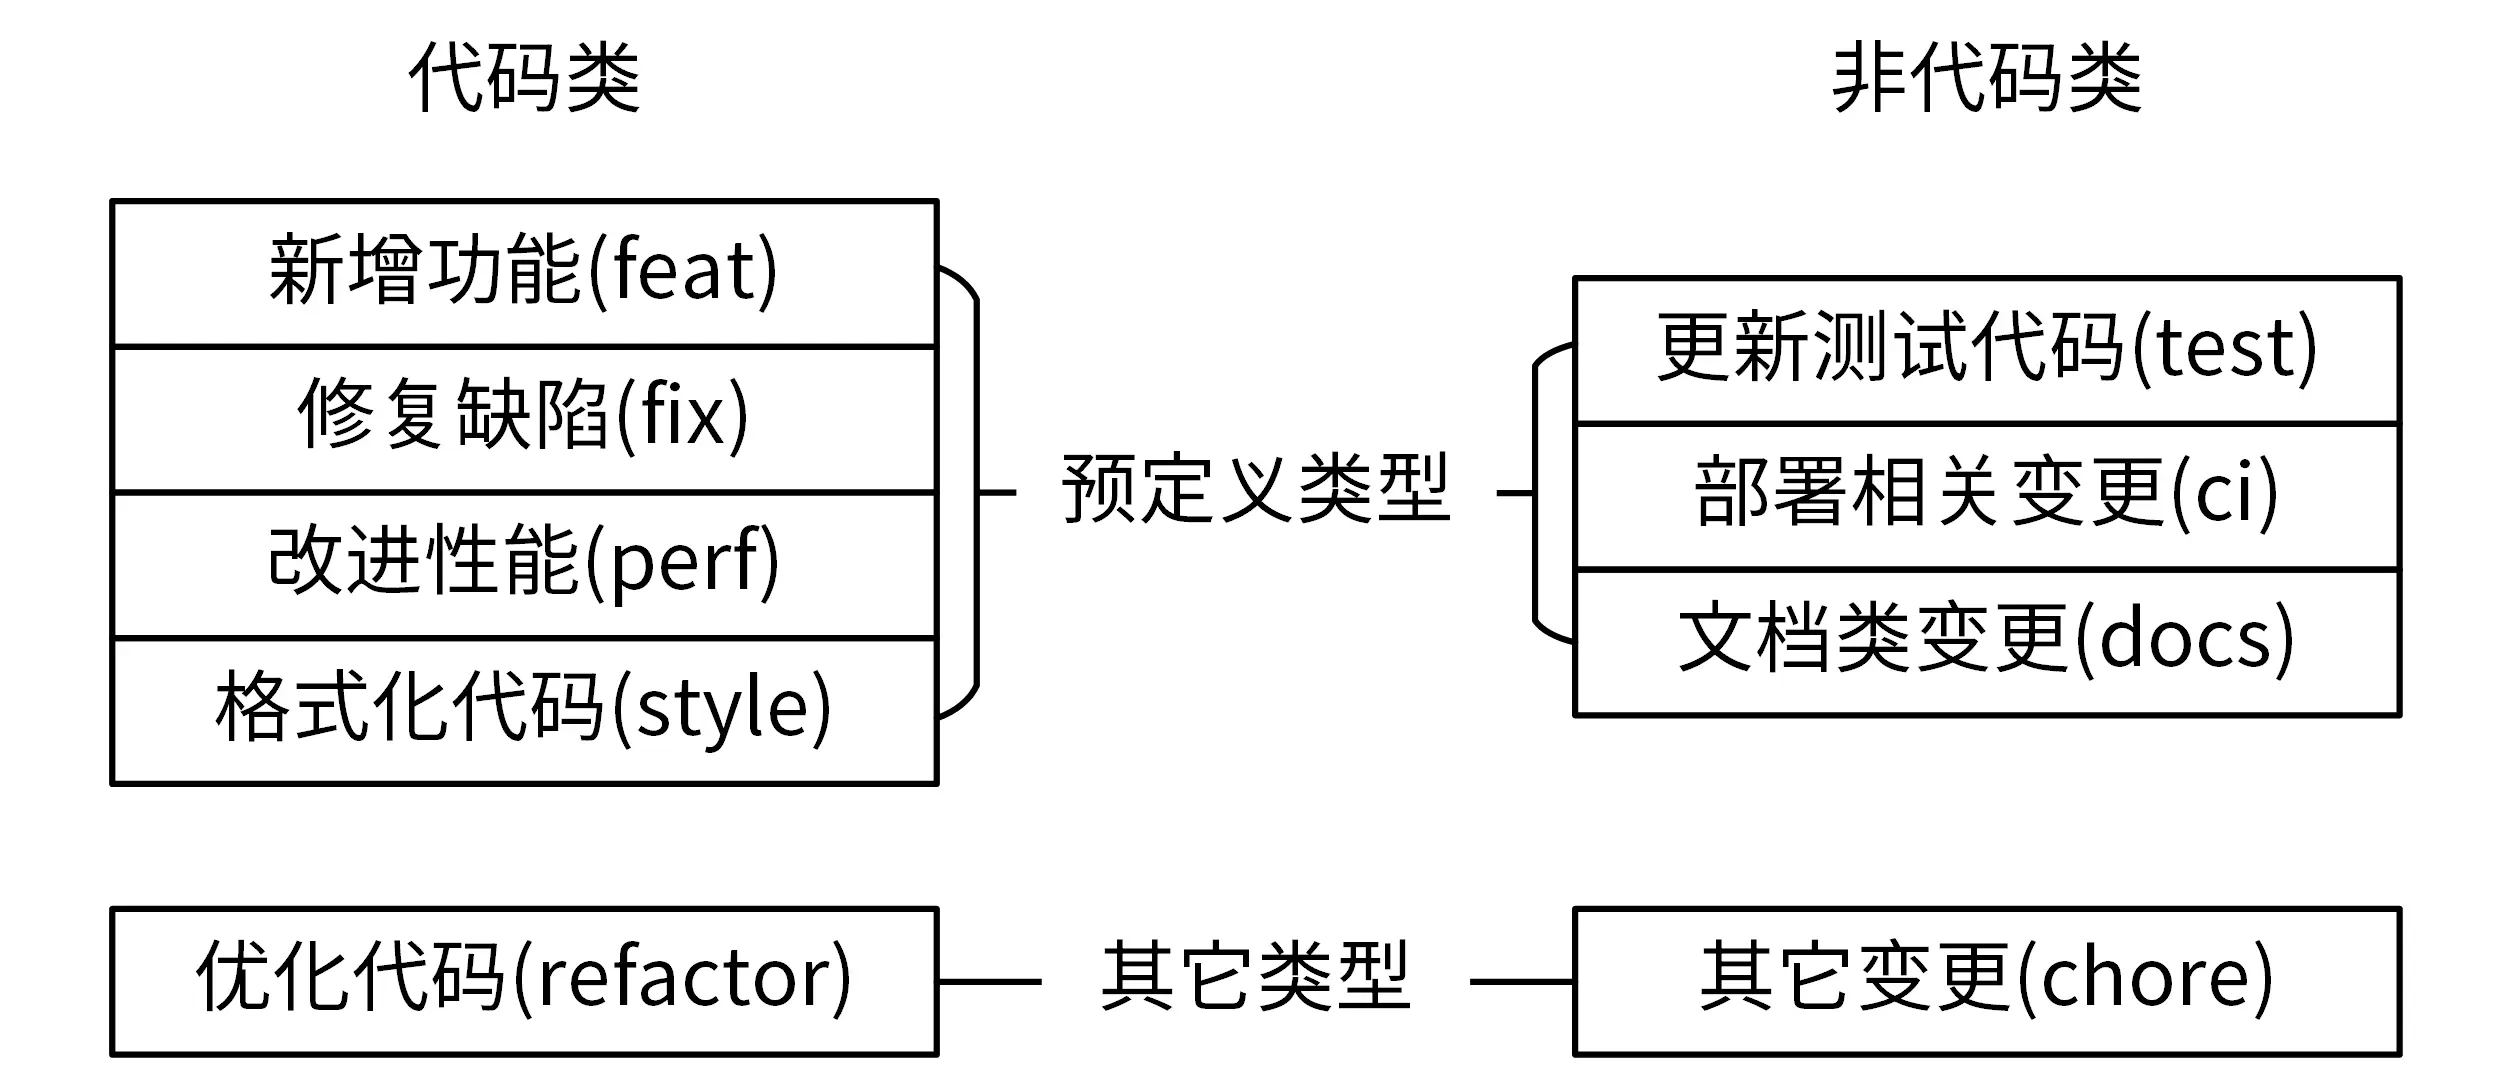
type说明commit类型,主要分为Development和Production两大类
- Development类别修改的是项目管理类的变更,如CI流程、构建方式等,不会影响到最终用户,具体类型
- style:代码格式类的变更,如格式化代码、删除空行等
- test: 增加或更新测试用例
- ci:持续集成和部署相关的改动
- docs:更新文档
- chore:其他类型,如构建流程、依赖管理或辅助工具的变更等
- Production类别会影响到最终用户,提交前需要做好充分的测试
- feat: 新增功能
- fix: bug修复
- perf: 提高代码性能的变更
- refactor: 不属于上面三类的其他类型,如简化代码、重命名变量等
scope用来说明影响范围,应根据项目情况设计大类如api、pkg、docs等
descrption是对commit的简单描述,必须以动词开头,使用现在时态,结尾不加句号
Body
body是对commit的详细描述,同样以动词开头,使用现在时态,内容包含改动的原因和改动点
通产用来说明不兼容的改动和关闭的issue,如下示例
1
2
|
BREAKING CHANGE: XXXXX
Cloes: #123, #234
|
Revert Commit
当还原commit的时,在还原的Header前面加revert: , Body里面说明还原的commit hash,如:
1
2
3
|
revert: feat(api): add 'Host' option

This reverts commit fjsdf34353534vdf
|
其他
合并提交: 对于过多的commit使用git rebase进行合并
修改message: 使用git rebase(注:修改message会将导致当前及置换的hash变更)
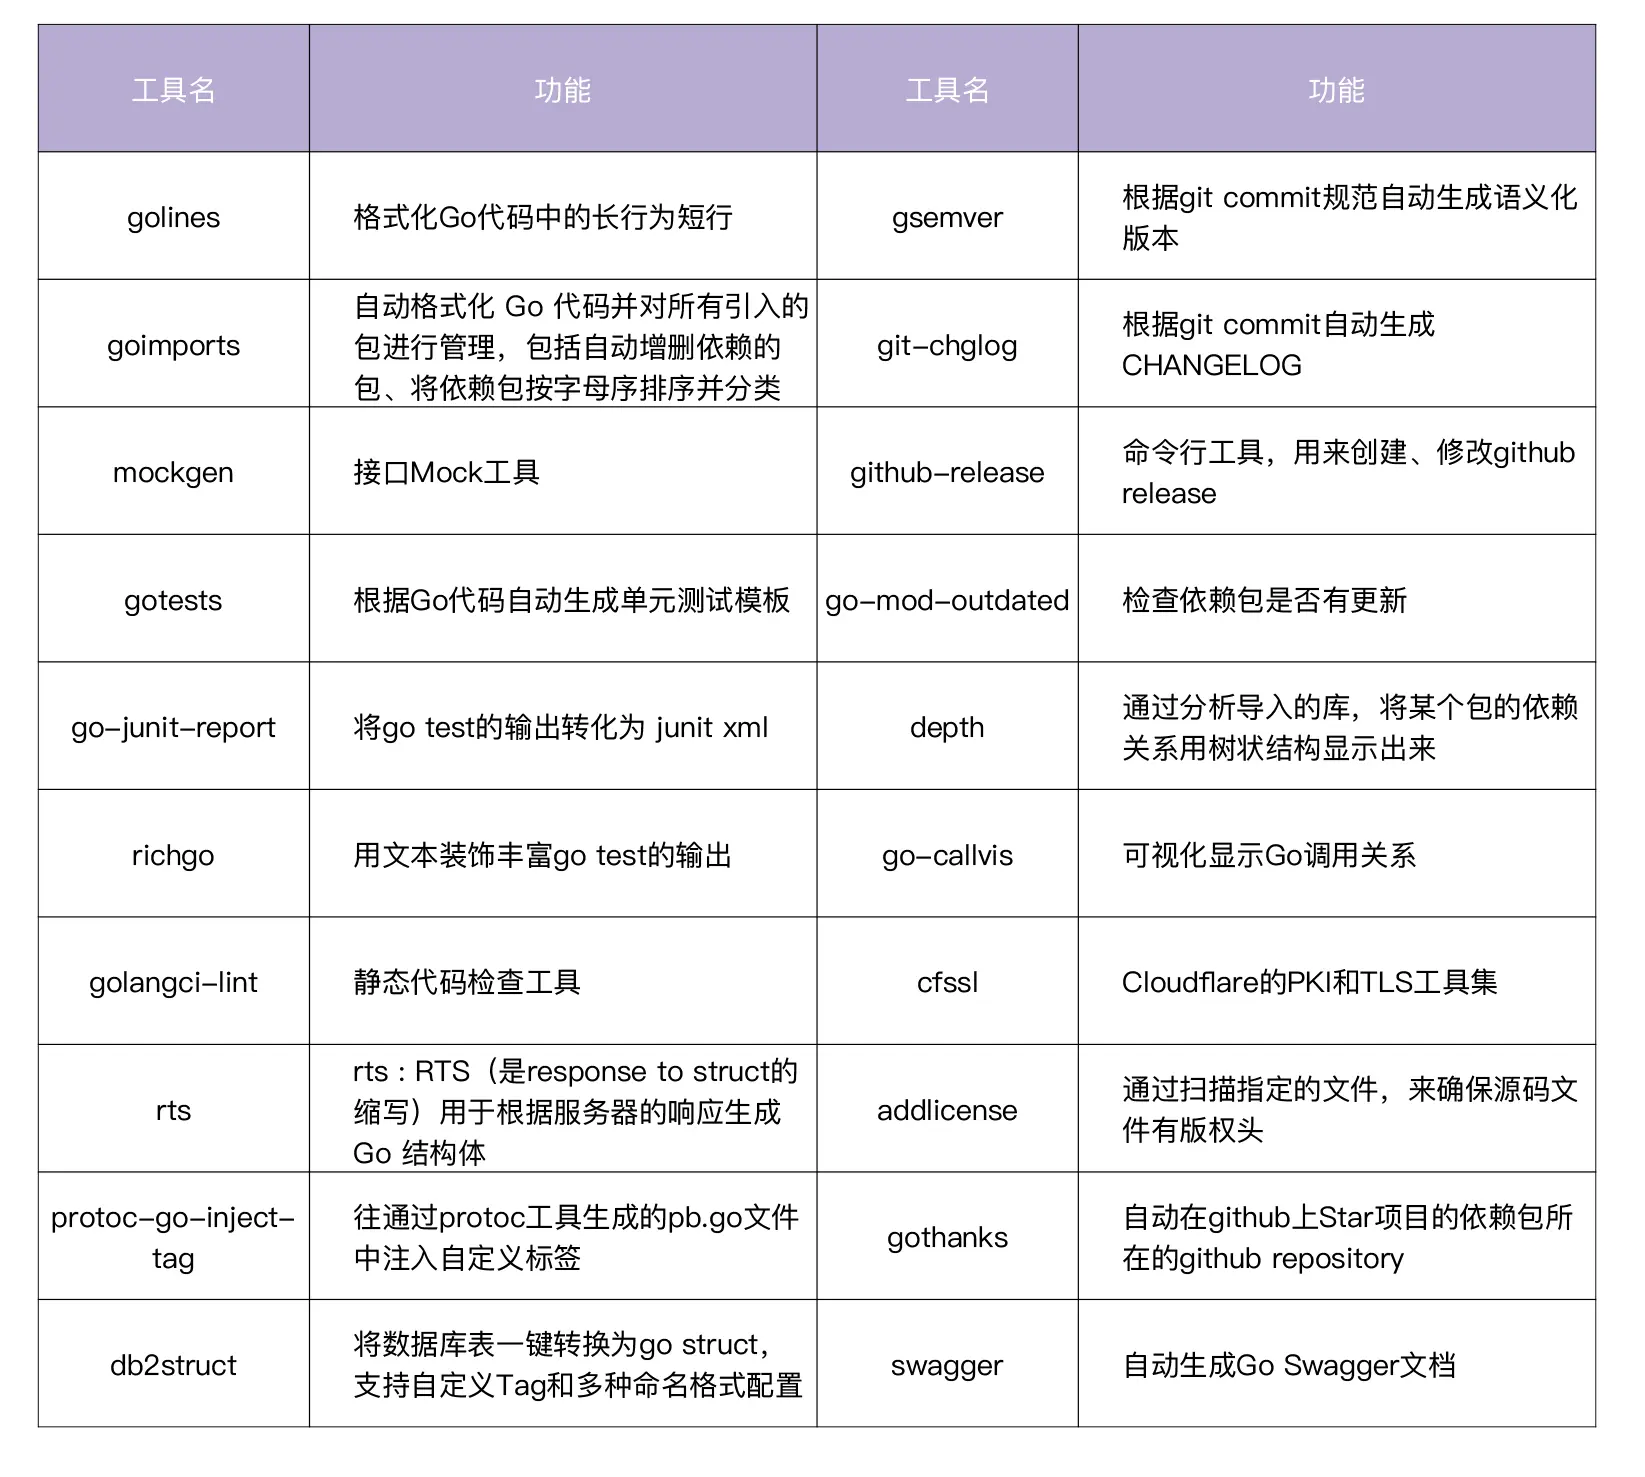
自动化工具:
第五讲 目录结构设计

目录介绍
1. /web
web目录主要存放web静态资源
2. /cmd
一个项目可能有多个组件,每个组件的main函数所在文件夹放在该目录
3. /internal
存放私有应用的代码,不能被其他项目导入
项目内应用之间共享代码存放于/internal/pkg
开发建议:最开始将共享代码都放/internal/pkg,做好对外发布的准备时再转到/pkg目录
IAM项目internal目录结构如下:
 1
 2
 3
 4
 5
 6
 7
 8
 9
10
11
12
13
14
15
16
17
18
19
20
21
22
23
24
25
26
27
28
|
├── apiserver
│   ├── api
│   │   └── v1
│   │       └── user
│   ├── options
│   ├── config
│   ├── service
│   │   └── user.go
│   ├── store
│   │   ├── mysql
│   │   │   └── user.go
│   │   ├── fake
│   └── testing
├── authzserver
│   ├── api
│   │   └── v1
│   ├── options
│   ├── store
│   └── testing
├── iamctl
│   ├── cmd
│   │   ├── cmd.go
│   │   ├── info
└── pkg
    ├── code
    ├── middleware
    ├── options
    └── validation
|
主要分为三大类
- /internal/pkg: 内部共享包存放目录
- /internal/iamctl: 对于大型项目,可能会存在客户端工具
- /internal/apiserver: 应用目录
针对具体的应用目录,也会根据功能来划分:
- /internal/apiserver/api/v1: HTTP API接口具体实现
- /internal/apiserver/options: command flag
- /internal/apiserver/service: 业务逻辑代码
- /internal/apiserver/store/mysql: 数据库交互
/internal/pkg通常也会划分:
- /internal/pkg/code: 业务Code码
- /internal/pkg/validation: 通用验证函数
- /internal/pkg/code: HTTP处理链
4. /pkg
pkg目录存放外部应用可以使用的代码库,应谨慎考虑
5. /vendor
项目依赖,通过go mod vendor创建
6. /third_party
外部帮助工具,比如fork了一个第三方go包,并做了小改动,可以放置该目录
7. /test
存放其他外部测试应用和测试数据
8. /configs
存放配置文件模板或默认配置
9. /deployments
存放系统和容器编排部署模板和配置
10. /init
存放初始化系统和进程管理配置文件,如systemd、supervisord等
11. /Makefile
项目管理文件
12. /scripts
存放脚本文件,通常可能分为三个目录
- /scripts/make-rules: 存放maker文件,实现Makerfile文件中的各个功能
- /scripts/lib: 存放shell脚本
- /scripts/intall: 如果项目支持自动化部署,可以将部署脚本放在该目录
13. /build
存放安装包和持续集成相关的文件,通常可能包含三个目录
- /build/package: 存放容器(Docker)、系统(deb,rpm)的包配置和脚本
- /build/ci: 存放CI(travis,circle)的配置文件
- /build/docker: 存放子项目各个组件的Dockerfile文件
存放这个项目的支持工具,这些工具可导入来自/pkg和/internal目录的代码
15. /githooks
git钩子
16. /assets
项目使用的其他资源(图片、CSS、Javascript等)
17. /website
放置项目网站相关的数据
18. /README.md
一般包含项目介绍、功能介绍、快速按照、使用指引、详细文档连接和开发指引等
文件较长时可以用tocenize加目录
19. /docs
存放设计文档、开放文档和用户文档等,可能包含下面几个目录
/docs/devel/{en-US, zh-CN}: 存放开发文档
/docs/guide/{en-US, zh-CN}: 存放用户手册
/docs/images: 存放图片文件
20. /CONTRIBUTING.md
用来说明如何贡献代码,规范协同流程
21. /api
存放项目提供的各种不同类型的API接口定义文件,可能有openapi、swagger等目录
1
2
3
4
5
6
|
├── openapi/
│   └── README.md
└── swagger/
    ├── docs/
    ├── README.md
    └── swagger.yaml
|
22. /LICENSE
版权文件
如果需要给源码文件加license头时,可以使用addlicense
项目依赖第三方包使用的license检查使用glice
23. /CHANGELOG
项目更新日志,可结合Angular规范和git-chglog自动生成内容
24. /examples
存放代码示例
其他建议
- 不使用/model目录,按功能拆分到使用的模块中
- 目录和包尽量使用单数
- 小项目可以先包含cmd、pkg、internal三个目录
第六讲 工作流设计
功能分支工作流
开发新功能时,基于master分支新建一个功能分支,在功能分支上进行开发,开发完之后合并到master
该模式适合小规模、人员固定的项目
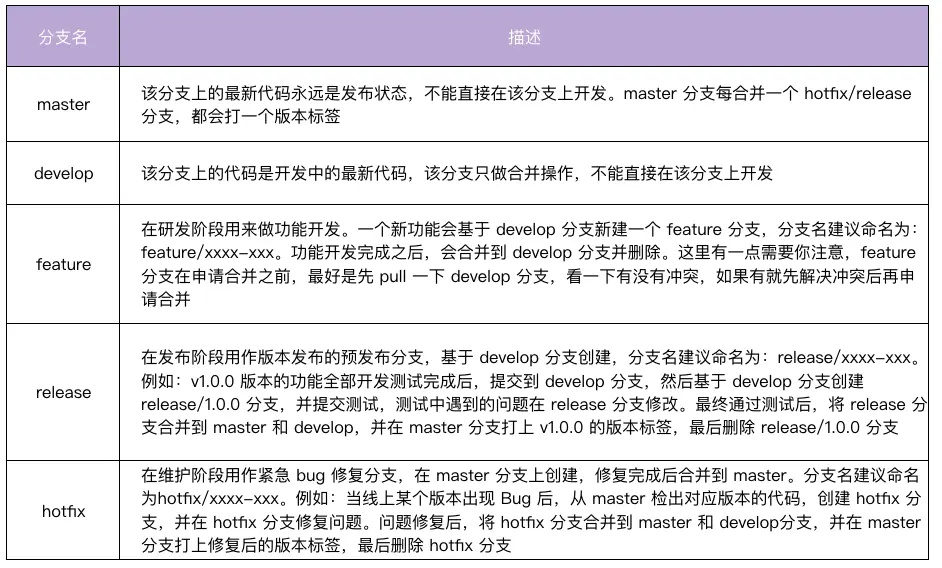
Git Flow工作流
Git Flow定义了5种分支: master、develop、release、 feature、hotfix,详细介绍如下
假设当前在一个future分支开发,突然发现了线上bug,需要hotfix,则流程如下:
 1
 2
 3
 4
 5
 6
 7
 8
 9
10
11
12
13
14
|
$ git stash # 1. 开发工作只完成了一半,还不想提交,可以临时保存修改至堆栈区
$ git checkout -b hotfix/print-error master # 2. 从 master 建立 hotfix 分支
$ vi main.go # 3. 修复 bug,callmainfunction -> call main function
$ git commit -a -m 'fix print message error bug' # 4. 提交修复
$ git checkout develop # 5. 切换到 develop 分支
$ git merge --no-ff hotfix/print-error # 6. 把 hotfix 分支合并到 develop 分支
$ git checkout master # 7. 切换到 master 分支
$ git merge --no-ff hotfix/print-error # 8. 把 hotfix 分支合并到 master
$ git tag -a v0.9.1 -m "fix log bug" # 9. master 分支打 tag
$ go build -v . # 10. 编译代码,并将编译好的二进制更新到生产环境
$ git branch -d hotfix/print-error # 11. 修复好后,删除 hotfix/xxx 分支
$ git checkout feature/print-hello-world # 12. 切换到开发分支下
$ git merge --no-ff develop # 13. 因为 develop 有更新,这里最好同步更新下
$ git stash pop # 14. 恢复到修复前的工作状态
|
该模式适合人员固定、规模较大的项目
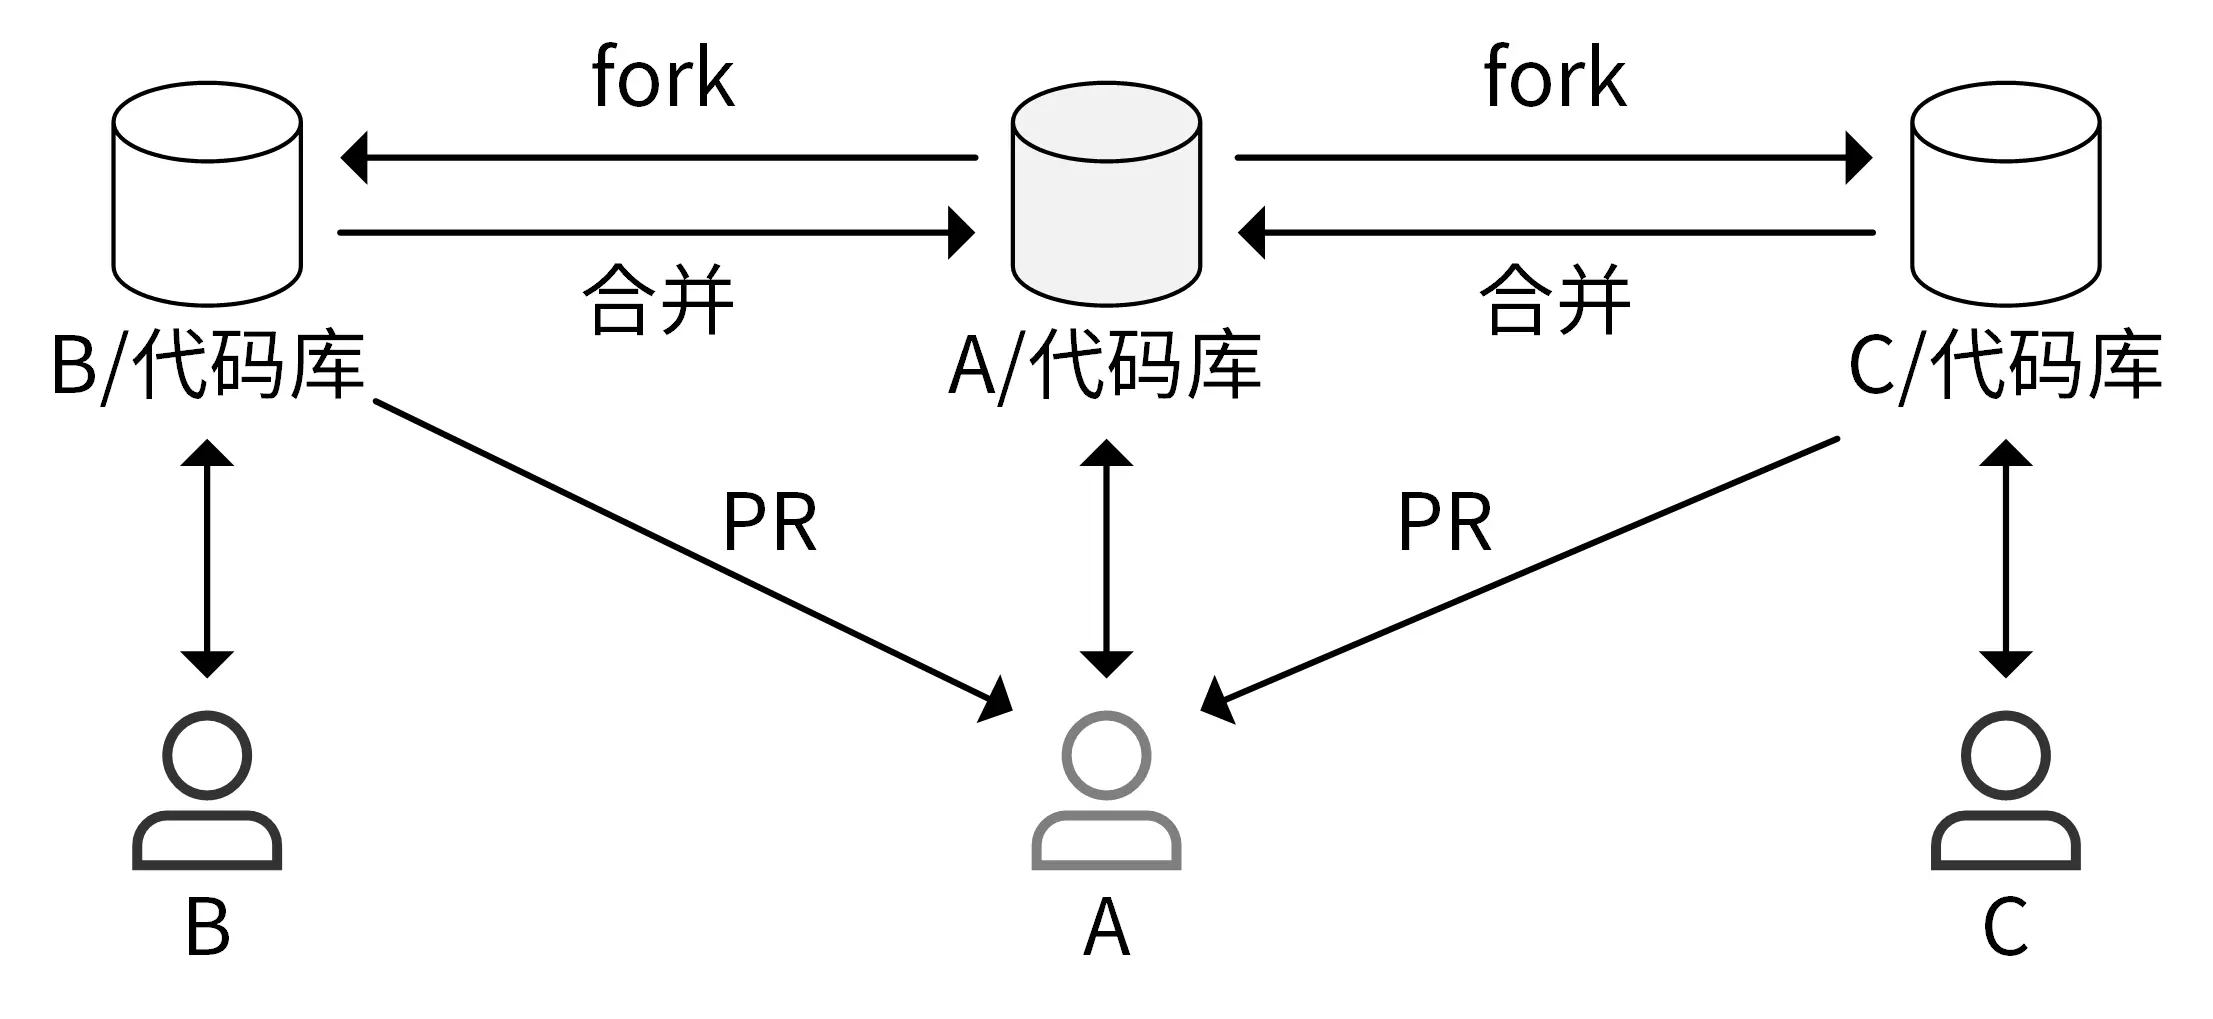
Forking工作流
开源项目常用模式
第七讲 研发流程设计
研发流程
通常研发流程包括6个阶段
- 需求阶段
- 设计阶段
- 开发阶段
- 测试阶段
- 发布阶段
- 运营阶段
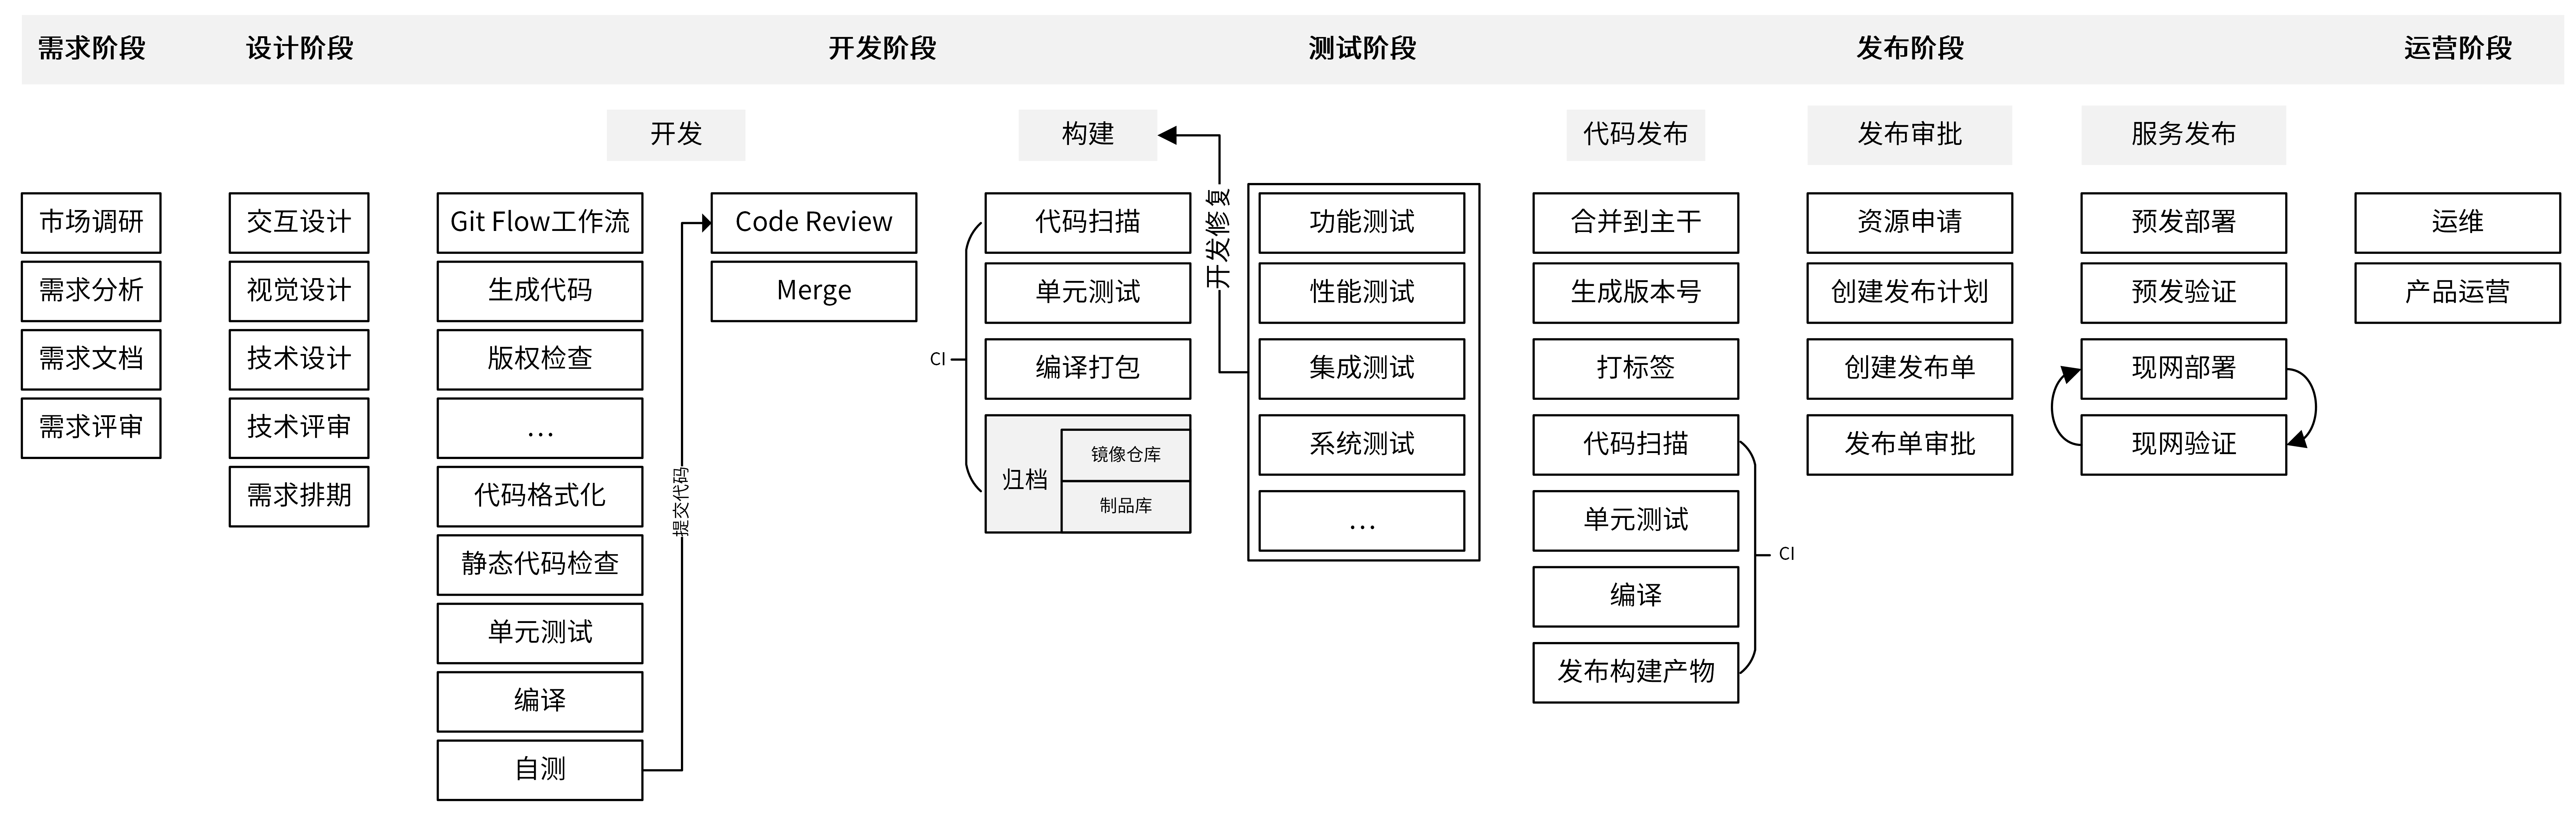
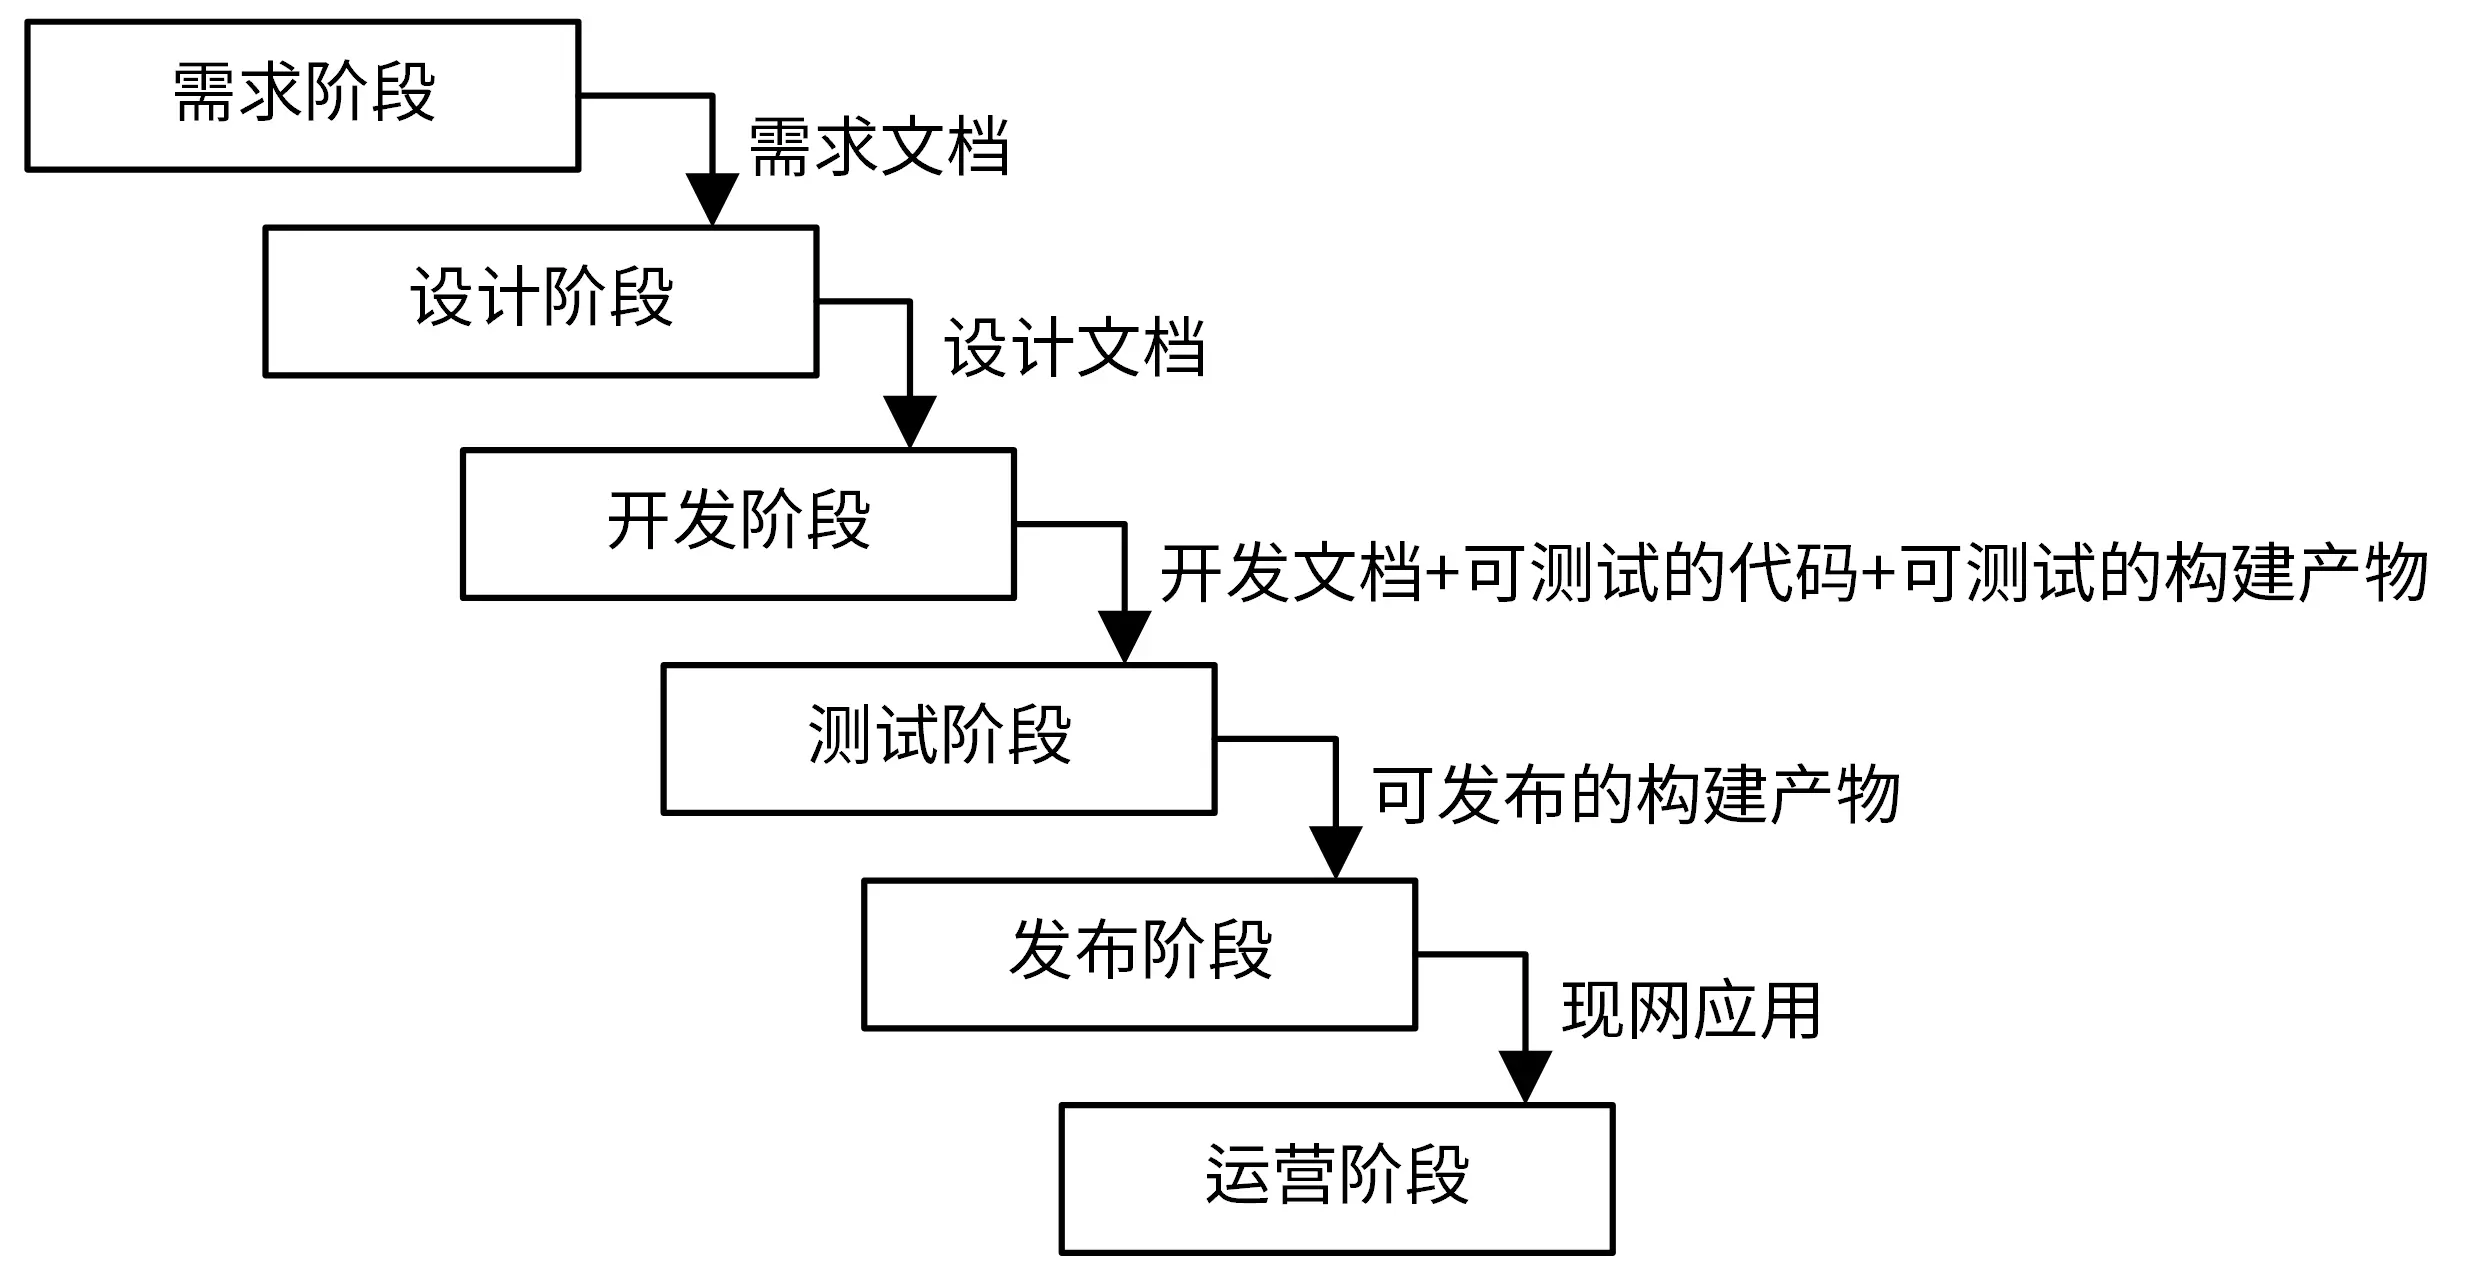
每个阶段结束时,需要一个最终产物,可以是文档、代码或者部署组件,这个产物是下一个阶段的输入
研发模式
研发模式有三种: 瀑布模式、迭代模式和敏捷模式
瀑布模式
瀑布墨迹按照预先规划好的阶段来推进研发进度,流程清晰,但研发周期长,交付后变更困难
迭代模式
研发任务被切分为一系列轮次,先把主要功能搭建起来,在通过客户反馈不断完善
敏捷模式
敏捷模式把大需求分成多个、可分阶段完成的小迭代,每个迭代交付都是一个可用的软件,开发过程中,软件一直处于可用状态
迭代模式关注研发流程。而敏捷模式不仅会关注研发流程,还会关注之外的一些东西,例如:团队协作,需求拆分
CI/CD
CI/CD通过自动化的手段来快速执行代码检查、测试、构建和部署任务,从而提高研发效率
- CI:Continuous Integration,持续集成
- CD:Continuous Delivery,持续交付
- CD:Continuous Deployment,持续部署
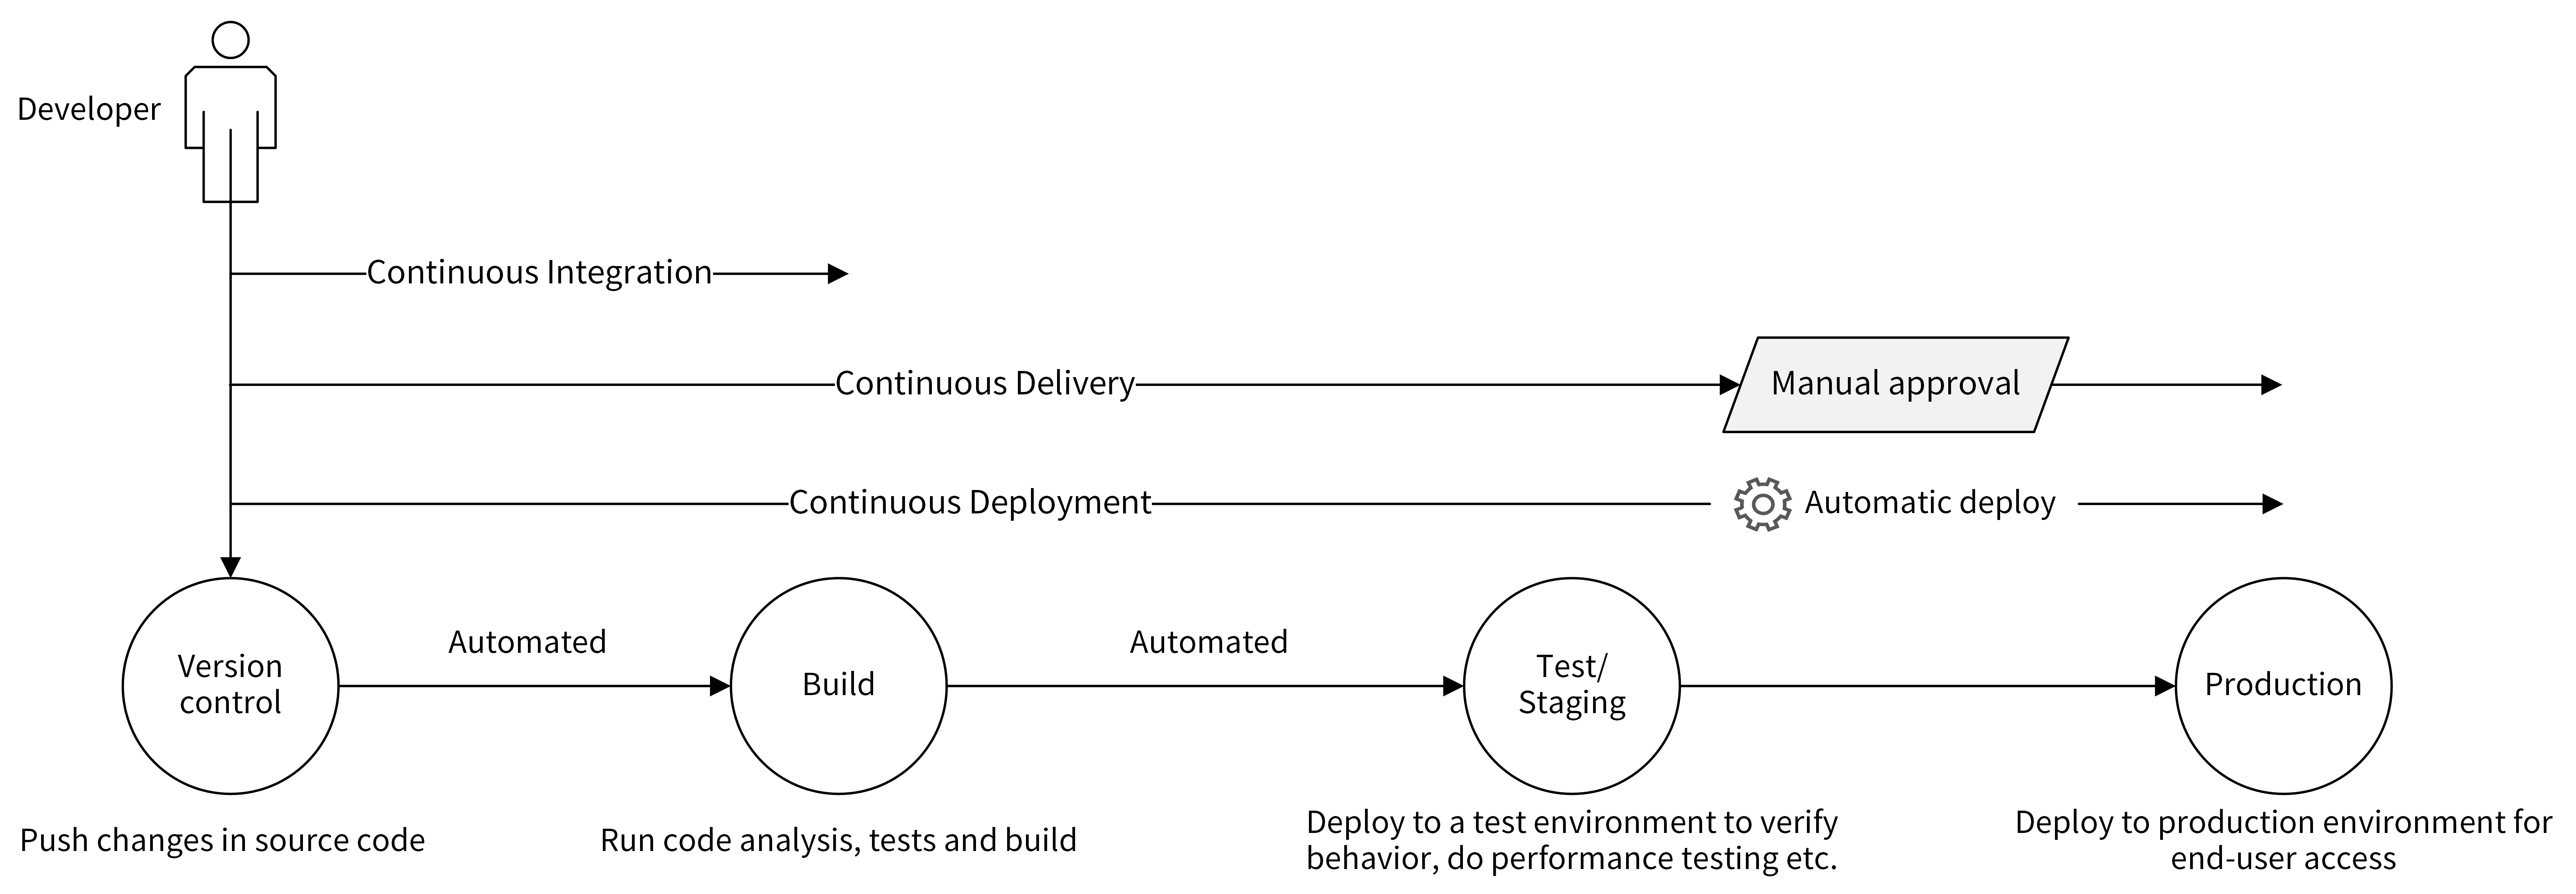
持续集成的核心在代码,持续交付的核心在可交付的产物,持续部署的核心在自动部署
持续集成
在代码push到git仓库后,CI工具会进行扫描、测试和构建,并将结果反馈给开发者
CI流程可以将问题在开发阶段就暴露出来,这会让开发人员交付代码时更有信心
持续交付
在持续集成的基础上,就构建产物自动部署到目标环境(测试、预发布)
持续部署
在持续交付的基础上,将经过充分测试的代码自动部署到生产环境,整个流程不在需要审核,完全自动化
DevOps
DevOps是一组过程、方法和系统的统称,用于促进开发、运维、质量部门之间的协作整合

目前常用的Ops手段: AIOps、ChatOps、GitOps
ChatOps
通过发送指令给聊天机器人,执行某个任务
ChatOps对操作者友好,信息透明可追溯
GitOps
基于Git和K8S实现云原生的持续交付
AIOps
利用AI技术来智能化运维IT系统
第八讲 设计方法
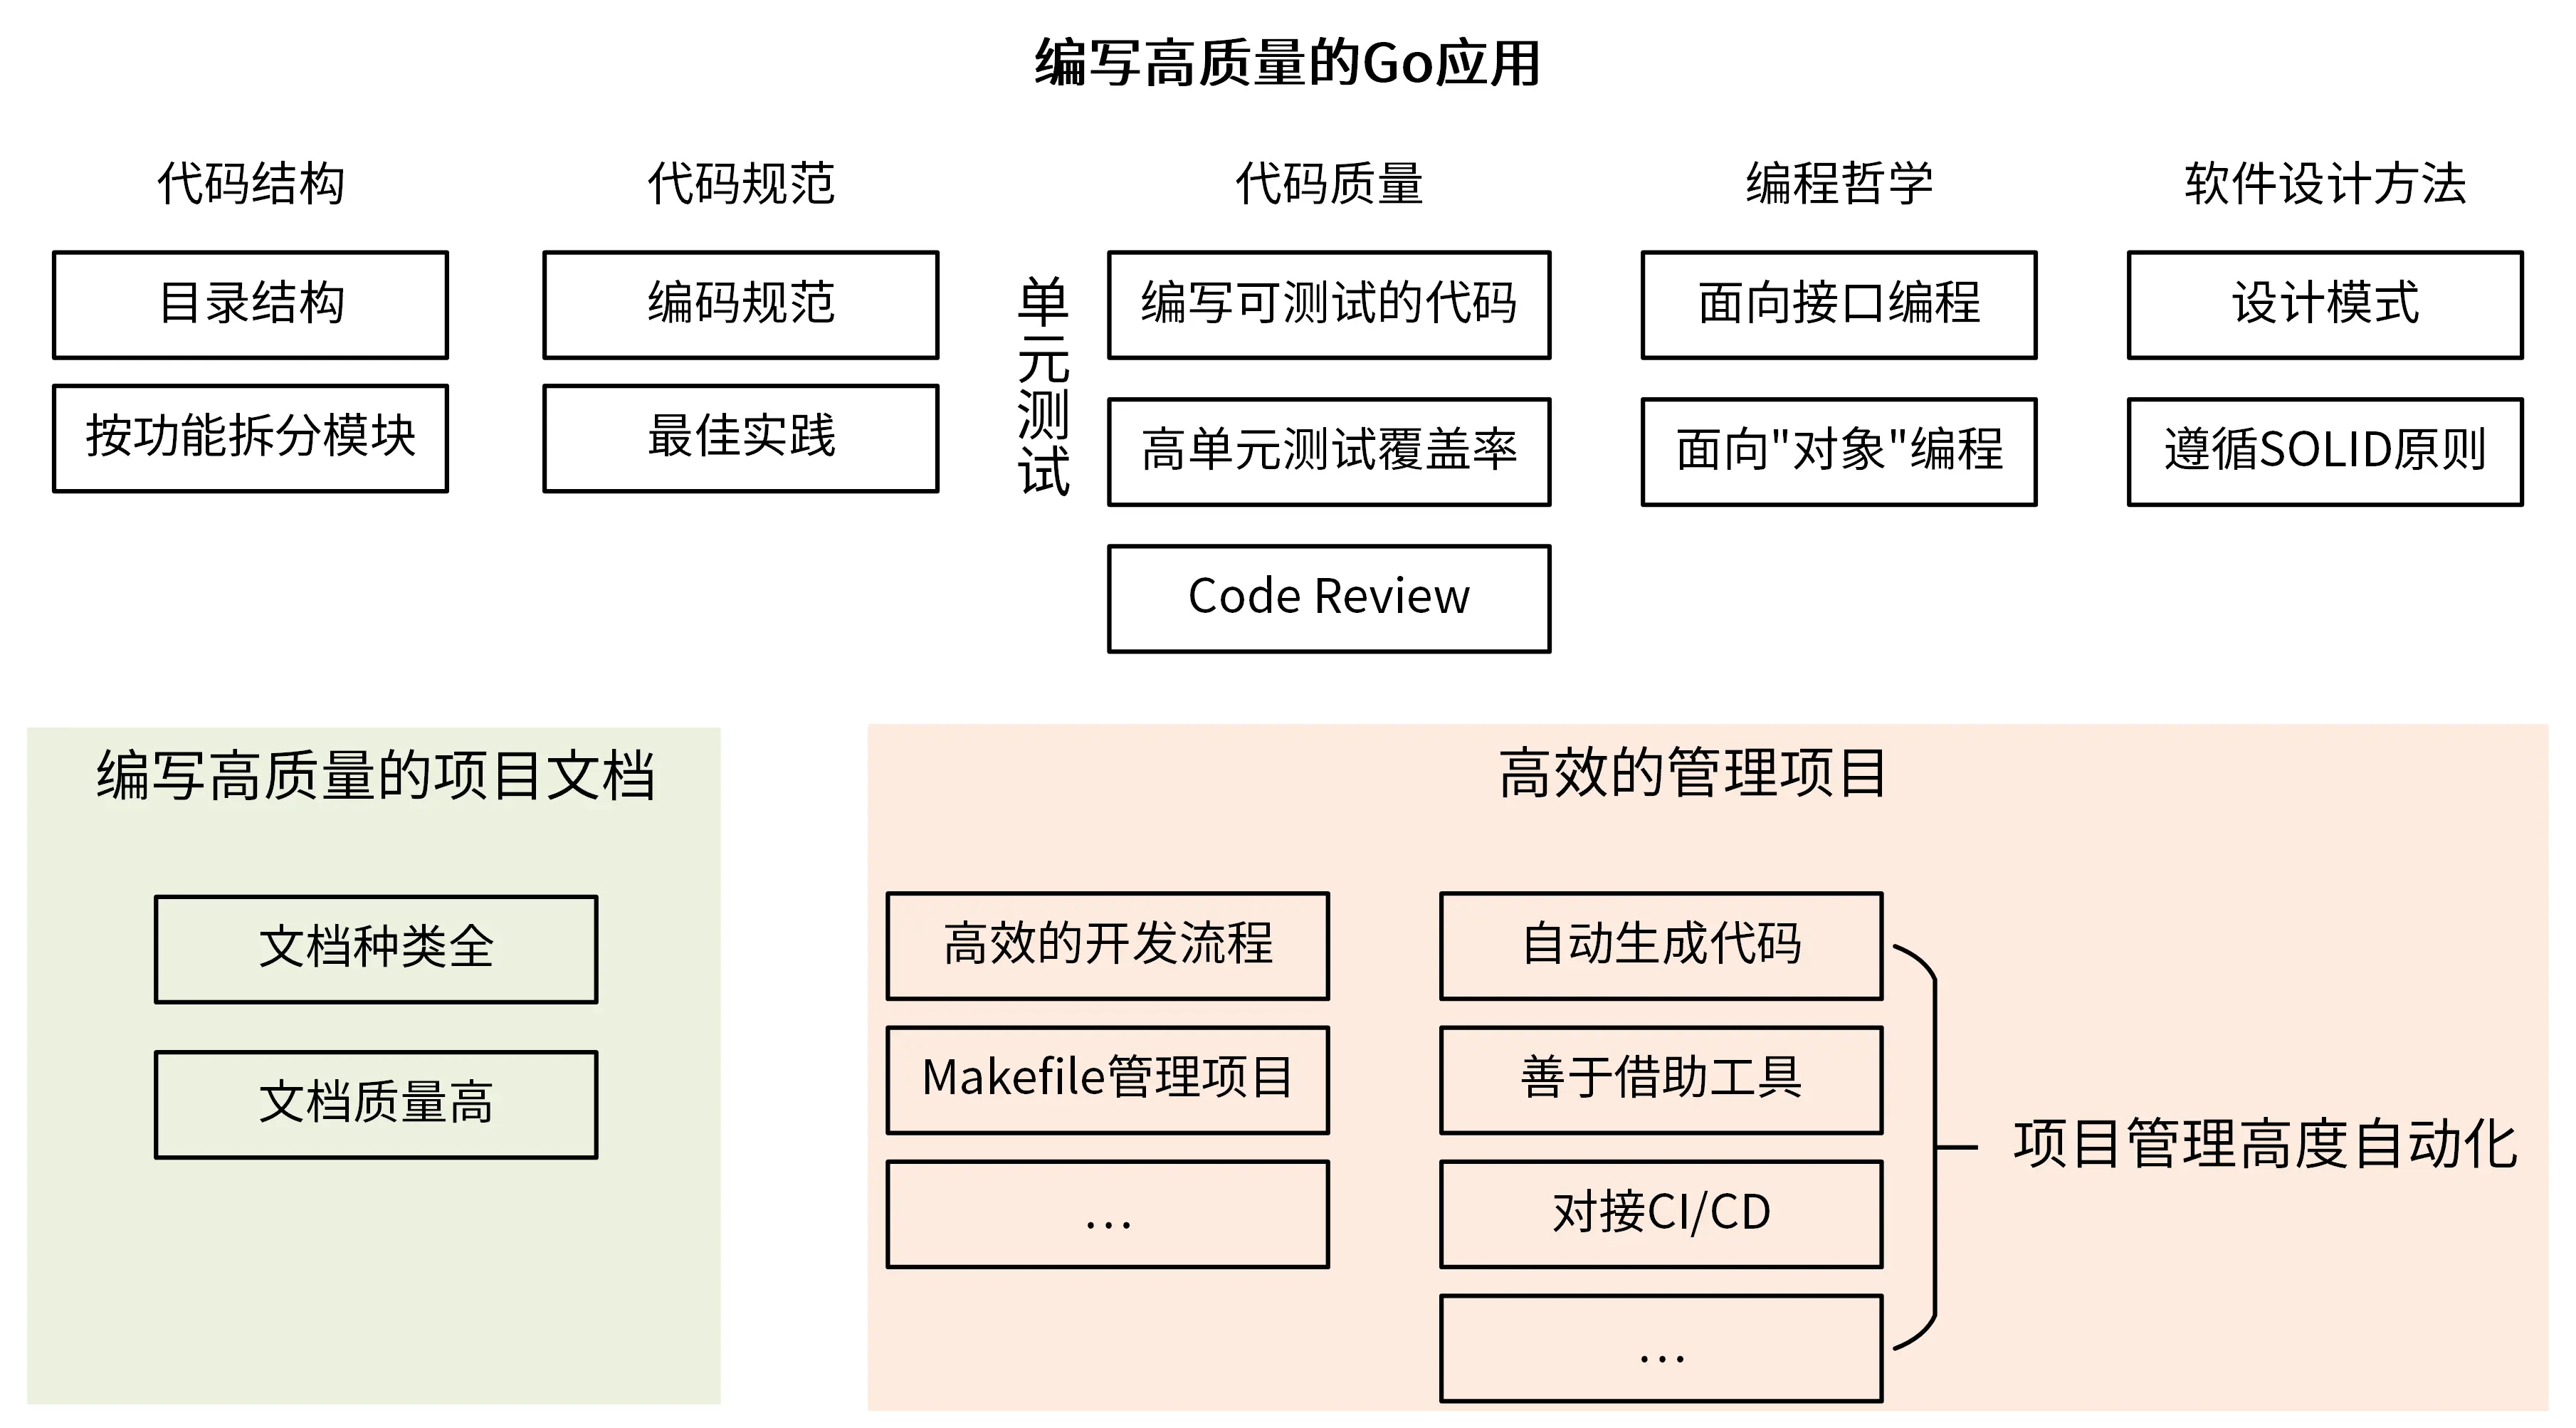
代码结构
按功能拆分目录而非按MVC等模块拆封
代码规范
可参考Uber的规范:Go Style Guide
可使用惊呆检查工具:golangcli-lint
官方CodeReview实践:Go Code Review Comments
代码质量
测试相关工具:
覆盖率检查
1
2
|
$ go test -race -cover  -coverprofile=./coverage.out -timeout=10m -short -v ./...
$ go tool cover -func ./coverage.out
|
编程哲学
软件设计方法
高效项目管理
-
使用Makefile管理项目
-
自动生成代码
-
对接CI、CD
-
编写高质量的文档
第九讲 设计模式

创建型模式
创建型模式(Creational Patterns)提供了在创建对象的同事隐藏创建逻辑的方式,而不是使用new运算符直接实例化对象。
比较常见的是单例模式和工厂模式
单例模式
单例模式(Singleton Pattern)指全局只有一个实例,有利于减少内存开销,防止冲突等优点,常用于数据库实例、全局配置等
 1
 2
 3
 4
 5
 6
 7
 8
 9
10
|
package singleton

type singleton struct {
}

var ins *singleton = &singleton{}

func GetInsOr() *singleton {
    return ins
}
|
- 懒汉模式:实际使用时创建,可能有并发问题,需要加锁
 1
 2
 3
 4
 5
 6
 7
 8
 9
10
11
12
13
14
15
16
17
18
|
package singleton

import (
  "sync"
)

type singleton struct {
}

var ins *singleton
var once sync.Once

func GetInsOr() *singleton {
  once.Do(func() {
    ins = &singleton{}
  })
  return ins
}
|
工厂模式
 1
 2
 3
 4
 5
 6
 7
 8
 9
10
11
12
13
14
15
|
type Person struct {
  Name string
  Age  int
}

func (p Person) Greet() {
  fmt.Printf("Hi, my name is %s\n", p.Name)
}

func NewPerson(name string, age int) *Person {
  return &Person{
  Name: name,
  Age:  age,
  }
}
|
 1
 2
 3
 4
 5
 6
 7
 8
 9
10
11
12
13
14
15
16
17
18
19
|
type Doer interface {
    Do(req *http.Request) (*http.Response, error)
}

func NewHTTPClient() Doer {
    return &http.Client{}
}

type mockHTTPClient struct{}

func (*mockHTTPClient) Do(req *http.Request) (*http.Response, error) {
    res := httptest.NewRecorder()
    return res.Result(), nil
}

func NewMockHTTPClient() Doer {
    return &mockHTTPClient{}
}
|
 1
 2
 3
 4
 5
 6
 7
 8
 9
10
11
12
13
14
15
16
17
18
19
20
21
|
type Person struct {
  name string
  age int
}

func NewPersonFactory(age int) func(name string) Person {
  return func(name string) Person {
    return Person{
      name: name,
      age: age,
    }
  }
}


newBaby := NewPersonFactory(1)
baby := newBaby("john")

newTeenager := NewPersonFactory(16)
teen := newTeenager("jill")
|
结构型模式
结构型模式的特点是关注类和对象的组合
策略模式
定义策略接口,并实现不同的策略,策略执行者可以设置不同的策略
 1
 2
 3
 4
 5
 6
 7
 8
 9
10
11
12
13
14
15
16
17
18
19
20
21
22
23
24
25
26
27
28
29
|
type IStrategy interface {
	do(a, b int) int
}

type add struct {
}

func (*add) do(a, b int) int {
	return a + b
}

type reduce struct {
}

func (*reduce) do(a, b int) int {
	return a - b
}

type Operator struct {
	strategy IStrategy
}

func (o *Operator) setStrategy(strategy IStrategy) {
	o.strategy = strategy
}

func (o *Operator) calculate(a, b int) int {
	return o.strategy.do(a, b)
}
|
模板模式
将一个类中能公共使用的方法放置在抽象类中实现,将不能公共使用的方法作为抽象方法强制子类去实现
 1
 2
 3
 4
 5
 6
 7
 8
 9
10
11
12
13
14
15
16
17
18
19
20
21
22
23
24
25
26
27
28
29
30
31
32
33
34
35
36
37
38
39
40
41
42
43
44
45
46
47
48
49
|
package template

import "fmt"

type Cooker interface {
  fire()
  cooke()
  outfire()
}

// 类似于一个抽象类
type CookMenu struct {
}

func (CookMenu) fire() {
  fmt.Println("开火")
}

// 做菜,交给具体的子类实现
func (CookMenu) cooke() {
}

func (CookMenu) outfire() {
  fmt.Println("关火")
}

// 封装具体步骤
func doCook(cook Cooker) {
  cook.fire()
  cook.cooke()
  cook.outfire()
}

type XiHongShi struct {
  CookMenu
}

func (*XiHongShi) cooke() {
  fmt.Println("做西红柿")
}

type ChaoJiDan struct {
  CookMenu
}

func (ChaoJiDan) cooke() {
  fmt.Println("做炒鸡蛋")
}
|
行为型模式
行为模式的特点是关注对象之间的通信
代理模式
代理模式Proxy pattern 可以为另外一个对象提供一个替身或者占位符,以控制对这个对象的访问
 1
 2
 3
 4
 5
 6
 7
 8
 9
10
11
12
13
14
15
16
17
18
19
20
21
22
23
24
25
26
27
28
29
30
31
32
33
34
35
36
37
|
package proxy

import "fmt"

type Seller interface {
  sell(name string)
}

// 火车站
type Station struct {
  stock int //库存
}

func (station *Station) sell(name string) {
  if station.stock > 0 {
    station.stock--
    fmt.Printf("代理点中:%s买了一张票,剩余:%d \n", name, station.stock)
  } else {
    fmt.Println("票已售空")
  }

}

// 火车代理点
type StationProxy struct {
  station *Station // 持有一个火车站对象
}

func (proxy *StationProxy) sell(name string) {
  if proxy.station.stock > 0 {
    proxy.station.stock--
    fmt.Printf("代理点中:%s买了一张票,剩余:%d \n", name, proxy.station.stock)
  } else {
    fmt.Println("票已售空")
  }
}
|
选项模式
通过选项模式可以创建一个带有默认值得struct变量,并选择性的修改其中一些参数的值
 1
 2
 3
 4
 5
 6
 7
 8
 9
10
11
12
13
14
15
16
17
18
19
20
21
22
23
24
25
26
27
28
29
30
31
32
33
34
35
36
37
38
39
40
41
42
43
44
45
46
47
48
49
50
51
52
53
54
55
56
57
58
59
60
61
62
|
package options

import (
  "time"
)

type Connection struct {
  addr    string
  cache   bool
  timeout time.Duration
}

const (
  defaultTimeout = 10
  defaultCaching = false
)

type options struct {
  timeout time.Duration
  caching bool
}

// Option overrides behavior of Connect.
type Option interface {
  apply(*options)
}

type optionFunc func(*options)

func (f optionFunc) apply(o *options) {
  f(o)
}

func WithTimeout(t time.Duration) Option {
  return optionFunc(func(o *options) {
    o.timeout = t
  })
}

func WithCaching(cache bool) Option {
  return optionFunc(func(o *options) {
    o.caching = cache
  })
}

// Connect creates a connection.
func NewConnect(addr string, opts ...Option) (*Connection, error) {
  options := options{
    timeout: defaultTimeout,
    caching: defaultCaching,
  }

  for _, o := range opts {
    o.apply(&options)
  }

  return &Connection{
    addr:    addr,
    cache:   options.caching,
    timeout: options.timeout,
  }, nil
}
|
第十讲 API风格
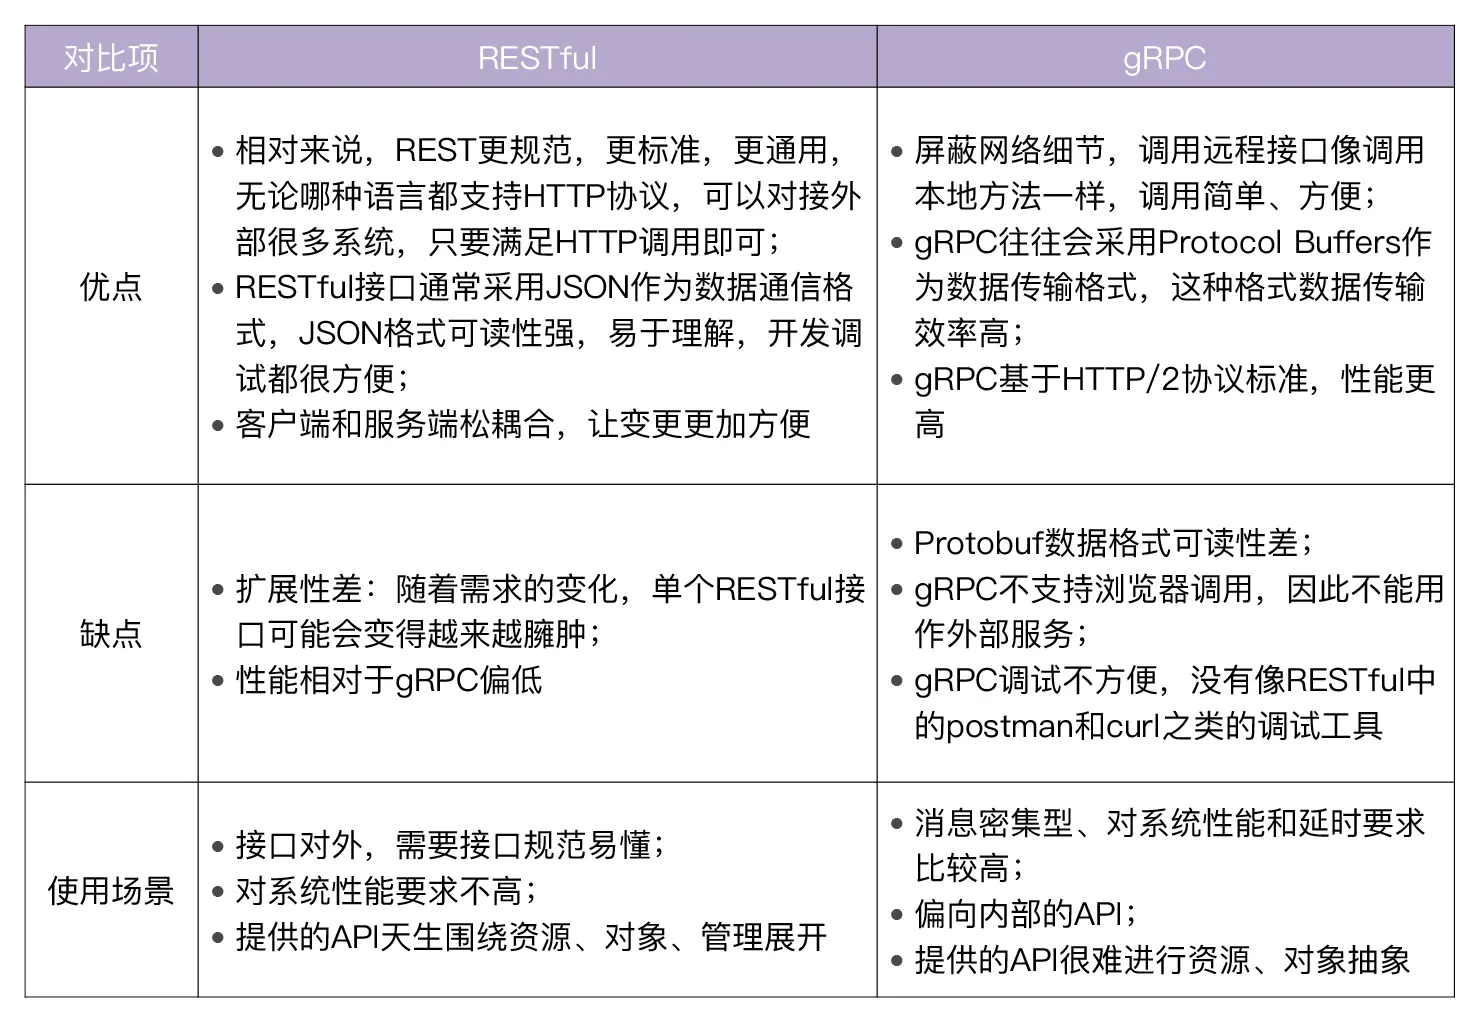
Restful API设计原则
URI设计
通常情况下:
- 资源使用名词复数表示
- URI结尾不包含
/
- 推荐使用
-
- 使用小写
- 避免层级过深,超过2层时将其他资源转为?参数,比如
1
2
|
/schools/tsinghua/classes/rooma/students/zhang # 不推荐
/students?school=qinghua&class=rooma # 推荐
|
实际场景中某些操作不能很好地映射为资源,可以参考如下做法:
- 将一个操作变成一个资源的属性,比如禁用用户可以设计URI: /users/zhangsan?active=false
- 将操作当做是一个资源的嵌套资源,如github star:
1
2
|
PUT /gits/:id/star
DELETE /gits/:id/star
|
- 有时也可以打破规范,如登录操作URI设计为:/login
操作和方法之间的映射

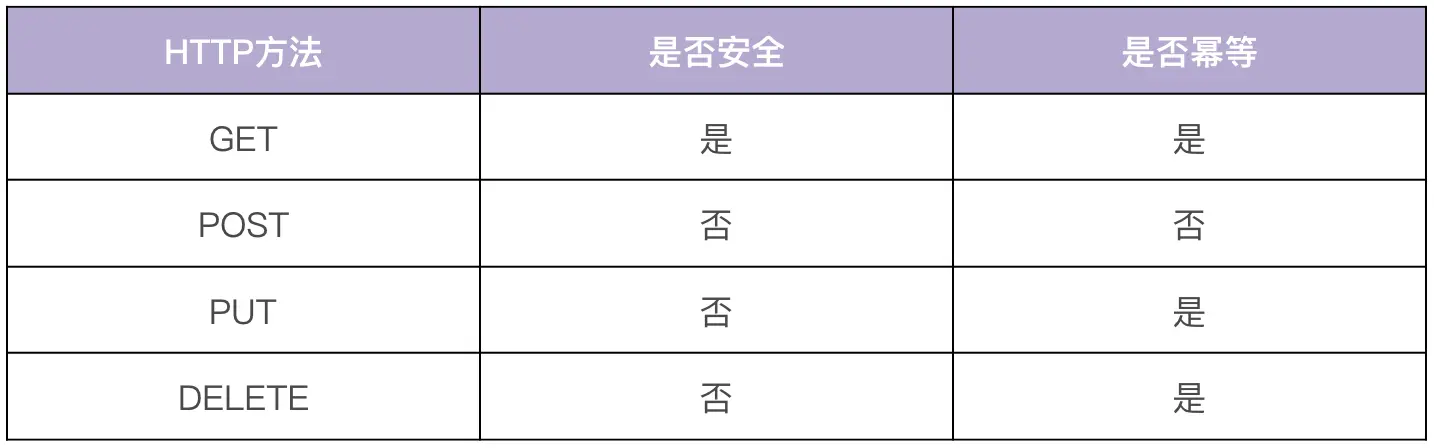
对资源的操作应蛮子安全性和幂等性:
- 安全性:不会改变资源状态,可以理解为只读
- 幂等性:执行1次和执行N次,对资源状态改变的效果是等价的
POST一般用在新建和批量删除这两种场景,批量删除更建议使用:DELETE /users?id=1,2,3
统一分页/过滤/排序/搜索功能
- 分页:在列出一个Collection所有Member时应该提供分页功能,如:/users?offset=0&limit=20
- 过滤:当不用返回一个资源的全部属性时可以指定,如:/users?fields=email,username,address
- 排序:根据指定字段排序,如:/users?sort=age,desc
- 搜索:当一个资源的Member太多时,可能需要提供搜索功能,搜索建议按模糊搜索来匹配
域名
主要有两种方式:
RPC API
RPC(Remote Procedure Call)即远程过程调用,通俗地来讲就是服务端实现了一个函数,
客户端使用RPC框架提供的接口,想调用本地函数一样调用这个函数,并获取返回值。
protobuf3可以使用optional关键字来支持显示判断是否传入该字段
- golang会将该字段转为指针类型,可以判断是否为
nil
- python可以通过
HasField方法来判断
可以通过grpc-gateway来同时支持restful-api
第十一讲 Makefile
基本形式
1
2
|
<target> : <prerequisites>
[tab]  <commands>
|
- target: 目标,目标非文件时称之为伪目标PHONBY
- prerequisities: 前置依赖目标
- command: 具体的shell命令,以
tab起手,每一行都是单独的session, 可用;共用session,使用\作为换行符
基本语法
声明伪目标
避免有和target同名的文件
1
2
3
|
.PHONY: clean
clean:
    rm -rf *.c
|
关闭回声
命令前面加@不会先打印命令
1
2
|
test:
    @echo 'hello world'
|
忽略错误
命令前面加-可忽略错误,继续往下执行
1
2
3
|
test:
	-eco 'hello world'
	@echo 'hello world2'
|
通配符
支持%、*、~
变量和赋值
 1
 2
 3
 4
 5
 6
 7
 8
 9
10
11
|
VARIABLE = value
# 在执行时扩展,允许递归扩展。

VARIABLE := value
# 在定义时扩展。

VARIABLE ?= value
# 只有在该变量为空时才设置值。

VARIABLE += value
# 将值追加到变量的尾端。
|
1
2
3
|
msg = 'hello world'
test:
    echo $(msg)
|
自动变量
1
2
|
a.txt:
echo 'hello' > $@
|
1
2
3
4
5
|
a.txt: b.txt c.txt
cp $< $@
# 等同于
a.txt: b.txt c.txt
cp b.txt a.txt
|
$^: 指所有前置条件$*: 指被%匹配的部分$(@D):指向$@的目录名$(@F):指向$@的文件名
条件语句
1
2
3
4
5
|
ifeq (arg1, arg)
echo 'eq'
else
echo 'neq'
endif
|
1
2
3
|
ifdef var1
echo 'var1 exist'
endif
|
循环语句
1
2
3
4
|
LIST = one two three
for i in $(LIST); do
echo $$i;
done;
|
内置函数
1
|
files := $(shell echo *.c)
|
1
2
|
# 将ee换成大写
$(subst ee,EE,feet on the street)
|
1
|
$(patsubst %.c,%.o,x.c bar.c)
|
第十二讲 流程管理
- 使用git-flow工作流
- 使用Makefile同一规范
静态代码检查
使用强大的golangci-lint
swagger文档生成
使用go-swagger自动生成openapi规范的文档
第十三讲 错误处理
HTTPS CODE
建议使用主要的几个错误码:
- 200: 请求成功
- 400: 客户端问题
- 500: 服务端问题
需要的的话额外补充:
- 401: 认证失败
- 403: 授权失败
- 404: 资源不存在
- 429: 请求超频
错误码设计
使用六位整数,分为三部分, 前两位表示服务,中间两位表示具体模块,末两位表示错误码序号
错误包设计
需求
- 支持记录错误堆栈
- 支持打印不同格式的信息
s: 打印展示给用户的信息(Code.String())v: 同上-v: 打印最顶层的错误码、调用栈、用户展示信息、内部信息+v: 递归打印-v上述信息#+v: 同+v, 但以JSON格式输出,方便日志收集
- 支持Wrap/Unwrap功能
- 支持Is判断功能
- 支持As转换功能
- 支持格式化和非格式化创建
实现
基于githu.com/pkg/errors二次开发
增加WithCode结构体
1
2
3
4
5
6
7
8
|
type withCode struct {
err error
code int
cause error
*stack
}
|
错误码实现
1
2
3
4
5
6
7
8
9
10
11
12
13
14
|
//Code接口
type Coder interface {
// HTTP status that should be used for the associated error code.
HTTPStatus() int
// External (user) facing error text.
String() string
// Reference returns the detail documents for user.
Reference() string
// Code returns the code of the coder
Code() int
}
|
第十四讲 日志包设计
基础功能
- 支持基本的日志信息:时间戳、文件名、行号、日志级别和日志信息
- 支持不同的日志级别
- 支持自定义配置,如调整日志级别,调整输出格式等
- 支持输出到标准输出和文件
高级功能
- 支持多种日志格式,如支持JSON格式方便filebeat日志采集工具采集并上报
- 能够按级别分类输出
- 支持日志轮转
- 具备HOOK能力,如发邮件高级等
可选功能
- 支持颜色输出
- 兼容标准log包
- 支持输出到不同的位置如Kafka等组件
关注点
分布式日志解决方法(EFK)

- Logstash Shipper监控采集日志,并发送到Kafka
- Logstash Indexer消费Kafka中的日志,处理后投递到Elasticsearch中
- Elasticsearch提供搜集、分析和存储数据三大功能
- Kibaba提供Web界面
第十五讲 日志包实现
优先开源日志包
- 标准log包
- glog: 实现了基本功能适合小项目
- logrus: 功能强大,适合大型项目
- zap: 性能高,内存分配次数少,适合对日志性能要求很高的项目
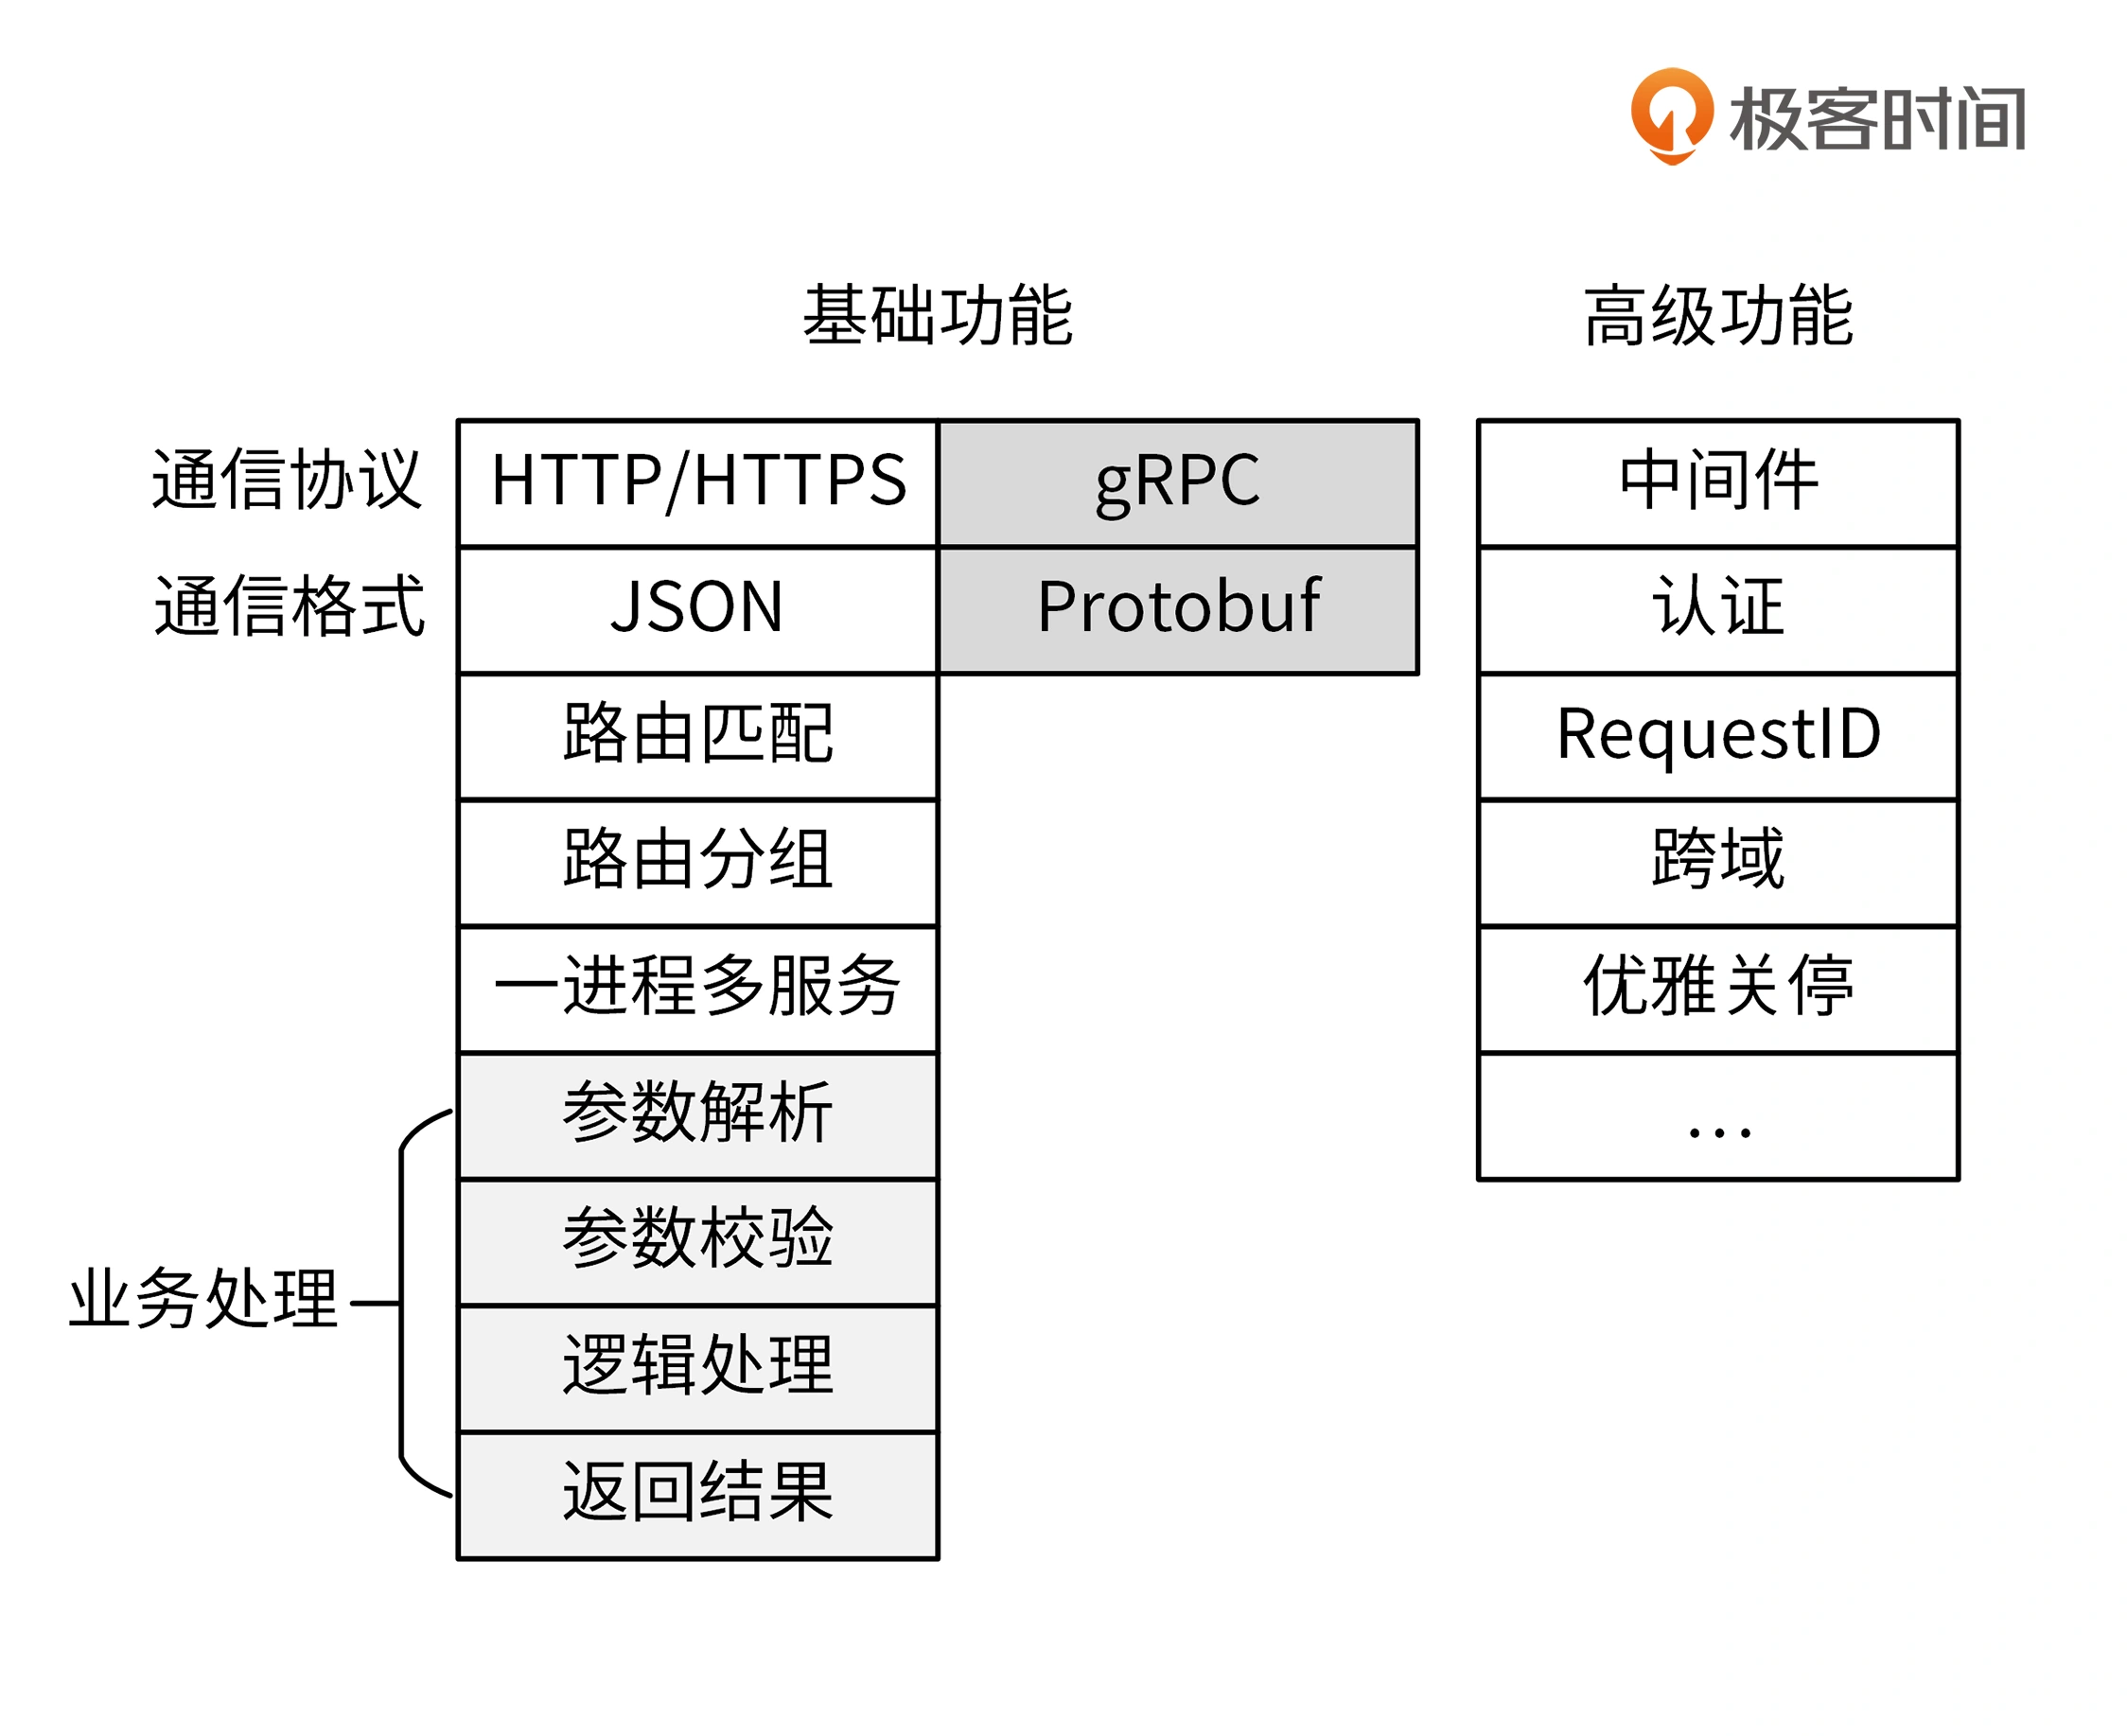
第十六讲 Web服务核心功能
第十七讲 认证机制
认证和授权的区别
- 认证(Authentication): 用来验证某个用户是否具有访问系统的权限
- 授权(Authorization): 用来验证某个 用户是否具有访问某个资源的权限
四种基本的认证方式
Basic
将用户名:密码进行base64编码后放到HTTP Authorization HEADER中
1
2
|
basic=`echo -n 'username:password' | base64`
curl -X POST -H "Authorization: Basic ${basic}" http://localhost:8080/login
|
这个方式使用了base64编码,入侵者可以反向编码获取用户名和密码;另外即使密码被加密,入侵者可以进行重放攻击
所以Basic虽简单,但既不安全,需要和SSL配合使用
Digest
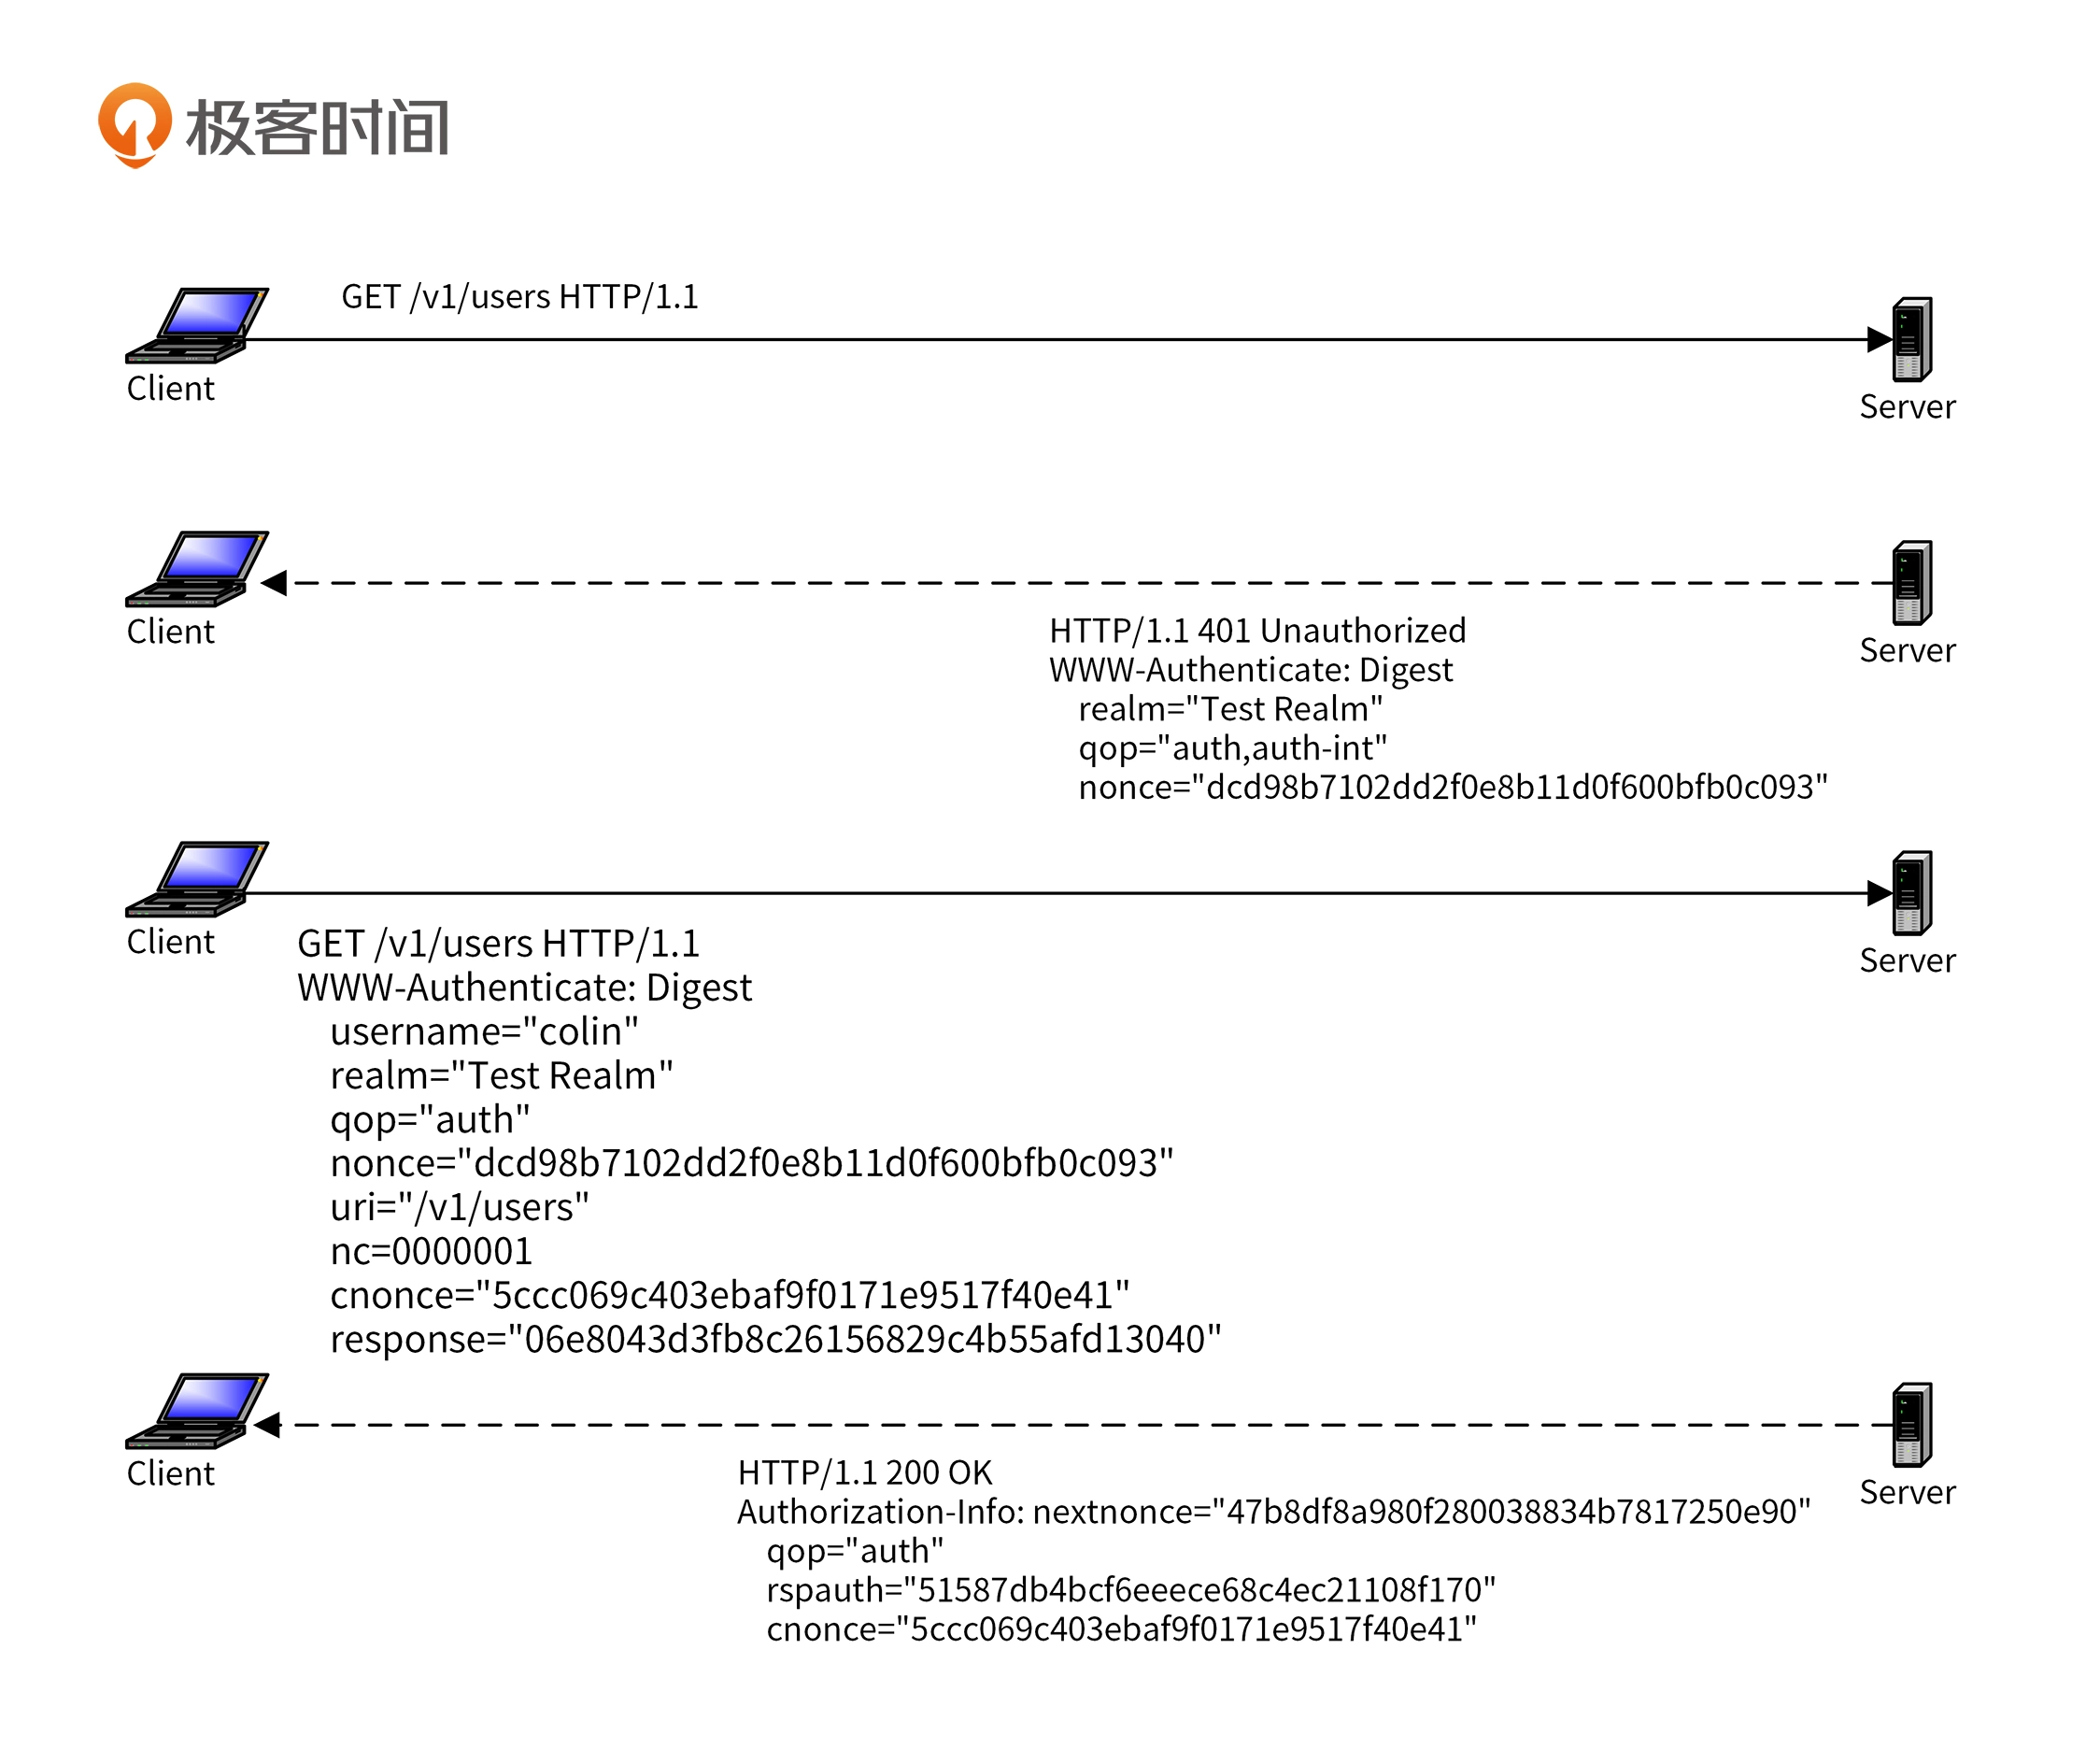 服务端给随机数nonce和加密算法(默认为md5),客户端请求是需要提供
密码叉腰response
服务端给随机数nonce和加密算法(默认为md5),客户端请求是需要提供
密码叉腰response
OAuth
OAuth(开放授权)允许用户让第三方应用访问该用户在某一个服务的思路资源(如昵称、头像等),
而无需将用户名和密码给第三方应用
OAuth2.0共分为四种授权方式
密码式
认证流程如下:
- 网站 A 向用户发出获取用户名和密码的请求;
- 用户同意后,网站 A 凭借用户名和密码向网站 B 换取令牌;
- 网站 B 验证用户身份后,给出网站 A 令牌,网站 A 凭借令牌可以访问网站 B 对应权限的资源。
隐藏式
这种方式适用于前端应用。认证流程如下:
- A 网站提供一个跳转到 B 网站的链接,用户点击后跳转至 B 网站,并向用户请求授权;
- 用户登录 B 网站,同意授权后,跳转回 A 网站指定的重定向 redirect_url 地址,并携带 B 网站返回的令牌,用户在 B 网站的数据给 A 网站使用。
这个授权方式存在着“中间人攻击”的风险,因此只能用于一些安全性要求不高的场景,并且令牌的有效时间要非常短。
凭借式
这种方式是在命令行中请求授权,适用于没有前端的命令行应用。认证流程如下:
- 应用 A 在命令行向应用 B 请求授权,此时应用 A 需要携带应用 B 提前颁发的 secretID 和 secretKey,其中 secretKey 出于安全性考虑,需在后端发送;
- 应用 B 接收到 secretID 和 secretKey,并进行身份验证,验证通过后返回给应用 A 令牌。
授权码式
- A 网站提供一个跳转到 B 网站的链接 +redirect_url,用户点击后跳转至 B 网站;
- 用户携带向 B 网站提前申请的 client_id,向 B 网站发起身份验证请求;
- 用户登录 B 网站,通过验证,授予 A 网站权限,此时网站跳转回 redirect_url,其中会有 B 网站通过验证后的授权码附在该 url 后;
- 网站 A 携带授权码向网站 B 请求令牌,网站 B 验证授权码后,返回令牌即 access_token。
Bearer
Bearer认证也称令牌认证,核心是 bearer token。bearer token 是一个加密字符串,通常由服务端根据密钥生成。客户端在请求服务端时,必须在请求头中包含Authorization: Bearer 。服务端收到请求后,解析出 ,并校验 的合法性。
当前最流行的 token 编码方式是 JSON Web Token
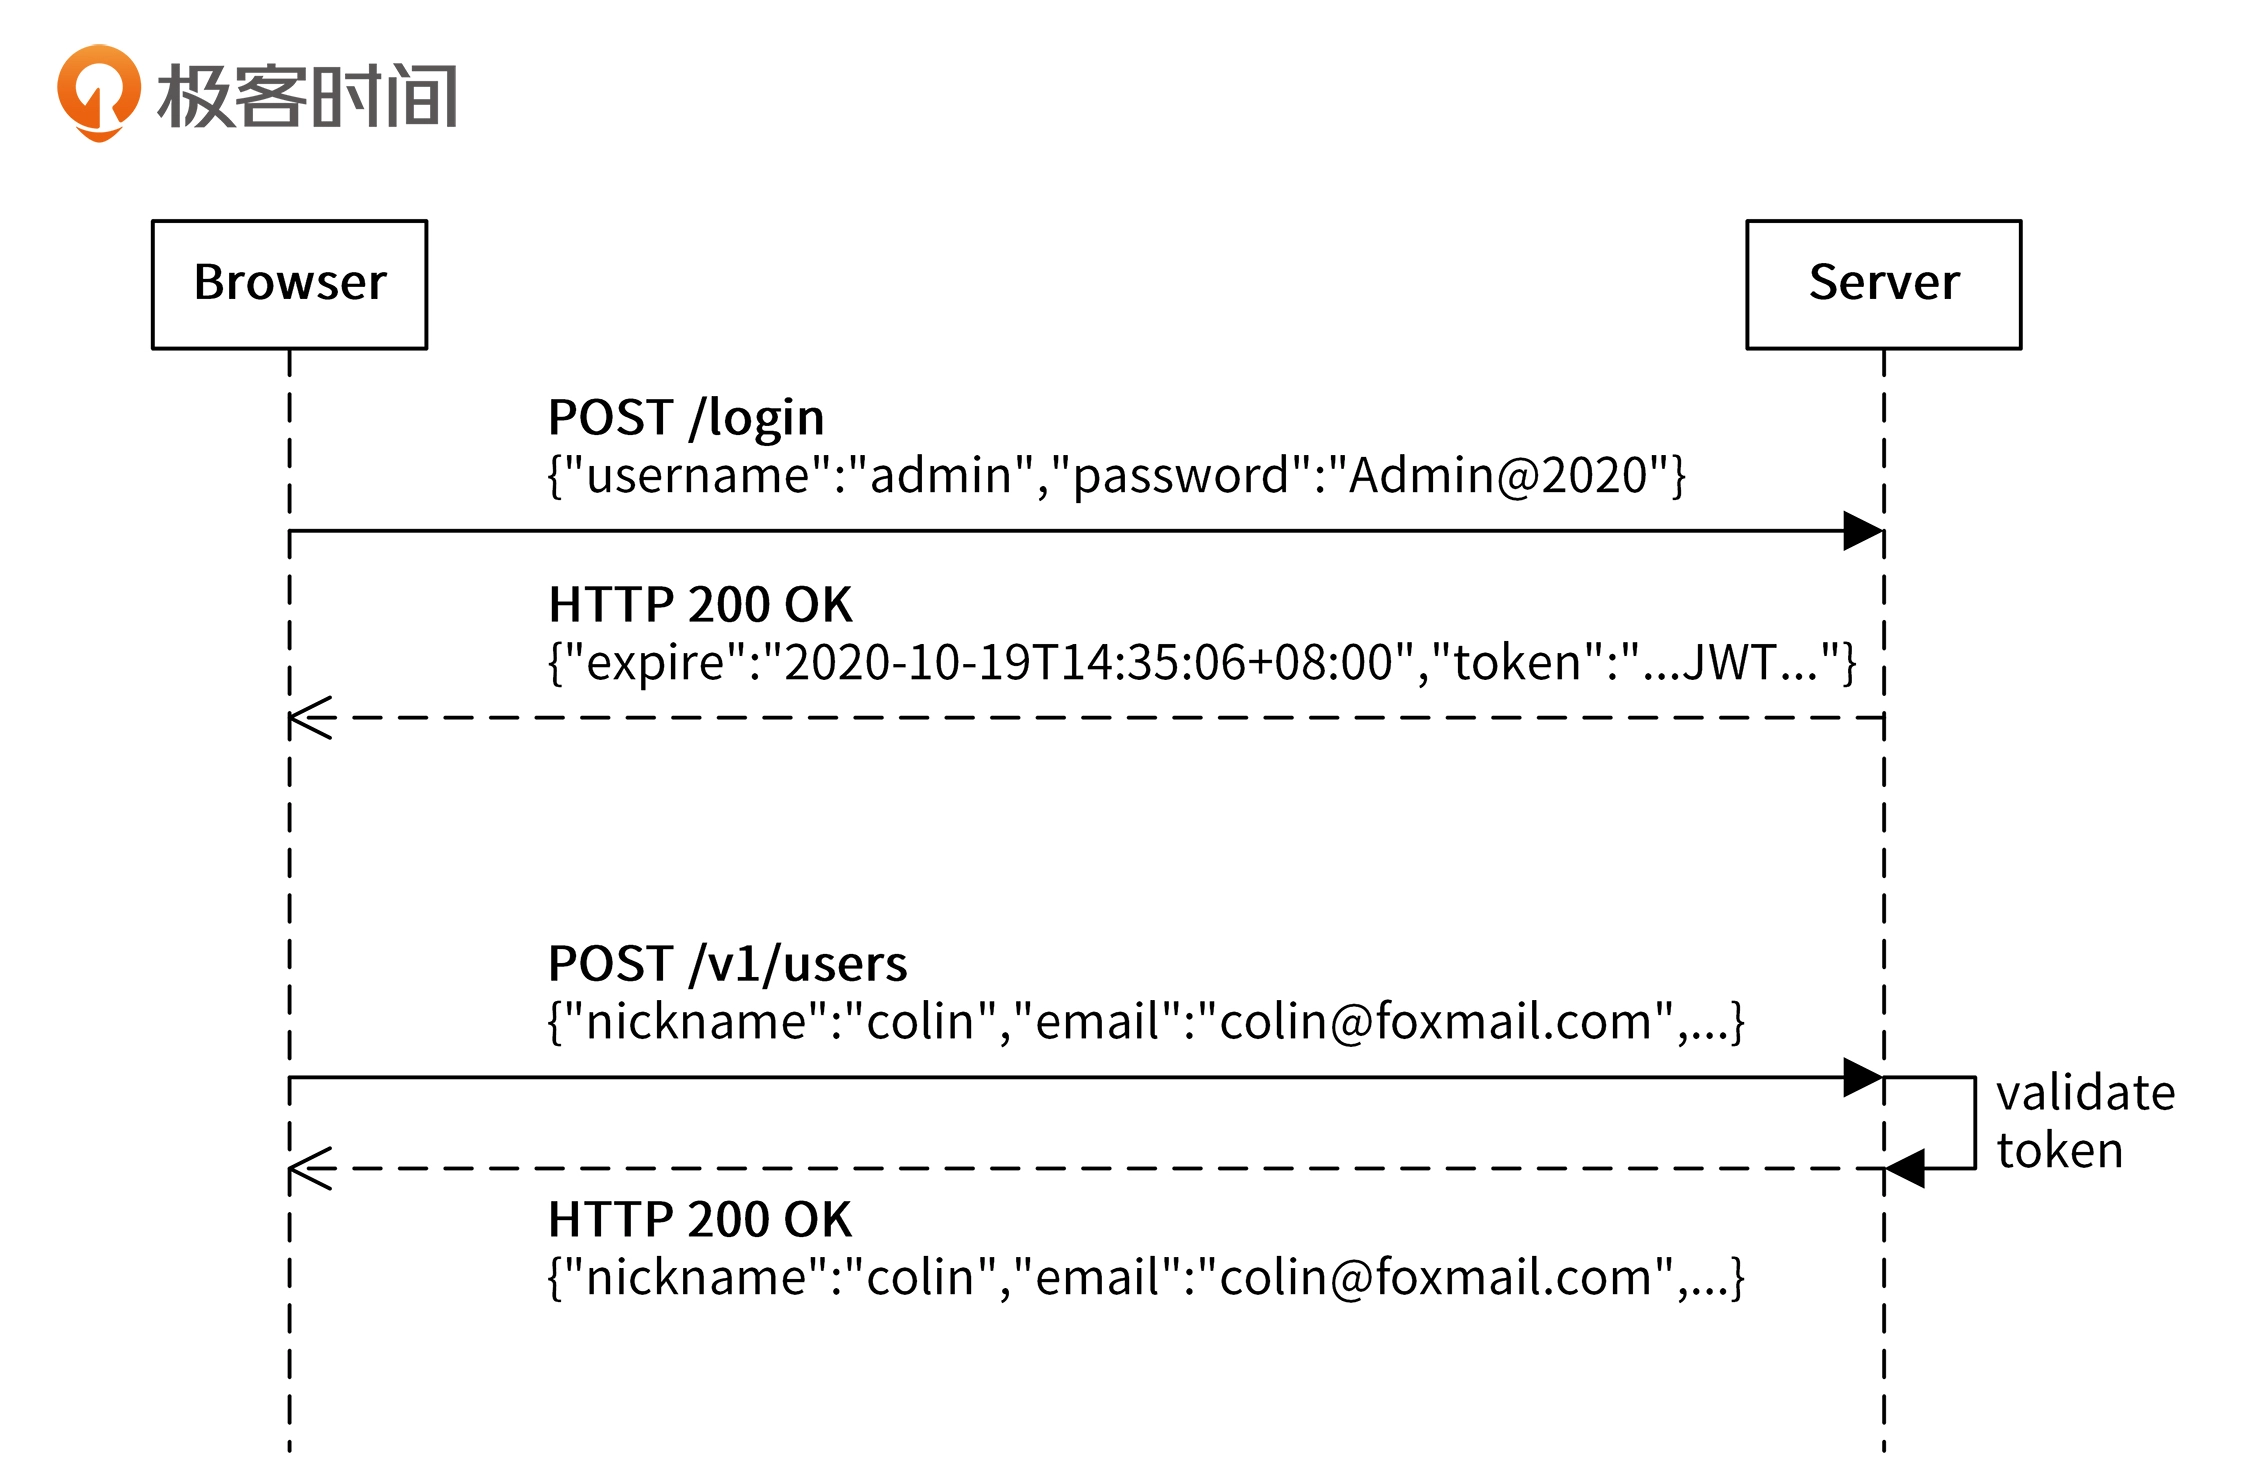 具体可以分为四步:
- 客户端使用用户名和密码请求登录。
- 服务端收到请求后,会去验证用户名和密码。如果用户名和密码跟数据库记录不一致,则验证失败;如果一致则验证通过,服务端会签发一个 Token 返回给客户端。
- 客户端收到请求后会将 Token 缓存起来,比如放在浏览器 Cookie 中或者 LocalStorage 中,之后每次请求都会携带该 Token。
- 服务端收到请求后,会验证请求中的 Token,验证通过则进行业务逻辑处理,处理完后返回处理后的结果。
第十八讲 IAM的认证功能设计
整体思路
- Basic认证摔死在前端登录的场景
- Bearer认证用在调用后端API服务的场景
具体设计
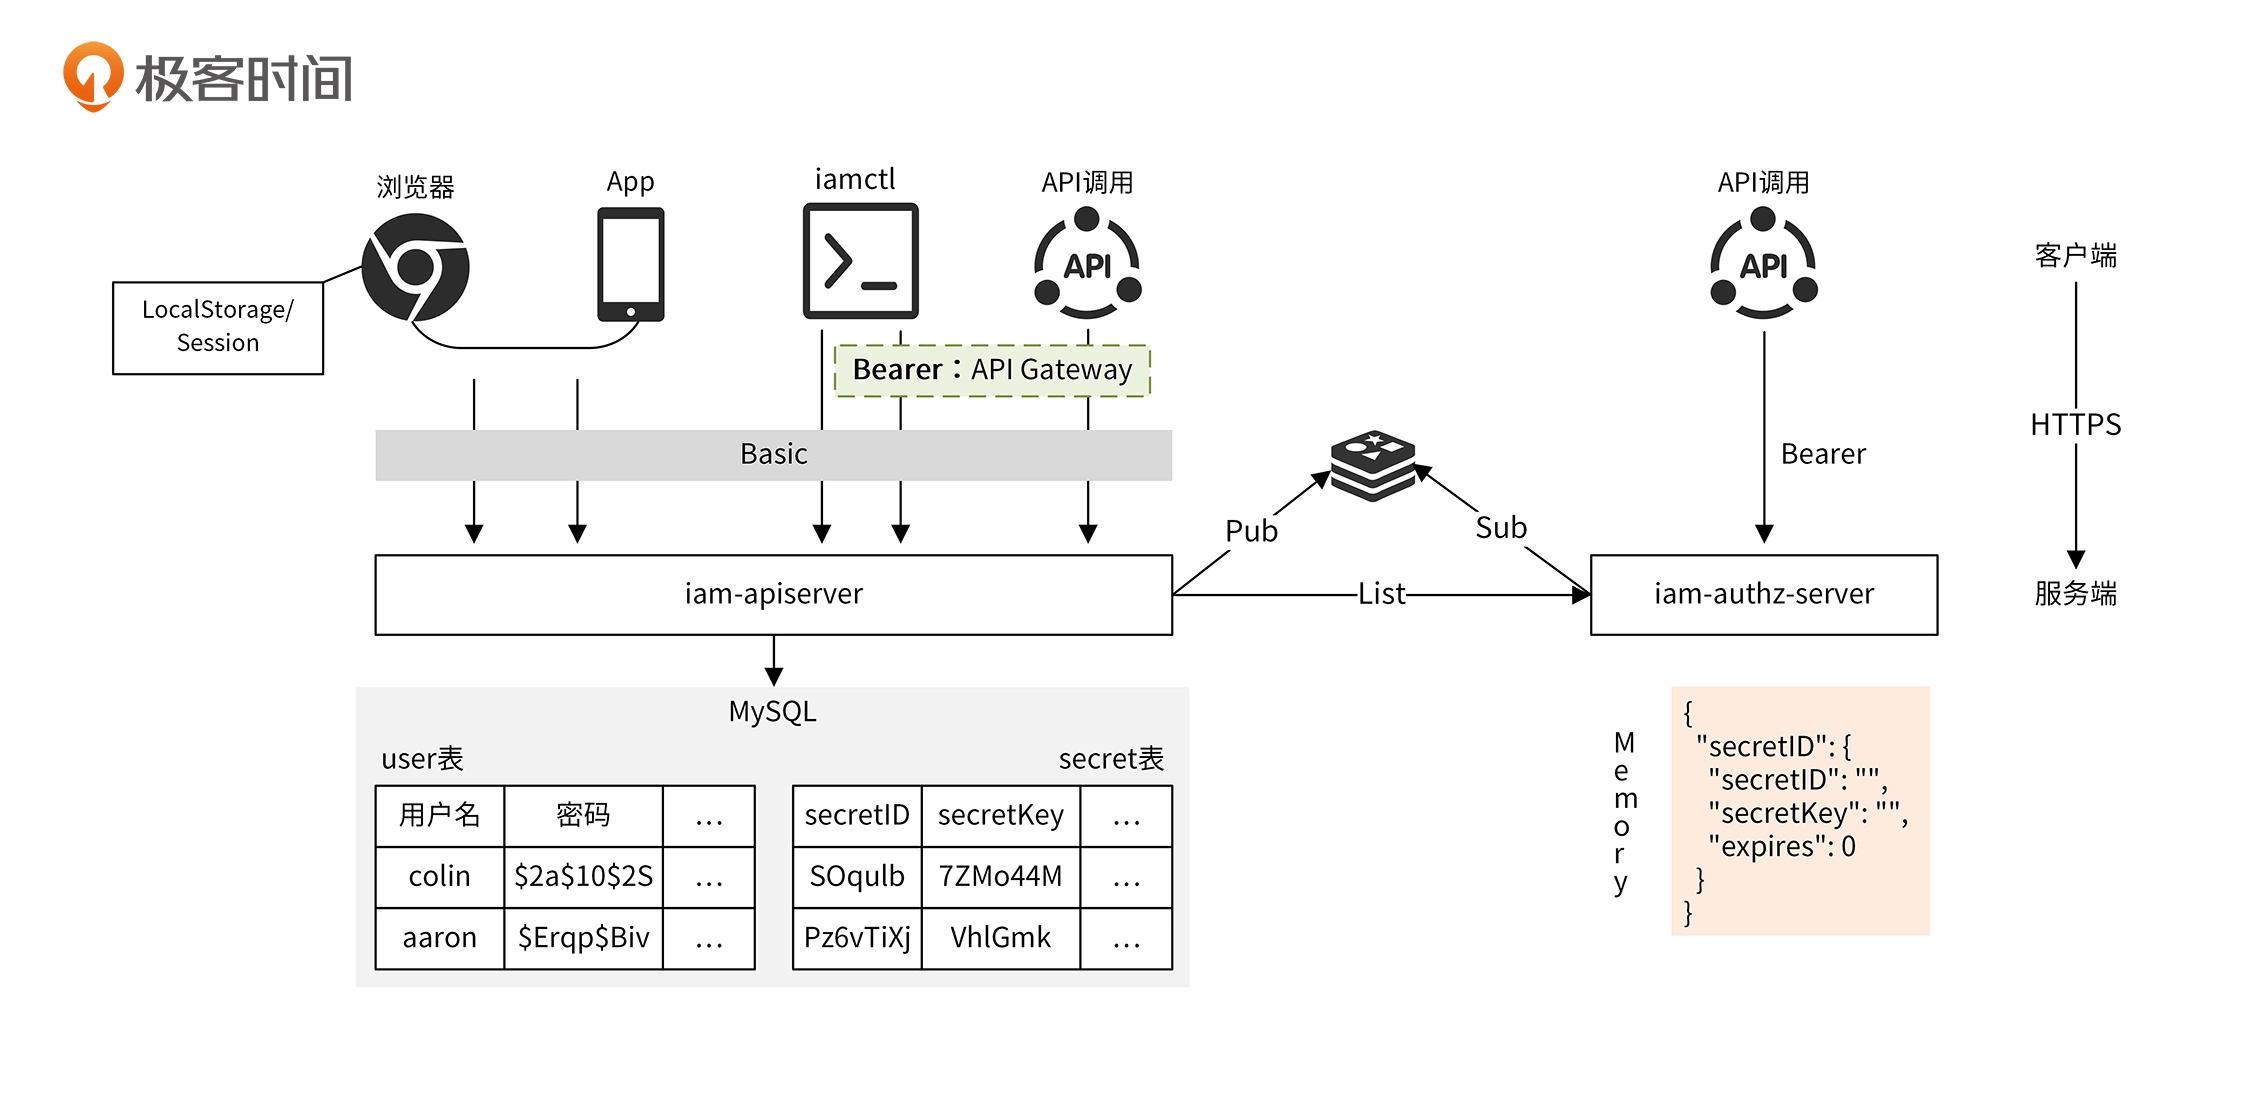
- 密钥CURD存储在iam-apiserver中
- iam-authz-server将密钥信息缓存在内存中,通过grpc api获取
- iam-apiserver有更新时,会发布到iam-authz-server订阅的频道
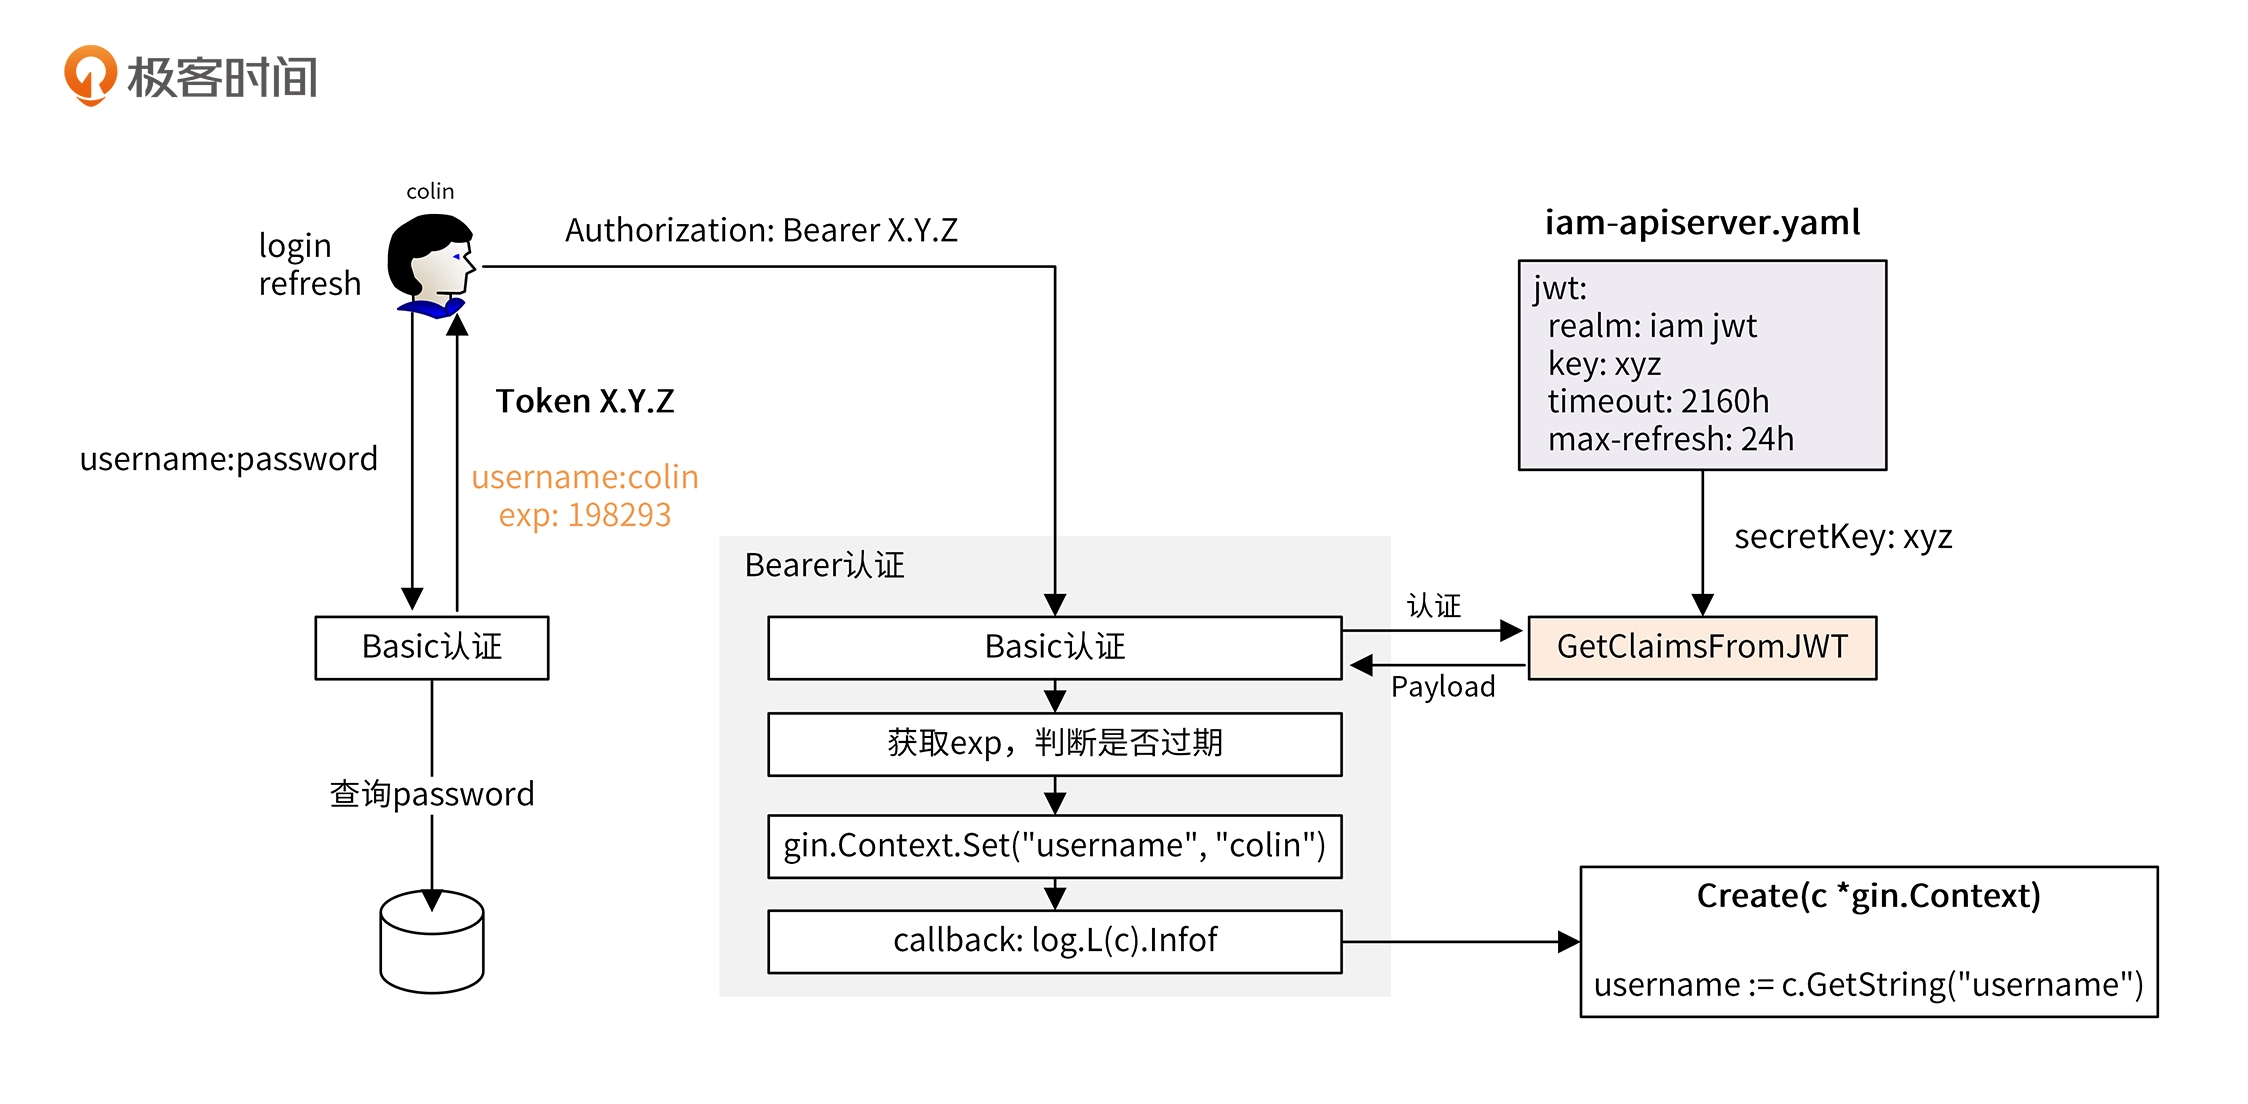
具体实现
因为项目要根据需要选择不同的认证方式,所以使用设计模式中的策略模式来实现
- basic策略: 实现了Basic认证
- jwt策略:实现了Bearer认证
- auto策略:根据HTTP HEAD自动选择Basic或Bearer认证
- cache策略:从缓存中加载认证信息
第十九讲 权限模型
常见权限模型
权限控制列表
ACL(Access Control List)用来判断用户是否可以对资源做特定的操作。例如允许Colin创建文章:
1
2
3
|
Subject: Colin
Action: Create
Object: Article
|
在ACL模型下,权限管理围绕资源Object来设定
自主访问控制
DAC(Discretionary Access Control)是ACL的扩展模型,不仅可以判断Subject是否可以对Object执行Action,同时也能让Subject将
Object、Action的相同权限授予其他的Subject
强制访问控制
MAC(Mandatory Access Control)是ACL的扩展模型,安全性更高,Subject和Object同时具有安全属性,只有
满足以下两点才能授权通过:
- Subject可以对Object做Action
- Object可以被Subject做Action
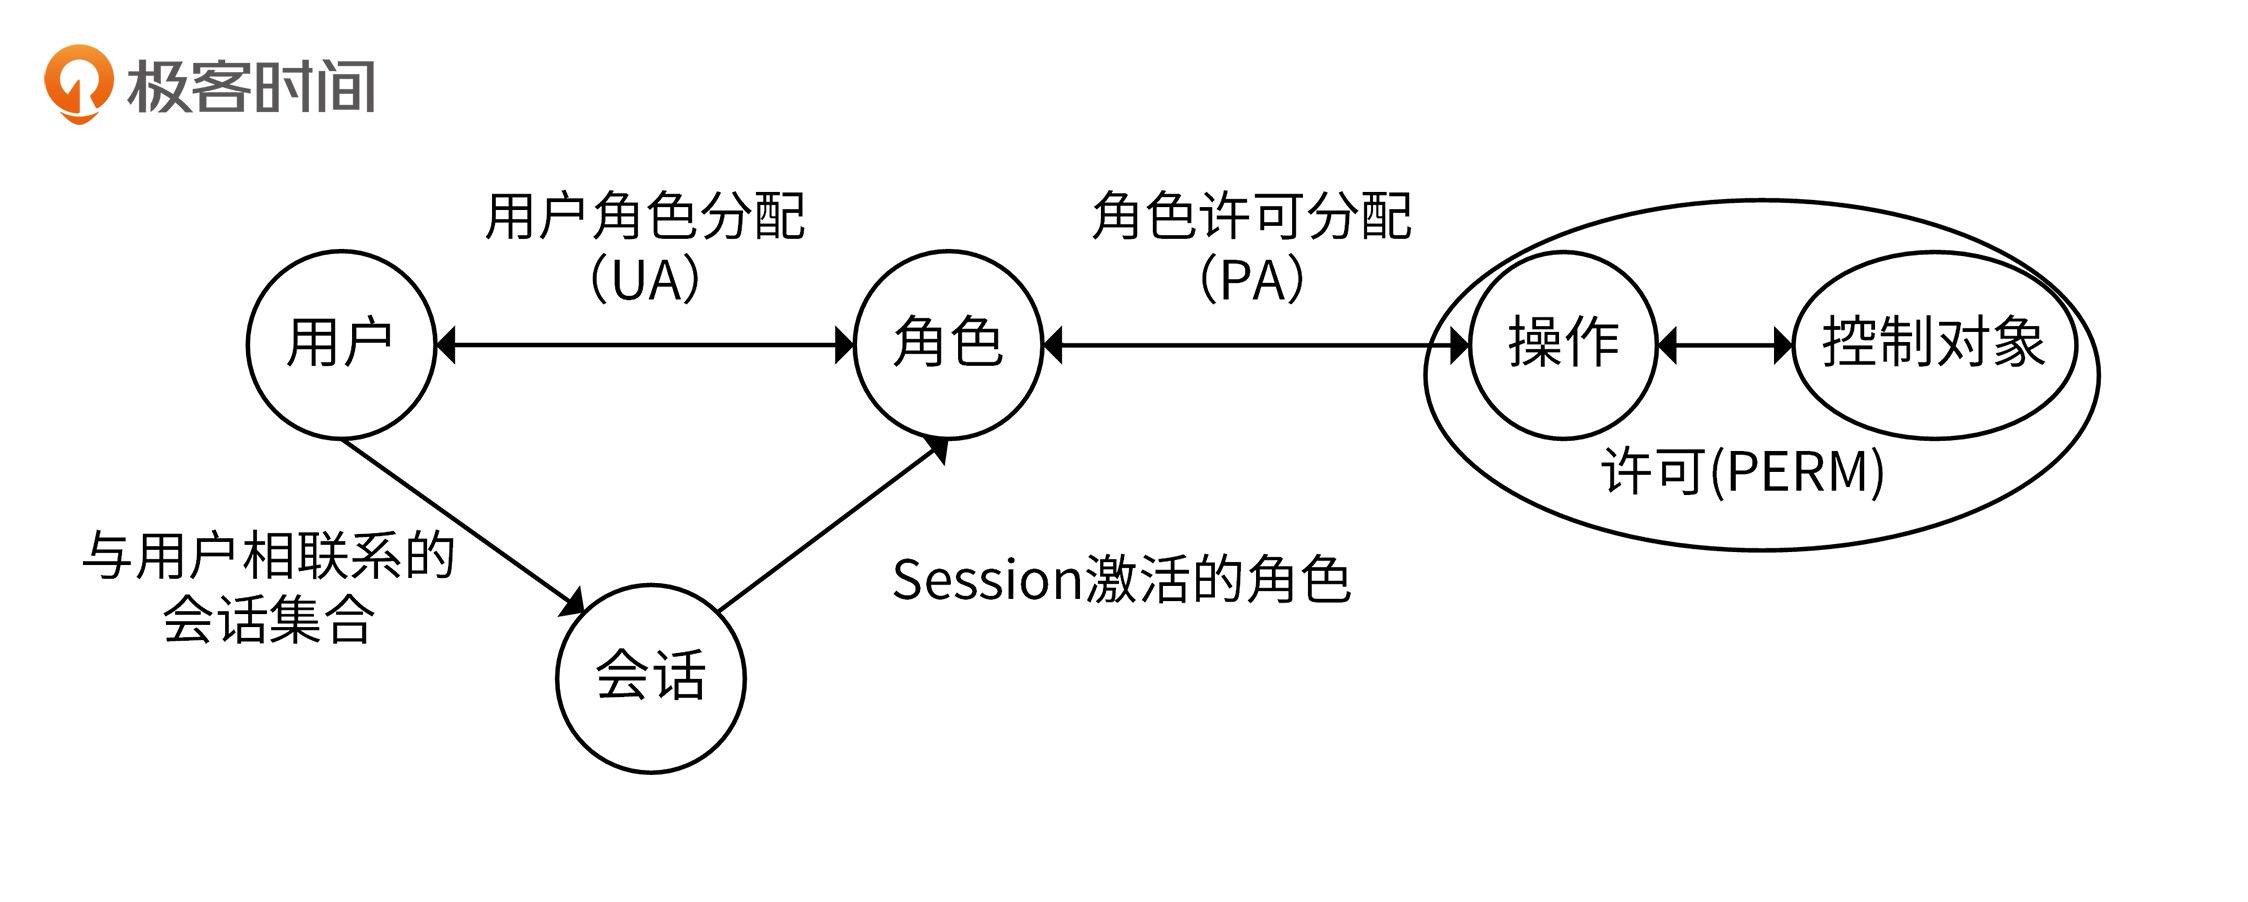
基于角色的访问控制
RBAC(Role-Based Access Control)引入了Role的概念,并将权限和角色进行关联,用户通过扮演某种角色,具有了该角色的所有权限
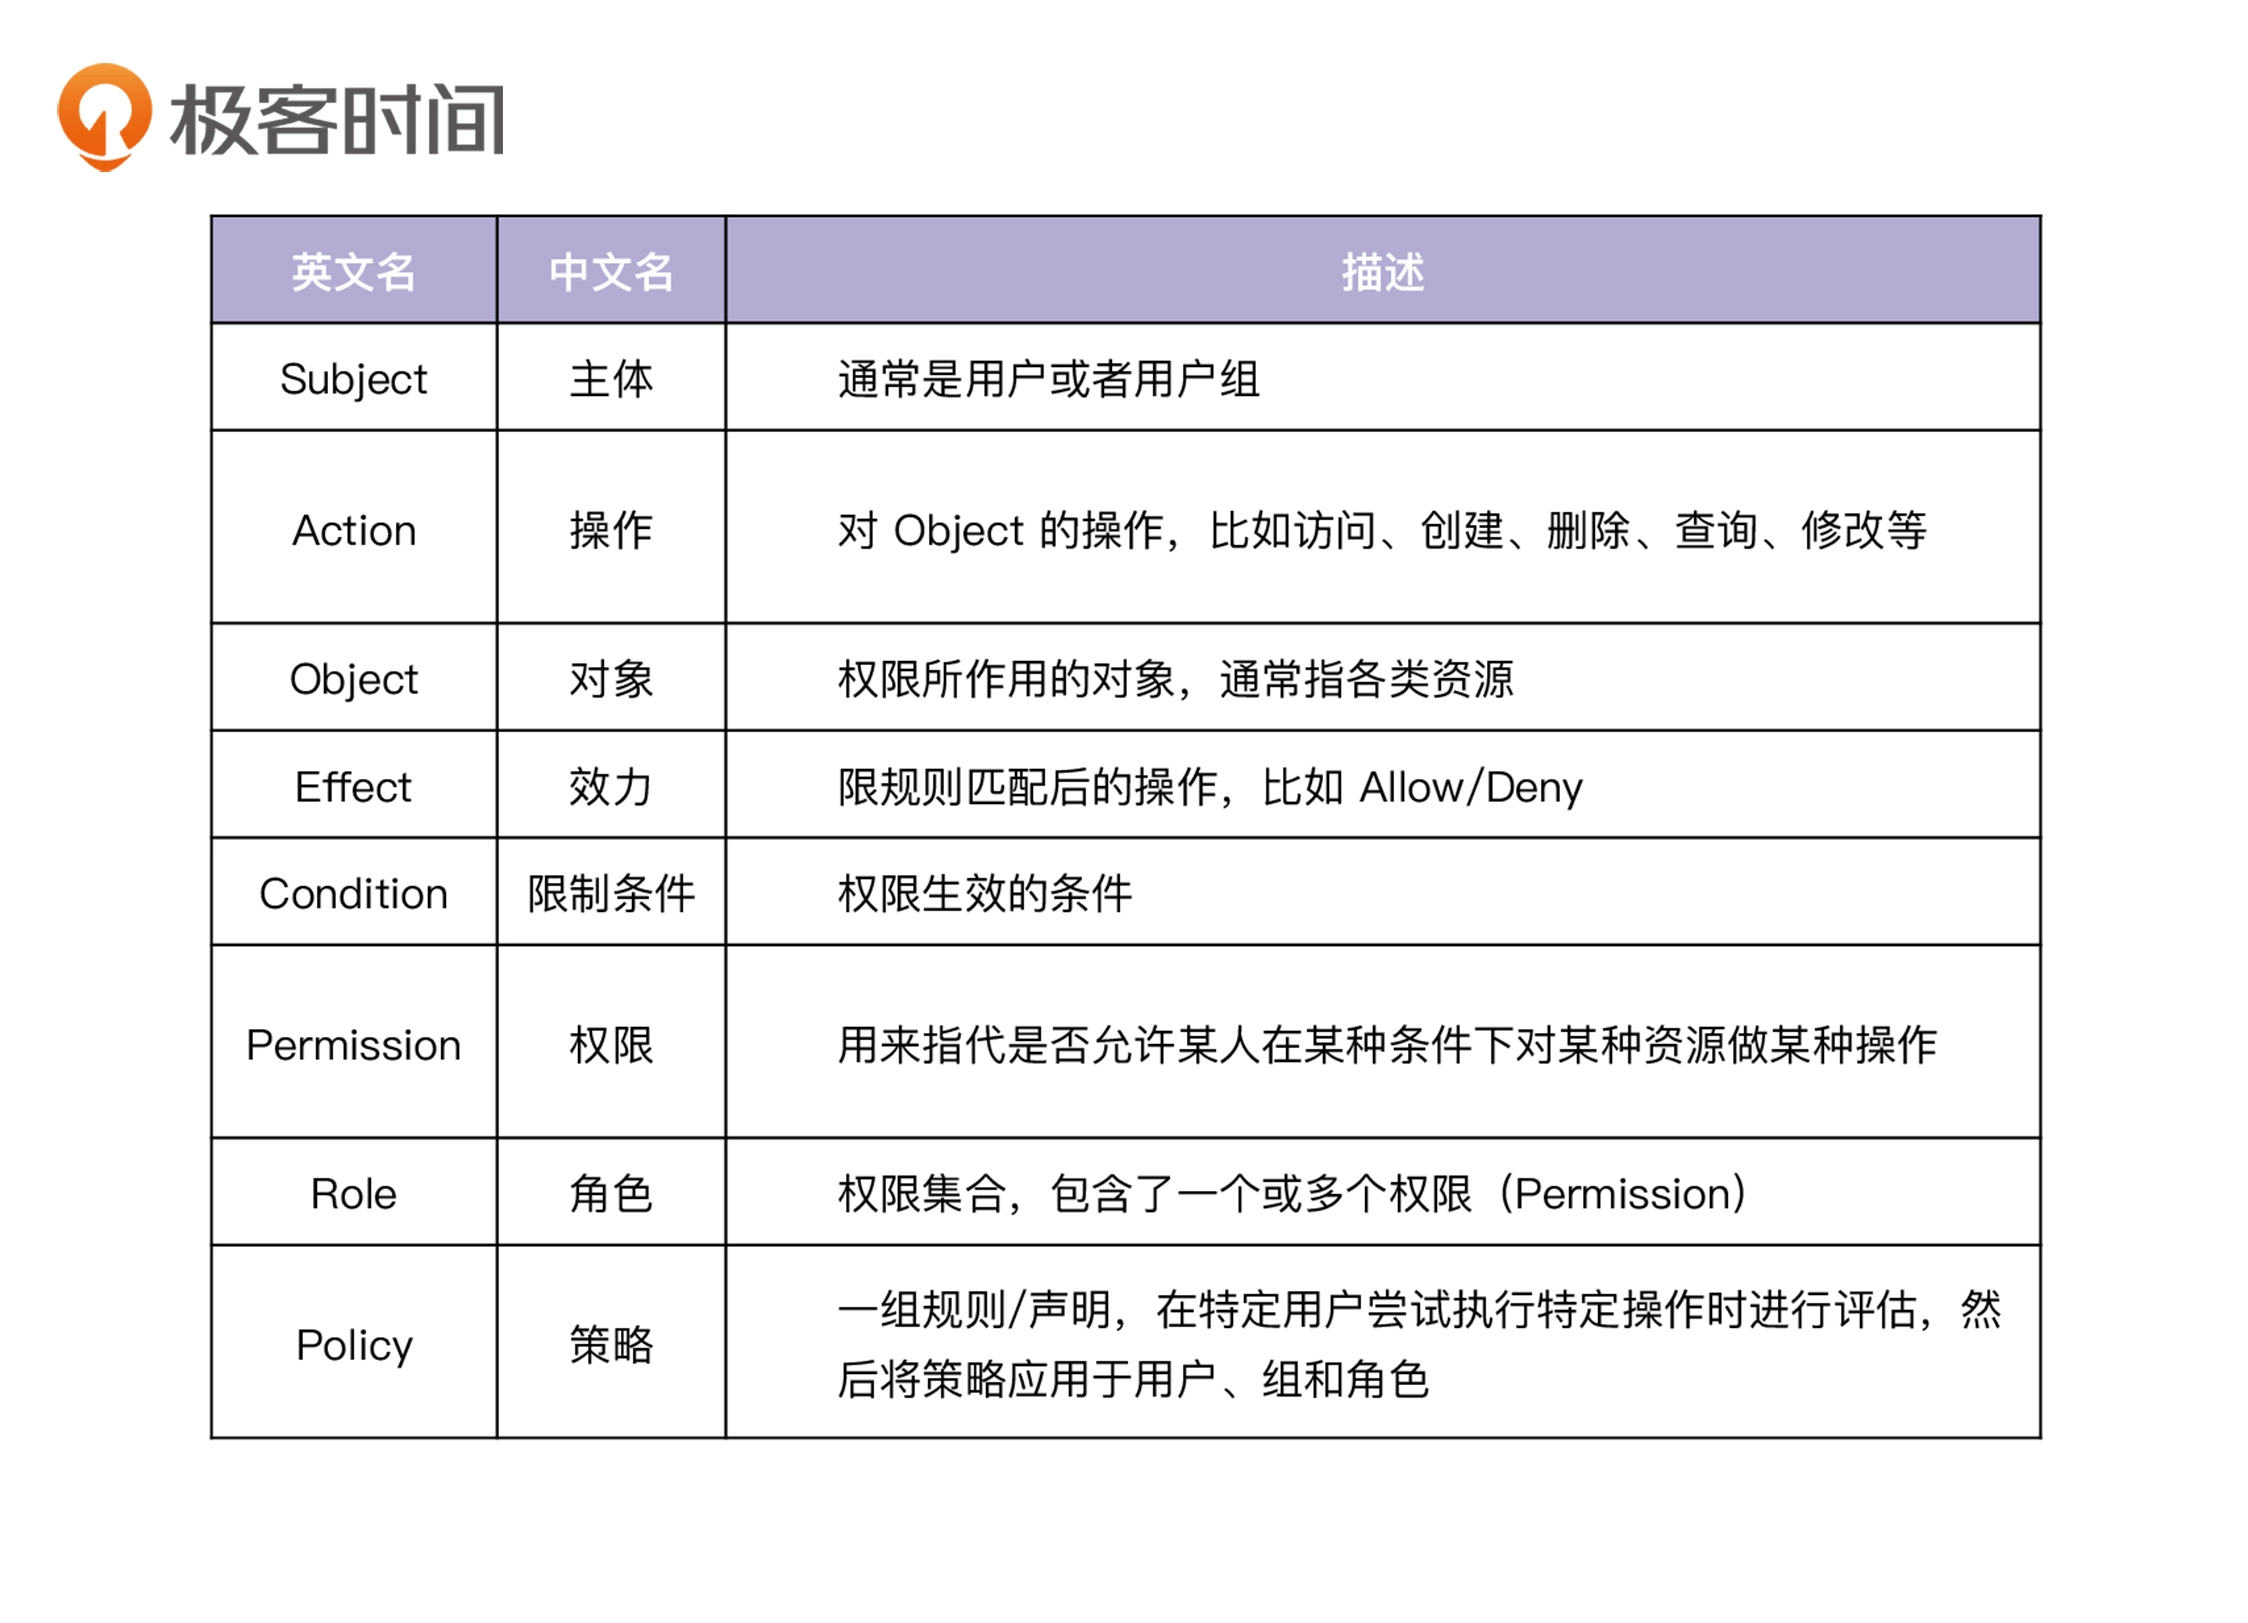
RBAC又分为四种:
RBAC0
基础模型,只包含核心的四要素(用户User、角色Role、权限Permission和会话Session)
用户和角色可以是多对多的关系,权限和角色也可以是多对多的关系
RBAC1
包括RBAC0,并添加了角色继承
RBAC2
包括RBAC0,并添加了约束,具有以下核心特性
- 互斥约束:同一个用户不能有 互斥的角色,互斥的权限不能分配非同一个角色
- 基数约束:一个角色被分配的用户数量是受限的
- 先决条件角色:要想获得较高权限,首先要拥有低一级的权限
- 静态职责分离(Static Separation of Duty):用户无法同时被赋予有冲突的角色
- 静态职责分离(Dynamic Separation of Duty):会话中无法同时激活有冲突的角色
RBAC3
全功能的RBAC,合并了上面三种
基于属性的权限验证
ABAC(Attribute-Based Access Control)规定了哪些属性的用户对哪些属性的资源在哪些条件限制下进行哪些操作
相比RBAC, ABAC对权限的控制粒度更新,主要规定了下面的这四类属性:
- 用户属性,如性别,年龄等
- 资源属性,如资源属性、类别等
- 操作属性,如创建、修改等
- 环境属性,如来源IP、当前时间等
下面是腾讯云的的一个样例
1
2
3
4
5
6
7
8
9
10
11
12
13
14
15
16
17
18
19
20
21
22
23
24
|
{
"version": "2.0",
"statement": [
{
"effect": "allow",
"action": [
"cos:List*",
"cos:Get*",
"cos:Head*",
"cos:OptionsObject"
],
"resource": "qcs::cos:ap-shanghai:uid/1250000000:Bucket1-1250000000/dir1/*",
"condition": {
"ip_equal": {
"qcs:ip": [
"10.217.182.3/24",
"111.21.33.72/24"
]
}
}
}
]
}
|
上面的授权策略表示:用户必须在 10.217.182.3/24 或者 111.21.33.72/24 网段才能调用云 API(cos:List*、cos:Get*、cos:Head*、cos:OptionsObject),对 1250000000 用户下的 dir1 目录下的文件进行读取操作。
ABAC 规定的四类属性分别是:
- 用户属性:用户为 1250000000。
- 资源属性:dir1 目录下的文件。
- 操作属性:读取(cos:List*、cos:Get*、cos:Head*、cos:OptionsObject 都是读取 API)。
- 环境属性:10.217.182.3/24 或者 111.21.33.72/24 网段。
第二十讲 iam-apiserver设计
iam-apiserver是一个web服务,对外提供RESTful API接口,
完成对用户、秘钥、策略三种资源的增删改查
功能介绍
认证相关接口
| 方法 |
路径 |
描述 |
| POST |
/login |
用户登录 |
| POST |
/logout |
用户登出 |
| POST |
/refresh |
刷新Token |
用户相关接口
| 方法 |
路径 |
描述 |
| POST |
/v1/users |
创建用户 |
| DELETE |
/v1/users |
批量删除用户 |
| DELETE |
/v1/users/:name |
删除用户 |
| PUT |
/v1/users/:name/change_password |
修改用户密码 |
| PUT |
/v1/users/:name |
修改用户属性 |
| GET |
/v1/users/:name |
查询用户信息 |
| GET |
/v1/users |
查询用户列表 |
秘钥相关接口
| 方法 |
路径 |
描述 |
| POST |
/v1/secrets |
创建秘钥 |
| DELETE |
/v1/secrets/:name |
删除秘钥 |
| PUT |
/v1/secrets/:name |
修改秘钥属性 |
| GET |
/v1/secrets/:name |
查询秘钥信息 |
| GET |
/v1/secrets |
查询秘钥列表 |
策略相关接口
| 方法 |
路径 |
描述 |
| POST |
/v1/policies |
创建授权策略 |
| DELETE |
/v1/policies |
批量删除授权策略 |
| DELETE |
/v1/policies/:name |
删除授权策略 |
| PUT |
/v1/policies/:name |
修改授权策略属性 |
| GET |
/v1/policies/:name |
查询授权策略信息 |
| GET |
/v1/policies |
查询授权策略列表 |
推荐使用curl测试, 测试样例集成到脚本
1
2
3
|
$ export IAM_APISERVER_HOST=127.0.0.1 # iam-apiserver部署服务器的IP地址
$ export IAM_APISERVER_INSECURE_BIND_PORT=8080 # iam-apiserver HTTP服务的监听端口
$ ./scripts/install/test.sh iam::test::apiserver
|
代码实现
配置处理
配置分为三种
- Options配置:用来构建命令行配置(默认配置先被命令行覆盖,然后被命令行参数覆盖)
- Configs应用配置:HTTP/GRPC的地址和端口、数据库配置等等,输入来自上一步
- 服务配置:服务启动的配置,输入来自上一步
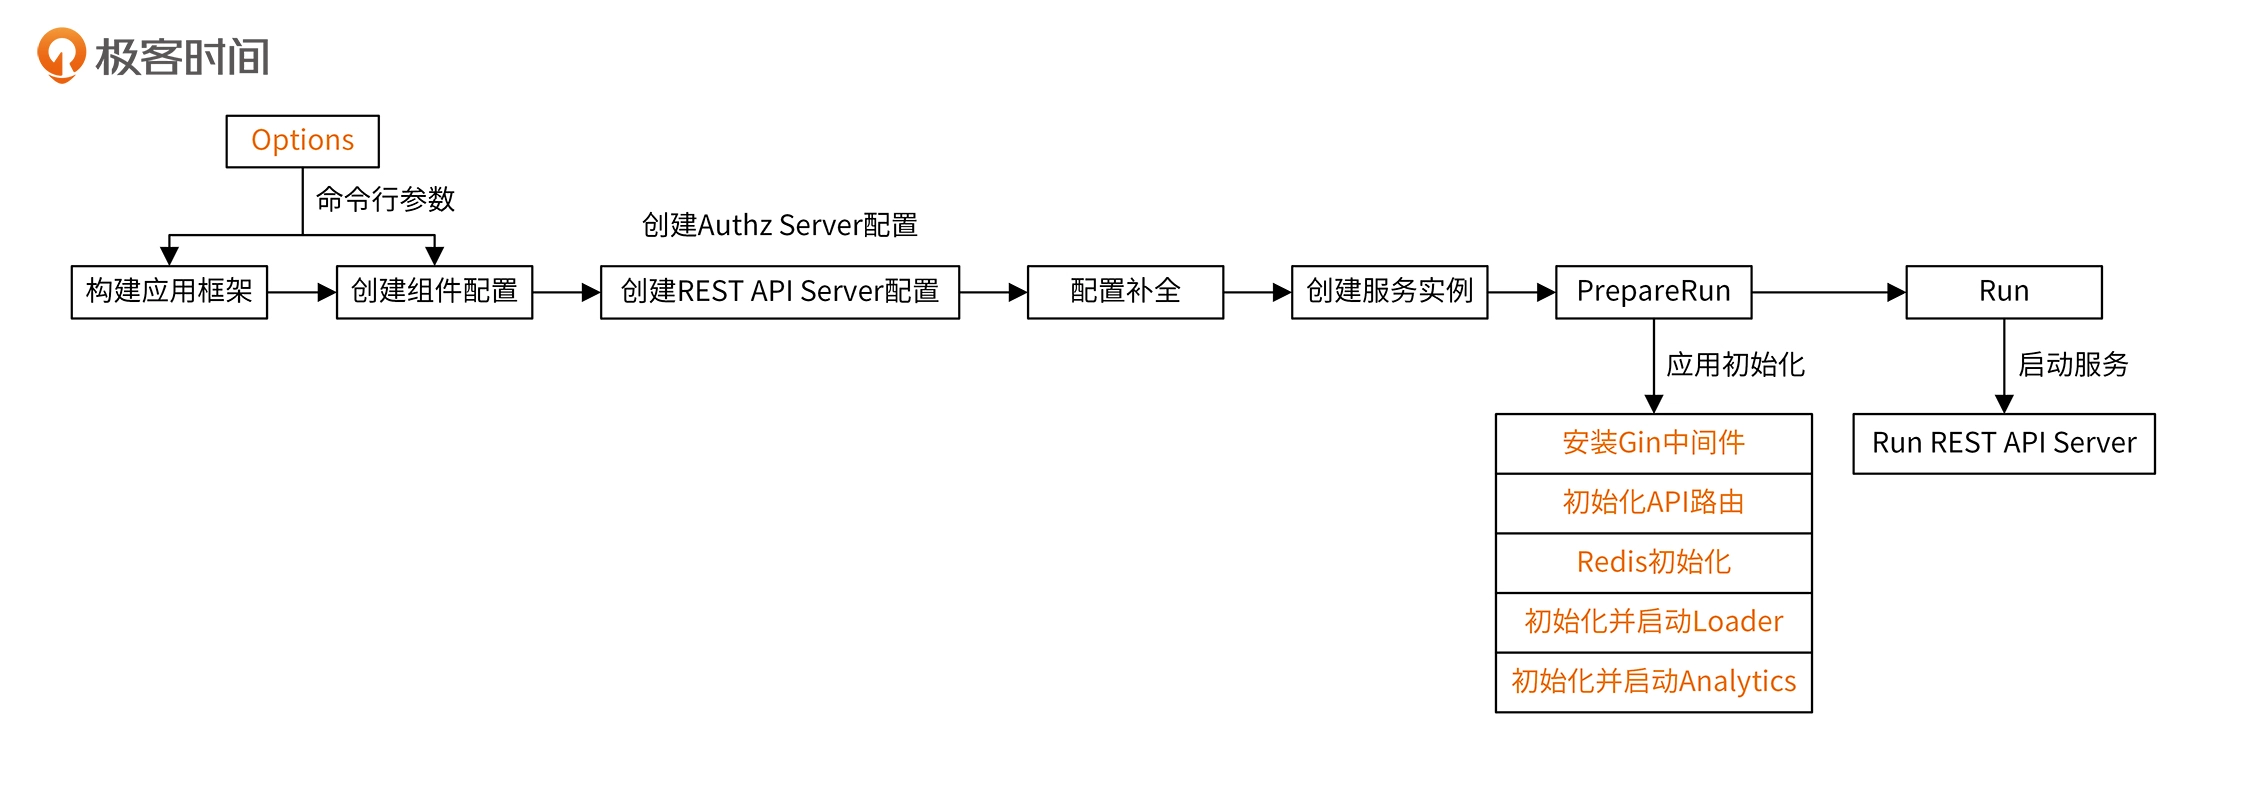
启动流程
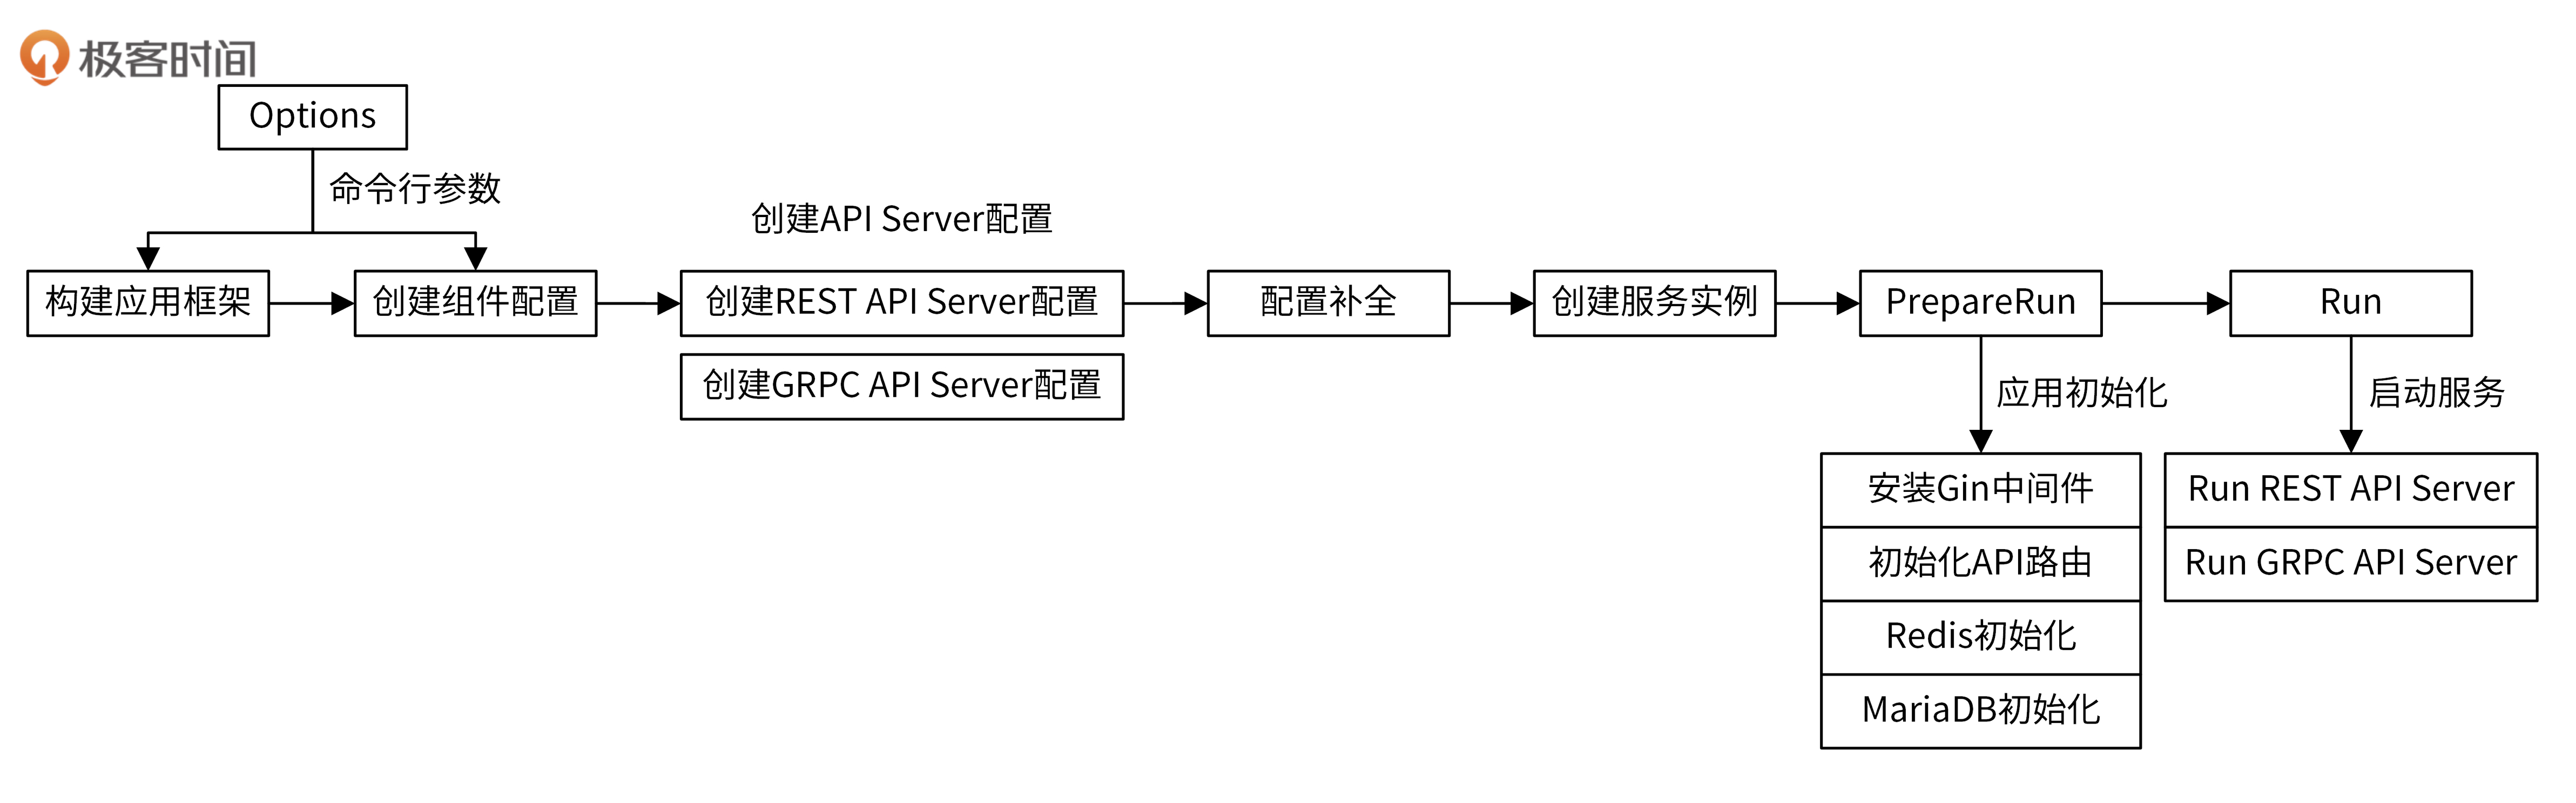
- 初始化Options
- 配置启动函数
run: 封装启动逻辑,初始化日志包、Configs
- 根据Configs应用配置,创建复位启动配置,进而创建HTTP/GRPC服务实例
- 调用
Prerun: 初始化路由、中间件、数据库
- 调用
Run: 启动HTTP/GRPC服务
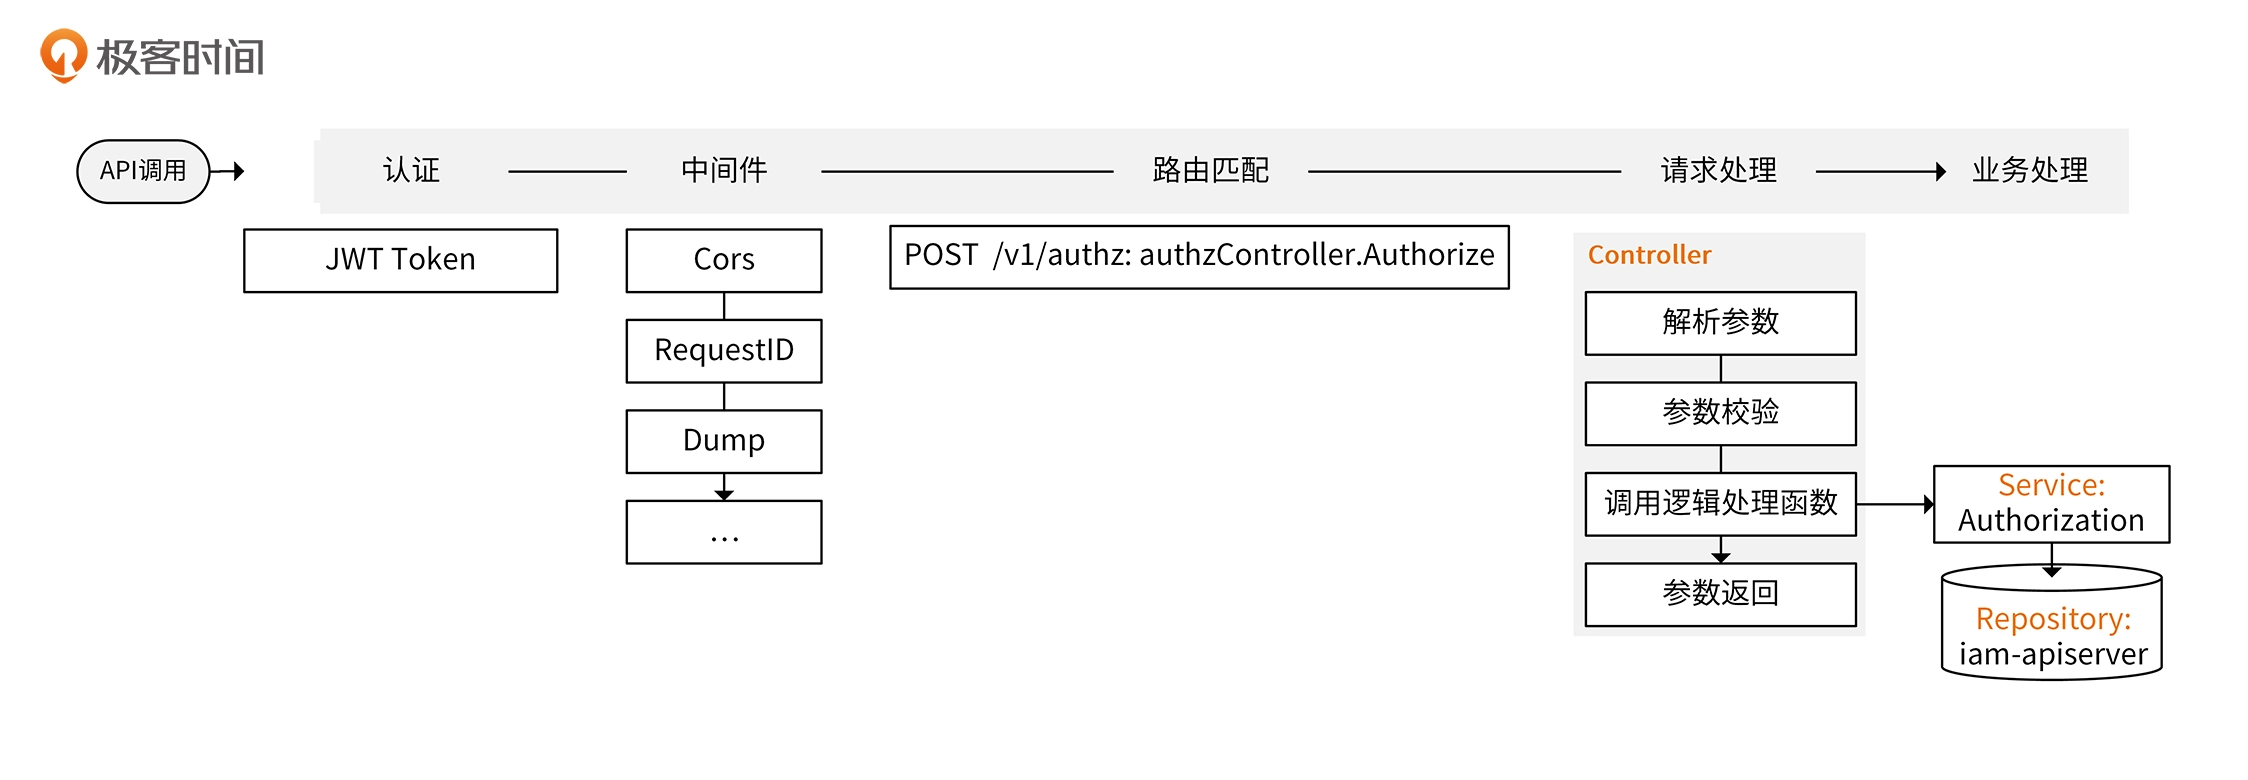
请求处理
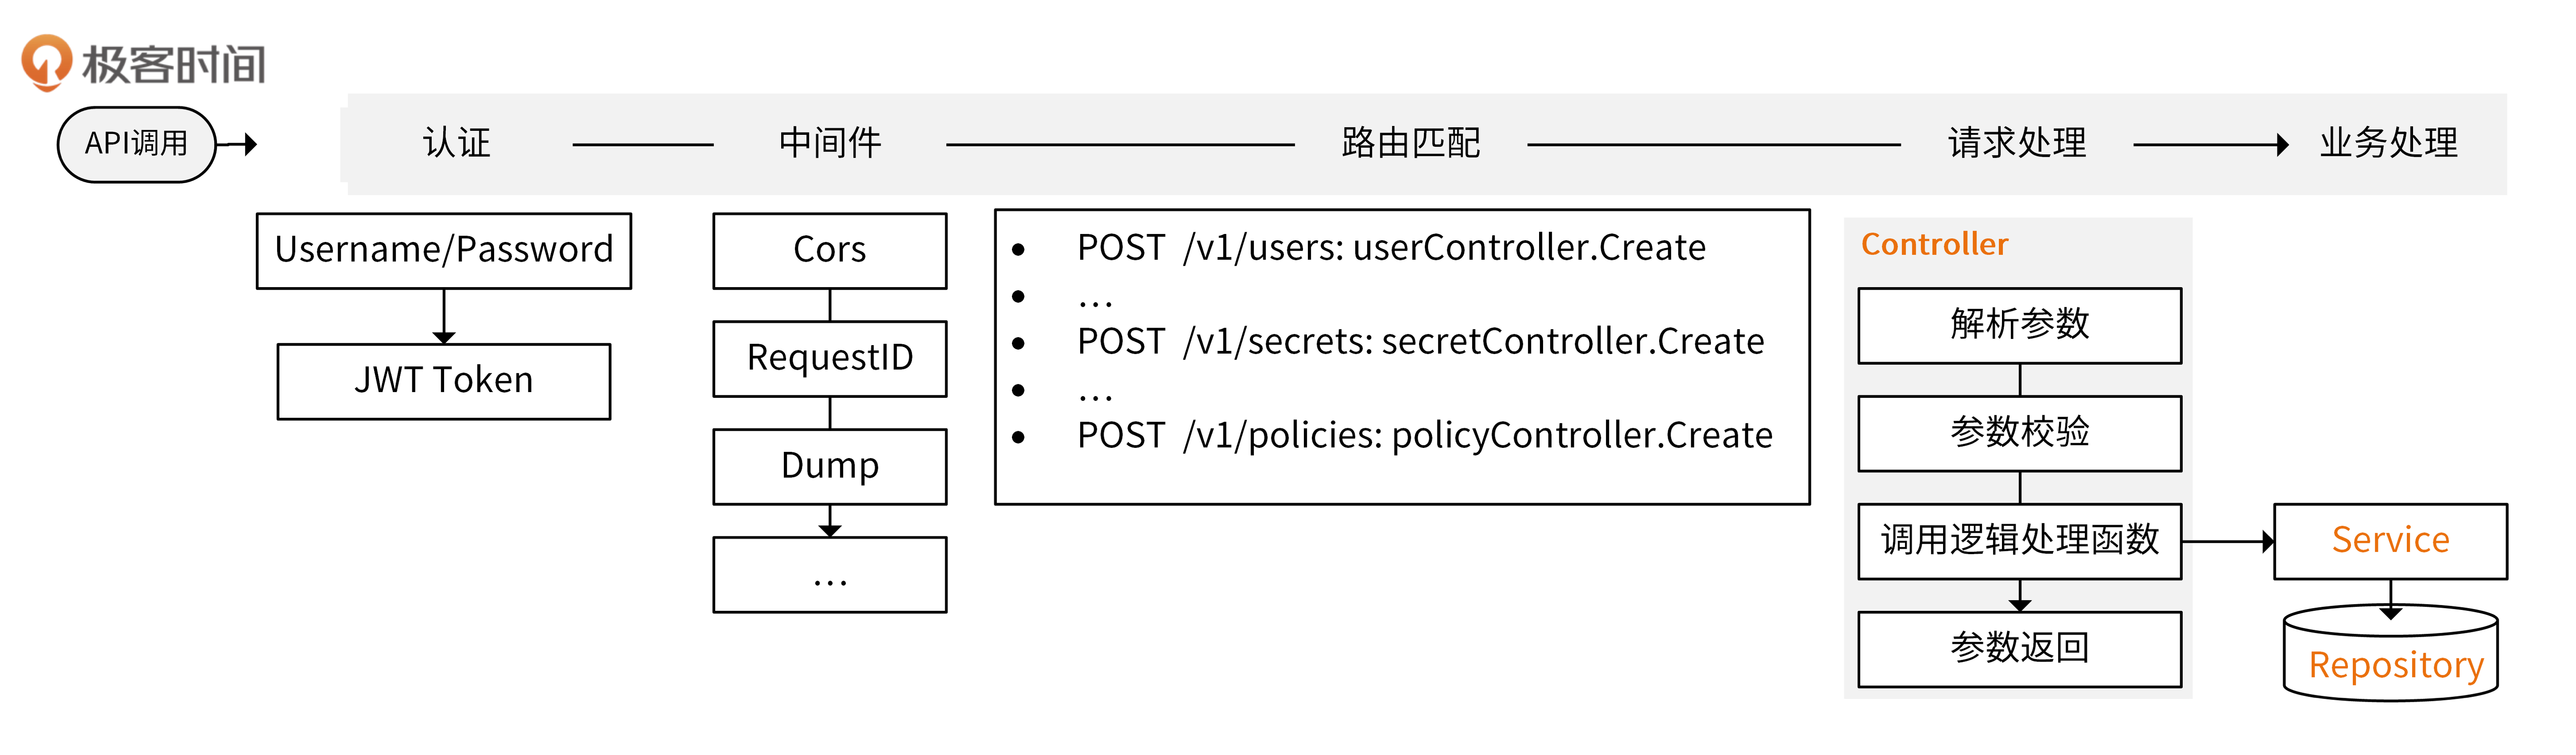
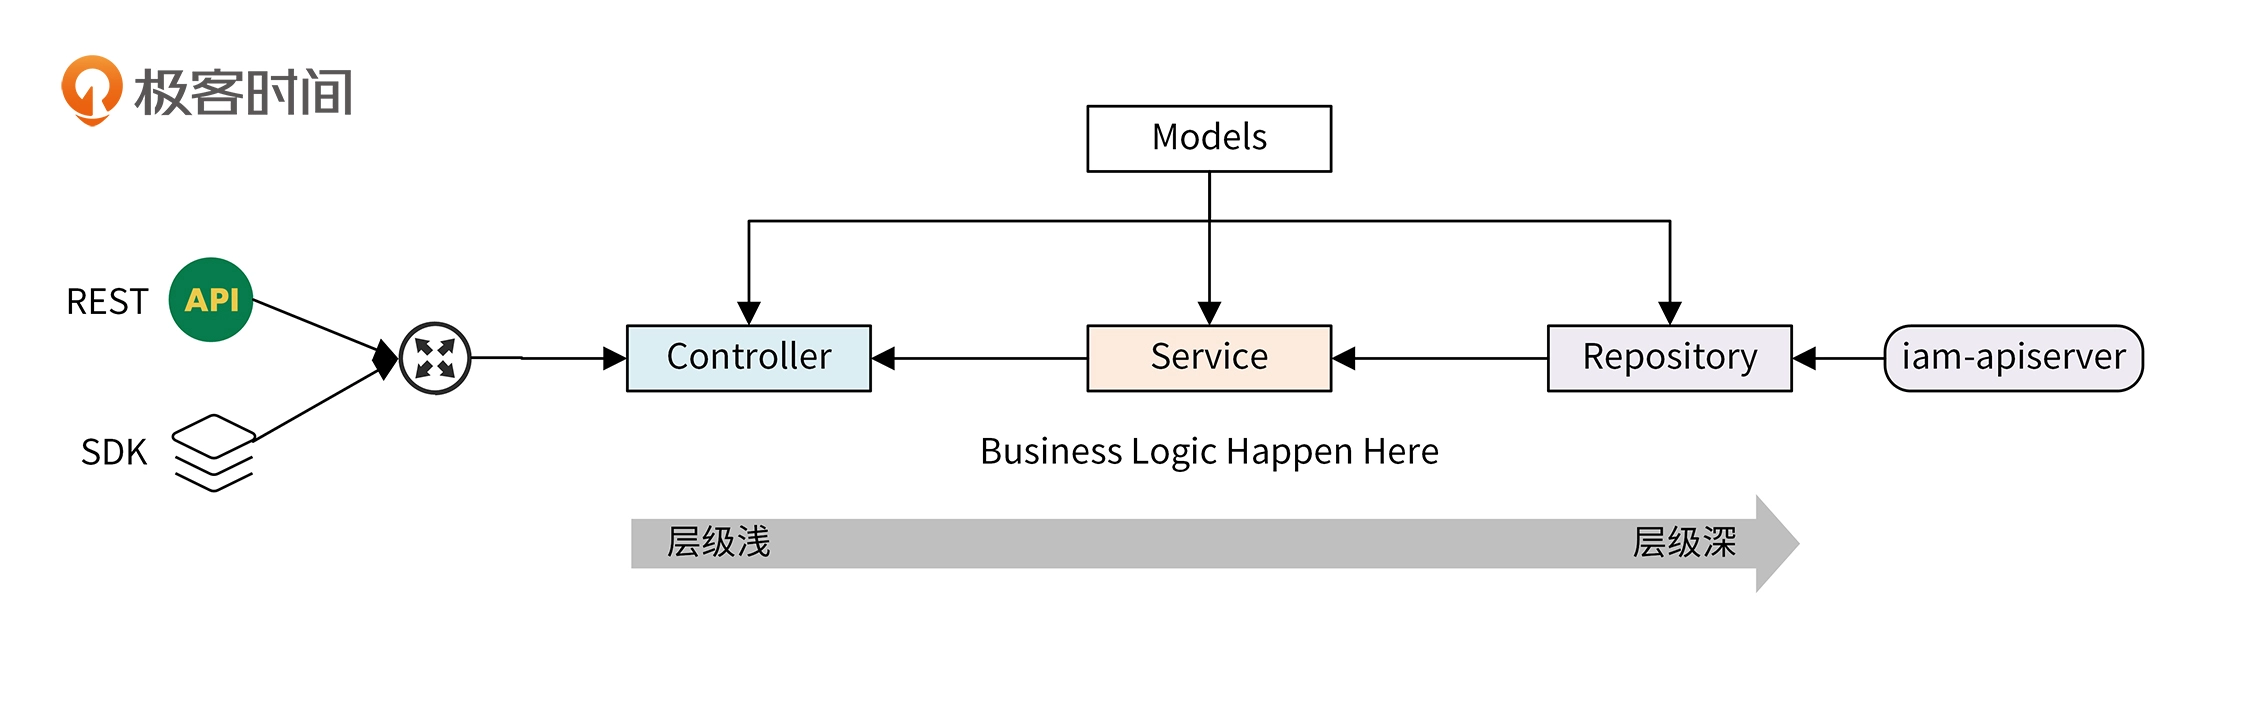
代码架构
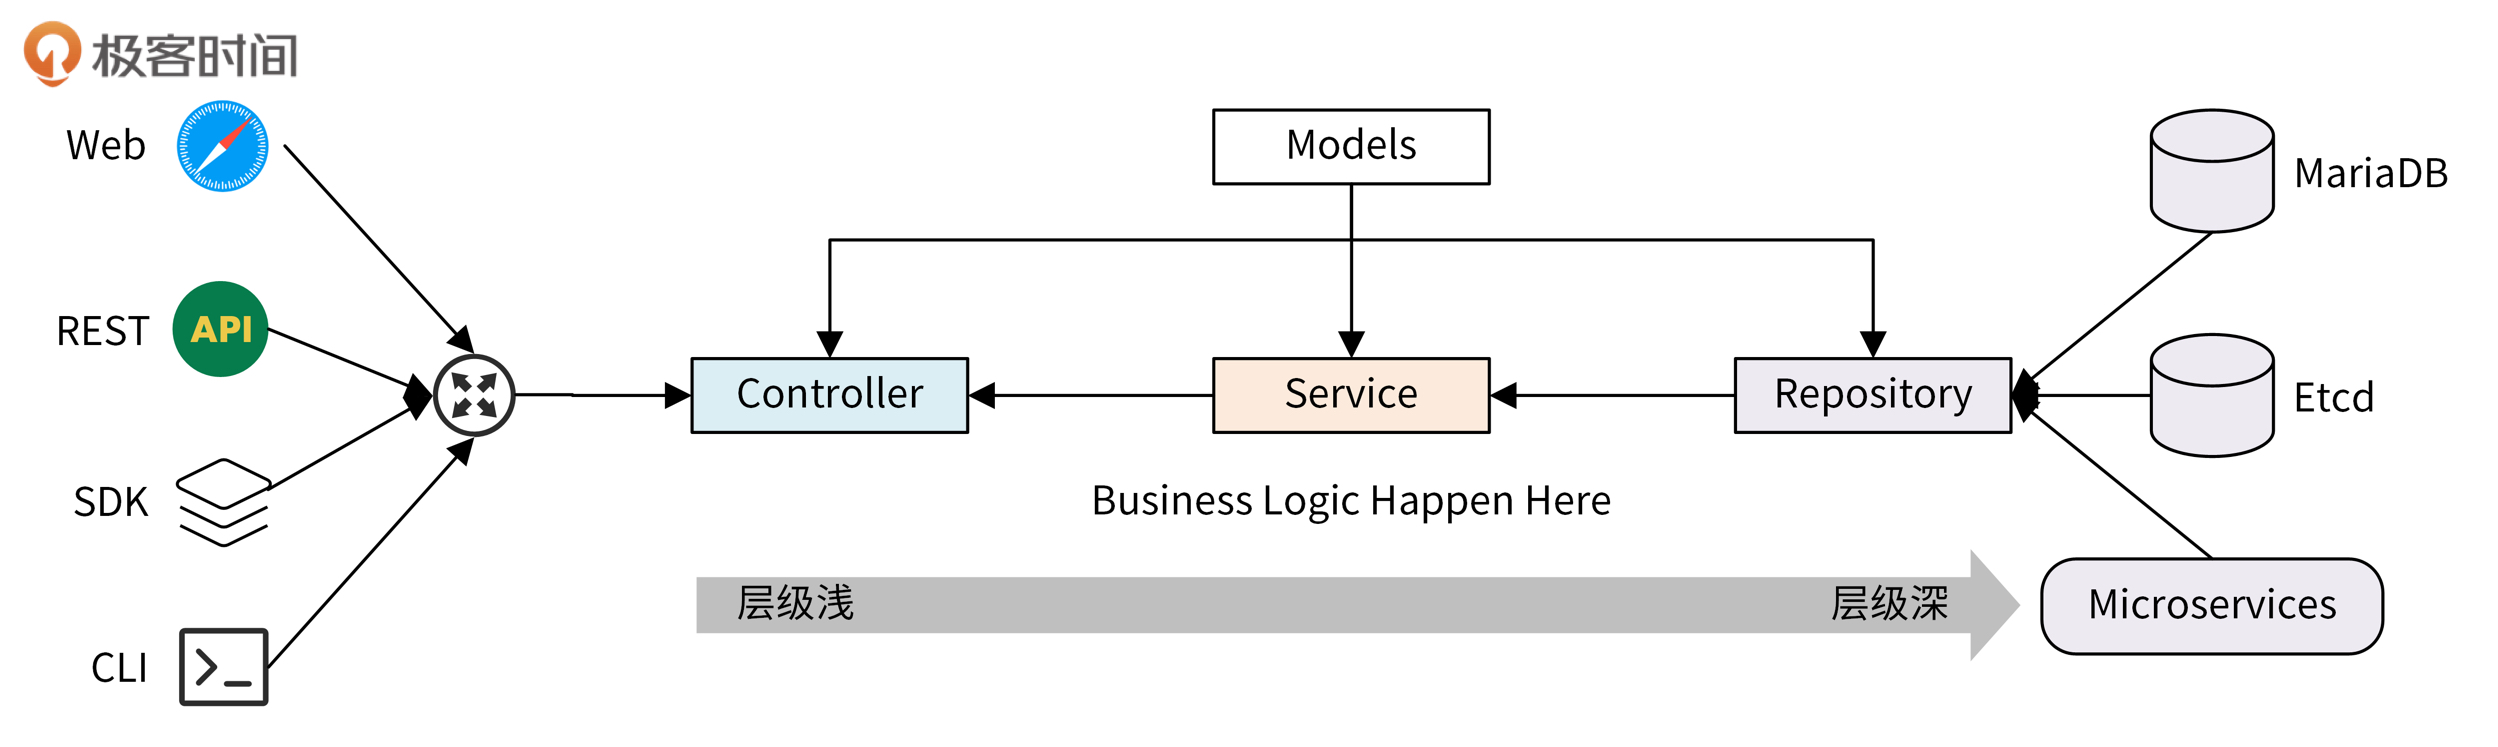
代码架构分为4层: 模型层(Models)、控制层(Controller)、业务层(Service)、仓库层(Repository)
层与层之间有严格的导入关系,防止循环导入的问题,具体如下:
- 模型层可以被仓库层、业务层和控制层导入
- 业务层可以导入仓库层的包
- 控制层可以业务层,特殊情况可以导入仓库层
具体看一下每一层
- 模型层(Models)
模型层,也称实体层(Entities),IAM项目将模型层单独放在了一个仓库,方便其他项目共用
模型即可作为数据库模型,又可作为API接口的入参模型或出参模型,如果有差异可以新建模型来适配
-
仓库层(Repository)
仓库层用来和数据库进行CURD交互,并起到数据转换的作用
-
业务层(Service)
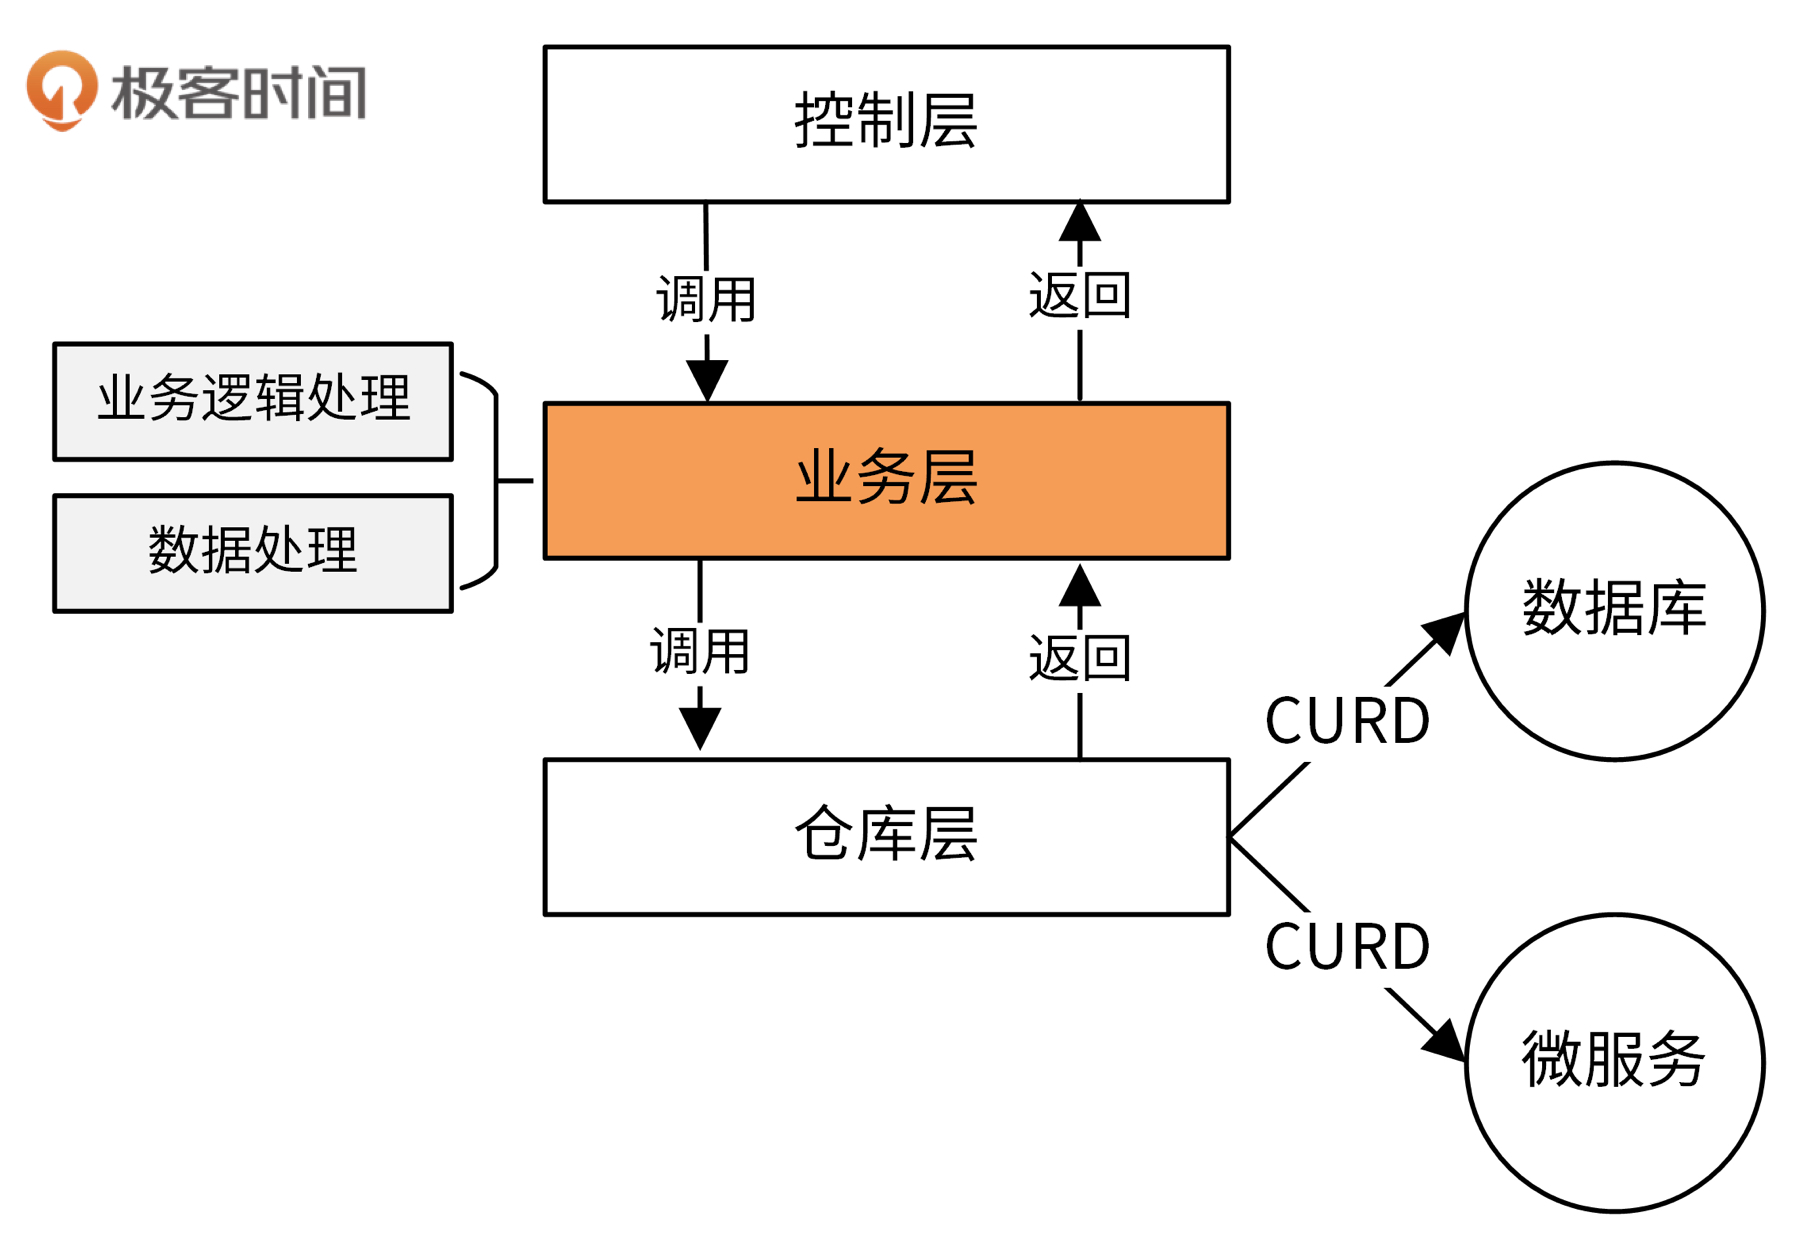
业务层主要完成业务逻辑处理
- 控制层(Controller)
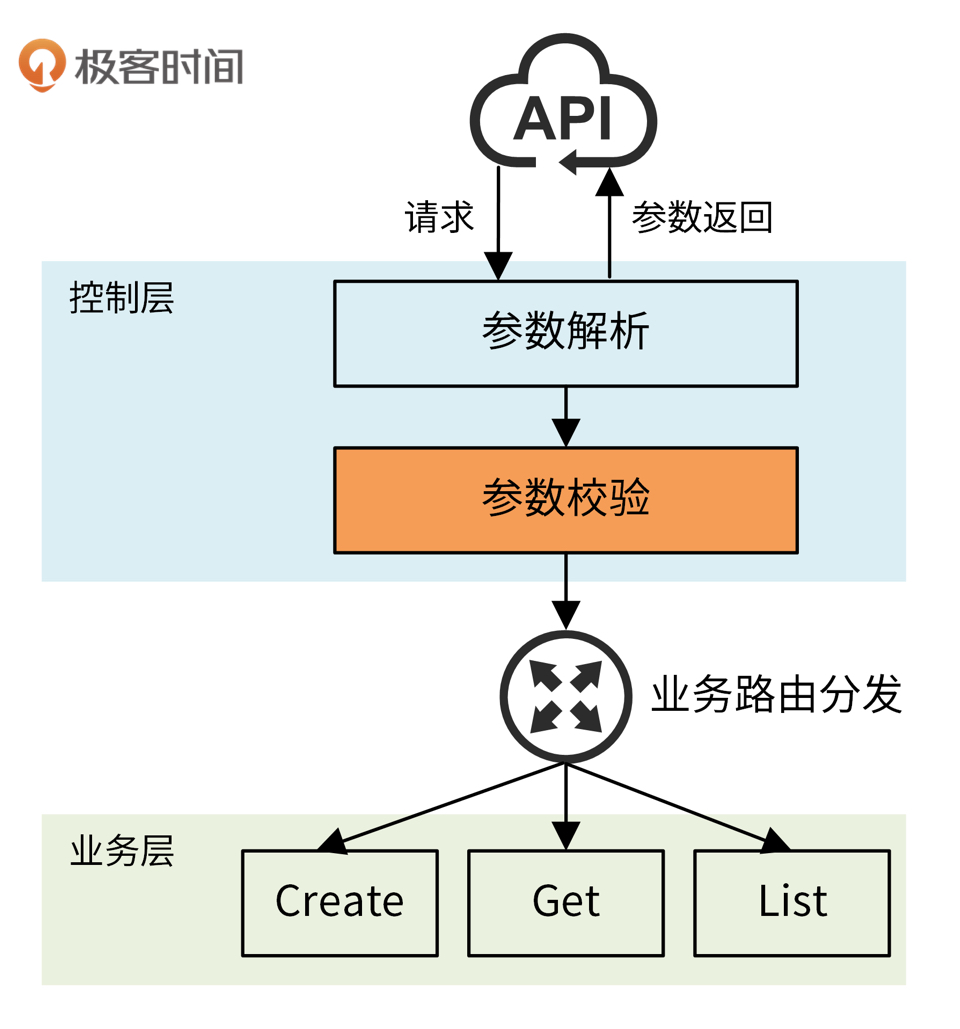
控制层接收HTTP请求,并进行参数解析、参数校验、逻辑分发处理、请求返回这些操作
控制层、业务层、仓库层之间是通过Interface通信
业务层和仓库层都使用的工厂方法设计模式
1
2
3
4
5
6
7
8
9
10
11
12
13
14
15
16
17
|
type Service interface {
Users() UserSrv
Secrets() SecretSrv
Policies() PolicySrv
}
type UserSrv interface {
Create(ctx context.Context, user *v1.User, opts metav1.CreateOptions) error
Update(ctx context.Context, user *v1.User, opts metav1.UpdateOptions) error
Delete(ctx context.Context, username string, opts metav1.DeleteOptions) error
DeleteCollection(ctx context.Context, usernames []string, opts metav1.DeleteOptions) error
Get(ctx context.Context, username string, opts metav1.GetOptions) (*v1.User, error)
List(ctx context.Context, opts metav1.ListOptions) (*v1.UserList, error)
ListWithBadPerformance(ctx context.Context, opts metav1.ListOptions) (*v1.UserList, error)
ChangePassword(ctx context.Context, user *v1.User) error
}
|
第二十一讲 iam-apiserver核心功能实现
应用框架相关
优雅关停
方式1
SetupSignalHandler
- 通过onlyOneSignalHandler确保只被调用一次
- 第一次接受信号,优雅关停,第二次强制退出
 1
 2
 3
 4
 5
 6
 7
 8
 9
10
11
12
13
14
15
16
17
18
19
20
21
22
23
24
25
26
27
28
29
30
31
32
33
34
35
36
37
38
39
40
41
42
43
44
|
var onlyOneSignalHandler = make(chan struct{})
var shutdownHandler chan os.Signal
func SetupSignalHandler() <-chan struct{} {
close(onlyOneSignalHandler) // panics when called twice
shutdownHandler = make(chan os.Signal, 2)
stop := make(chan struct{})
signal.Notify(shutdownHandler, shutdownSignals...)
go func() {
<-shutdownHandler
close(stop)
<-shutdownHandler
os.Exit(1) // second signal. Exit directly.
}()
return stop
}
func (s *grpcAPIServer) Run(stopCh <-chan struct{}) {
listen, err := net.Listen("tcp", s.address)
if err != nil {
log.Fatalf("failed to listen: %s", err.Error())
}
log.Infof("Start grpc server at %s", s.address)
go func() {
if err := s.Serve(listen); err != nil {
log.Fatalf("failed to start grpc server: %s", err.Error())
}
}()
<-stopCh
log.Infof("Grpc server on %s stopped", s.address)
s.GracefulStop()
}
|
方式2
封装GracefulShutdown,
通过ShutdownManager监听指定信号
通过ShutdownCallback处理后续逻辑
1
2
3
4
5
6
7
8
9
10
11
12
13
|
type GracefulShutdown struct {
callbacks []ShutdownCallback
managers []ShutdownManager
errorHandler ErrorHandler
}
func (gs *GracefulShutdown) AddShutdownManager(manager ShutdownManager) {
gs.managers = append(gs.managers, manager)
}
func (gs *GracefulShutdown) AddShutdownCallback(shutdownCallback ShutdownCallback) {
gs.callbacks = append(gs.callbacks, shutdownCallback)
}
|
健康检查
server启动后会尝试ping /healthz 接口确保服务启动正常
插件化加载中间件
1
2
3
4
5
6
7
8
9
10
11
12
13
14
15
16
17
18
19
|
func (s *GenericAPIServer) InstallMiddlewares() {
// necessary middlewares
s.Use(middleware.RequestID())
s.Use(middleware.Context())
// install custom middlewares
for _, m := range s.middlewares {
mw, ok := middleware.Middlewares[m]
if !ok {
log.Warnf("can not find middleware: %s", m)
continue
}
log.Infof("install middleware: %s", m)
s.Use(mw)
}
}
|
编程规范相关
API版本
- API版本号放在URI中,如
/v1/secrets
- API路径和控制层、业务层、模型层的代码想映射
1
2
3
|
internal/apiserver/controller/v1/secret/ # 控制几层代码存放位置
internal/apiserver/service/v1/secret.go # 业务层代码存放位置
github.com/marmotedu/api/apiserver/v1/secret.go # 模型层代码存放位置
|
1
2
|
$ ls internal/apiserver/controller/v1/secret/
create.go delete_collection.go delete.go doc.go get.go list.go secret.go update.go
|
统一资源元数据
 1
 2
 3
 4
 5
 6
 7
 8
 9
10
11
12
13
14
15
16
17
18
19
20
21
22
23
24
|
type ObjectMeta struct {
ID uint64 `json:"id,omitempty" gorm:"primary_key;AUTO_INCREMENT;column:id"`
InstanceID string `json:"instanceID,omitempty" gorm:"unique;column:instanceID;type:varchar(32);not null"`
Name string `json:"name,omitempty" gorm:"column:name;type:varchar(64);not null" validate:"name"`
Extend Extend `json:"extend,omitempty" gorm:"-" validate:"omitempty"`
ExtendShadow string `json:"-" gorm:"column:extendShadow" validate:"omitempty"`
CreatedAt time.Time `json:"createdAt,omitempty" gorm:"column:createdAt"`
UpdatedAt time.Time `json:"updatedAt,omitempty" gorm:"column:updatedAt"`
}
type Secret struct {
// May add TypeMeta in the future.
// metav1.TypeMeta `json:",inline"`
// Standard object's metadata.
metav1.ObjectMeta ` json:"metadata,omitempty"`
Username string `json:"username" gorm:"column:username" validate:"omitempty"`
SecretID string `json:"secretID" gorm:"column:secretID" validate:"omitempty"`
SecretKey string `json:"secretKey" gorm:"column:secretKey" validate:"omitempty"`
// Required: true
Expires int64 `json:"expires" gorm:"column:expires" validate:"omitempty"`
Description string `json:"description" gorm:"column:description" validate:"description"`
}
|
apiserver中所有的资源都是REST资源,具体分为两种属性
公共属性介绍
- ID
映射为数据库的id字段,但业务层并没有用到
- InstanceID
资源的唯一标识,格式为resource-random_str,如secrest-yj8m30
InstanceID通过gorm提供的HOOK自动更新
1
2
3
4
5
|
func (s *Secret) AfterCreate(tx *gorm.DB) (err error) {
s.InstaceID = iduti.GetInstanceId(s.ID, "secret-")
return tx.Save(s).Error
}
|
使用InstanceID的优点有:
- 看标识名就知道什么类型的资源,方便 排障
- 长度可控,相比UUID占用空间小
- 相比ID字段隐私性强,不会暴露数据规模
- Extend 和 ExtendShadow
为了满足满足表格动态扩展字段但有不想在数据库中加字段的情况,我们
在业务逻辑中加Extend字段,序列化好以ExtendShadow存到数据库中
Extend是 map[string]interface{} 类型
ExtendShadow 是 Mysql text 类型
两者之间通过gorm Hook自动序列化和反序列化
 1
 2
 3
 4
 5
 6
 7
 8
 9
10
11
12
13
14
15
16
17
18
19
20
21
22
|
// BeforeCreate run before create database record.
func (s *Secret) BeforeCreate(tx *gorm.DB) (err error) {
s.ExtendShadow = s.Extend.String()
return
}
// BeforeUpdate run before update database record.
func (s *Secret) BeforeUpdate(tx *gorm.DB) (err error) {
s.ExtendShadow = s.Extend.String()
return err
}
// AfterFind run after find to unmarshal a extend shadown string into metav1.Extend struct.
func (s *Secret) AfterFind(tx *gorm.DB) (err error) {
if err := json.Unmarshal([]byte(s.ExtendShadow), &s.Extend); err != nil {
return err
}
return nil
}
|
- CreateAt 和 UpdateAt
gorm会自动处理这两个字段
统一返回
1
2
3
4
5
6
7
8
9
10
11
12
13
14
15
|
func WriteResponse(c *gin.Context, err error, data interface{}) {
if err != nil {
log.Errorf("%#+v", err)
coder := errors.ParseCoder(err)
c.JSON(coder.HTTPStatus(), ErrResponse{
Code: coder.Code(),
Message: coder.String(),
Reference: coder.Reference(),
})
return
}
c.JSON(http.StatusOK, data)
}
|
并发处理
查询列表接口时可能需要对于查出来的每一条记录做一些其他逻辑处理,需要并发处理
 1
 2
 3
 4
 5
 6
 7
 8
 9
10
11
12
13
14
15
16
17
18
19
20
21
22
23
24
25
26
27
28
29
30
31
32
33
34
35
36
37
38
39
40
41
42
43
44
45
46
47
48
49
50
51
52
53
54
55
56
57
58
59
60
|
func (u *userService) List(ctx context.Context, opts metav1.ListOptions) (*v1.UserList, error) {
users, err := u.store.Users().List(ctx, opts)
if err != nil {
log.L(ctx).Errorf("list users from storage failed: %s", err.Error())
return nil, errors.WithCode(code.ErrDatabase, err.Error())
}
wg := sync.WaitGroup{}
errChan := make(chan error, 1)
finished := make(chan bool, 1)
var m sync.Map
// Improve query efficiency in parallel
for _, user := range users.Items {
wg.Add(1)
go func(user *v1.User) {
defer wg.Done()
// some cost time process
policies, err := u.store.Policies().List(ctx, user.Name, metav1.ListOptions{})
if err != nil {
errChan <- errors.WithCode(code.ErrDatabase, err.Error())
return
}
m.Store(user.ID, &v1.User{
...
Phone: user.Phone,
TotalPolicy: policies.TotalCount,
})
}(user)
}
go func() {
wg.Wait()
close(finished)
}()
select {
case <-finished:
case err := <-errChan:
return nil, err
}
// infos := make([]*v1.User, 0)
infos := make([]*v1.User, 0, len(users.Items))
for _, user := range users.Items {
info, _ := m.Load(user.ID)
infos = append(infos, info.(*v1.User))
}
log.L(ctx).Debugf("get %d users from backend storage.", len(infos))
return &v1.UserList{ListMeta: users.ListMeta, Items: infos}, nil
}
|
如上示例结合了 chan、sync.Map和WaitGroup
其他
插件化选择JSON库
通过使用+build标签构建的时候自动使用对应的json库
调用链实现
Context中间件会设置好RequestID和Username信息
1
2
3
4
5
6
7
|
func Context() gin.HandlerFunc {
return func(c *gin.Context) {
c.Set(log.KeyRequestID, c.GetString(XRequestIDKey))
c.Set(log.KeyUsername, c.GetString(UsernameKey))
c.Next()
}
}
|
log.L(ctx context.Context)函数会打印调用链信息:
1
2
3
|
2021-07-19 19:41:33.472 INFO apiserver apiserver/auth.go:205 user `admin` is authenticated. {"requestID": "b6c56cd3-d095-4fd5-a928-291a2e33077f", "username": "admin"}
2021-07-19 19:41:33.472 INFO apiserver policy/create.go:22 create policy function called. {"requestID": "b6c56cd3-d095-4fd5-a928-291a2e33077f", "username": "admin"}
...
|
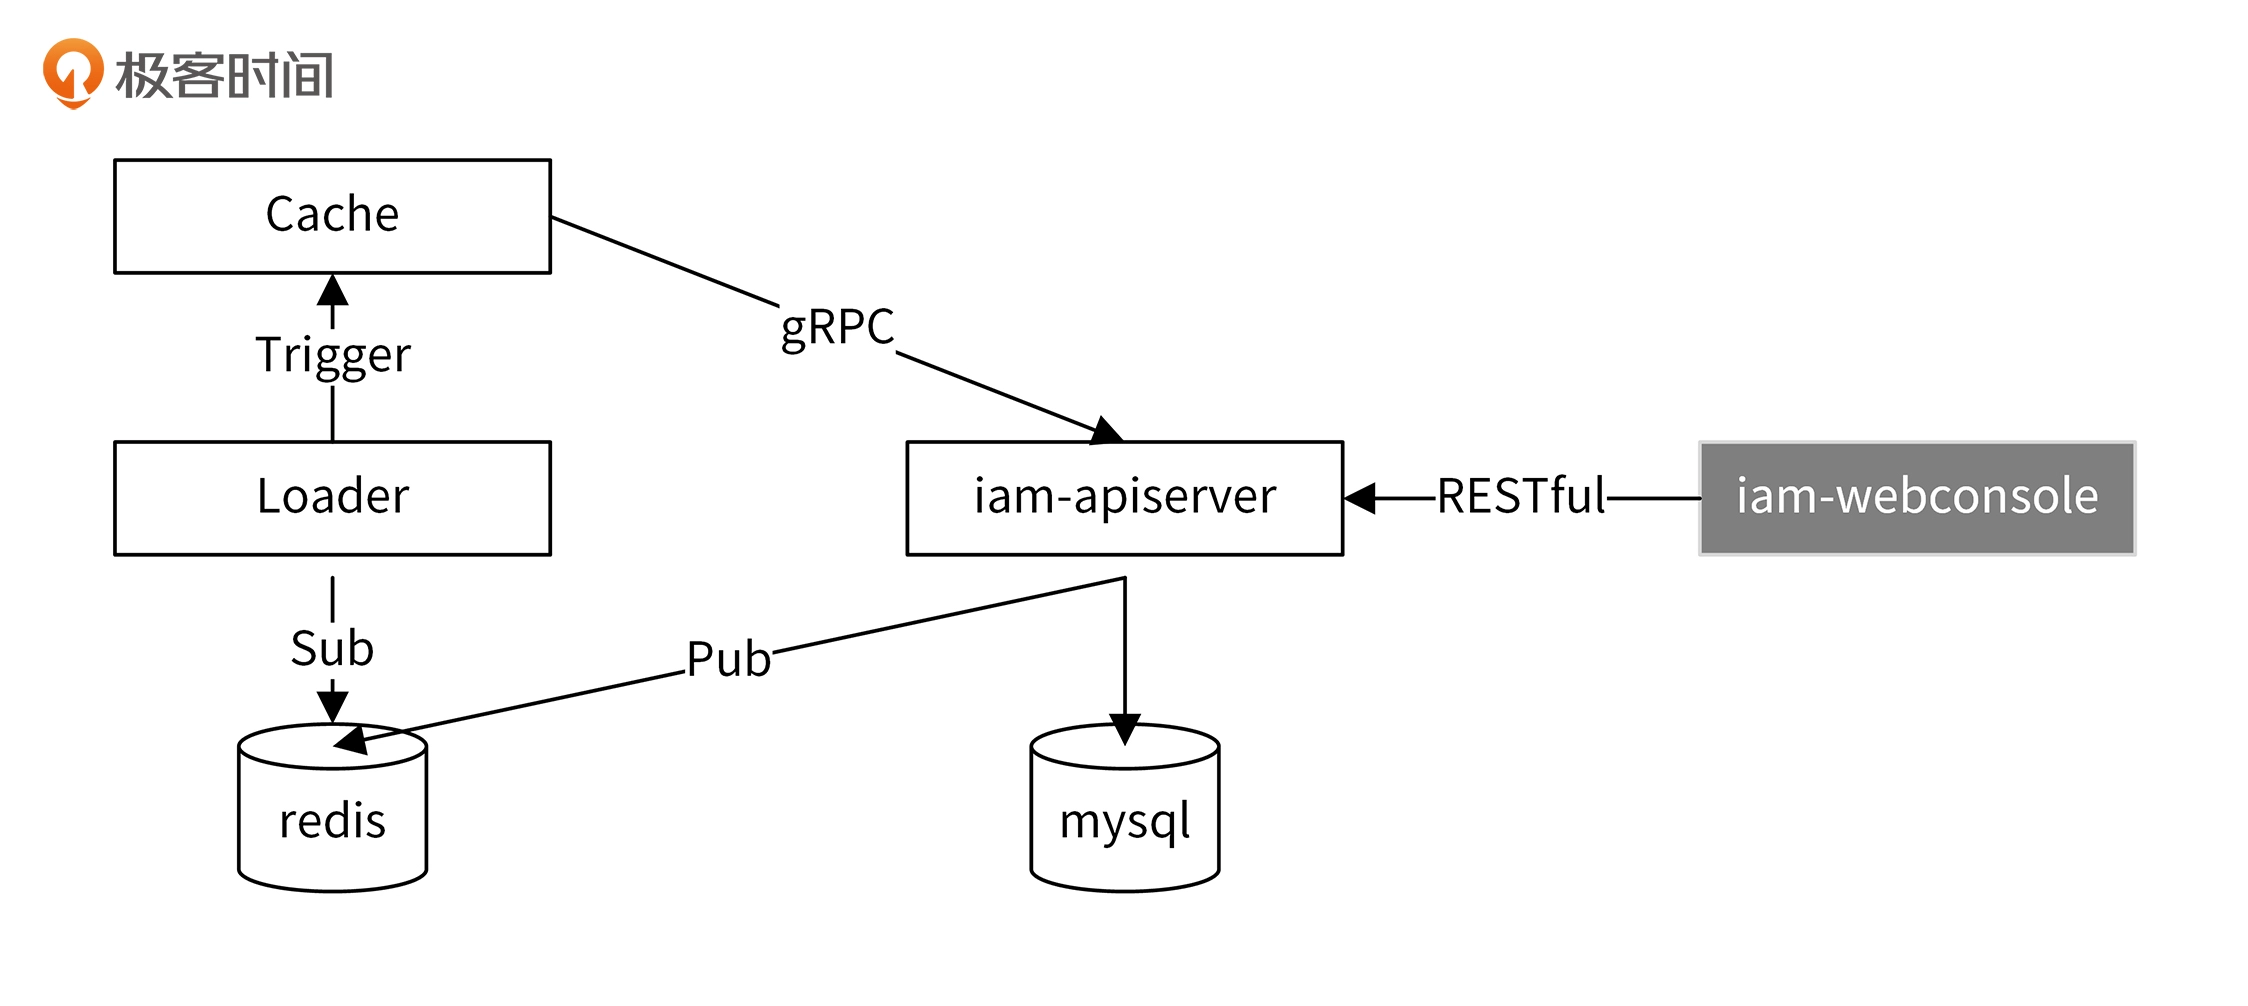
数据一致性

- authz-server启动时会通过grpc接口调用api-server获取数据
- 当api-server数据更新时,发通过redis发信心给authz-server
- authz-server订阅收到信息后会重新通过grpc接口加载全量数据
第二十二讲 GORM介绍
常用操作
模型定义
通过column标签指定列名,通过给Model添加TableName方法指定表名
1
2
3
4
5
6
7
8
9
10
|
type Animal struct {
AnimalID int64 `gorm:"column:animalID;primarykey"` // 将列名设为 `animalID`
Birthday time.Time `gorm:"column:birthday"` // 将列名设为 `birthday`
Age int64 `gorm:"column:age"` // 将列名设为 `age`
}
func (a *Animal) TableName() string {
return "animal"
}
|
连接数据库
1
2
3
4
5
6
7
8
9
10
11
|
import (
"gorm.io/driver/mysql"
"gorm.io/gorm"
)
func main() {
// 参考 https://github.com/go-sql-driver/mysql#dsn-data-source-name 获取详情
dsn := "user:pass@tcp(127.0.0.1:3306)/dbname?charset=utf8mb4&parseTime=True&loc=Local"
db, err := gorm.Open(mysql.Open(dsn), &gorm.Config{})
}
|
创建记录
1
2
3
4
5
6
7
8
|
type User struct {
gorm.Model
Name string
Age uint8
Birthday *time.Time
}
user := User{Name: "Jinzhu", Age: 18, Birthday: time.Now()}
result := db.Create(&user) // 通过数据的指针来创建
|
db.Create 函数会返回三个值
- user.ID: 主键,直接赋值给user变量
- result.Error: error
- result.RowsAffected: 插入记录的条数
删除记录
1
2
3
4
5
6
7
|
// DELETE from users where id = 10 AND name = "jinzhu";
db.Where("name = ?", "jinzhu").Delete(&User{})
// DELETE FROM users WHERE id = 10;
db.Delete(&User{}, 10)
|
当模型中包含DeletedAt字段时,默认 执行 软删除
1
2
3
4
5
6
|
// UPDATE users SET deleted_at="2013-10-29 10:23" WHERE age = 20;
db.Where("age = ?", 20).Delete(&User{})
// SELECT * FROM users WHERE age = 20 AND deleted_at IS NULL;
db.Where("age = 20").Find(&user)
|
永久删除可用 Unscoped
1
2
|
// DELETE FROM orders WHERE id=10;
db.Unscoped().Delete(&order)
|
更新记录
获取记录实例再更新
1
2
3
4
5
6
|
db.First(&user)
user.Name = "jinzhu 2"
user.Age = 100
// UPDATE users SET name='jinzhu 2', age=100, birthday='2016-01-01', updated_at = '2013-11-17 21:34:10' WHERE id=111;
db.Save(&user)
|
指定列更新
1
2
3
4
5
|
// UPDATE users SET age=200, updated_at='2013-11-17 21:34:10' WHERE name='colin';
db.Model(&User{}).Where("name = ?", "colin").Update("age", 200)
// UPDATE users SET name='hello', age=18, updated_at = '2013-11-17 21:34:10' WHERE name = 'colin';
db.Model(&user).Where("name", "colin").Updates(User{Name: "hello", Age: 18, Active: false})
|
查询记录
简单查询
 1
 2
 3
 4
 5
 6
 7
 8
 9
10
11
12
13
14
15
16
17
18
19
20
21
22
23
24
25
26
27
28
|
// 获取第一条记录(主键升序)
// SELECT * FROM users ORDER BY id LIMIT 1;
db.First(&user)
// 获取最后一条记录(主键降序)
// SELECT * FROM users ORDER BY id DESC LIMIT 1;
db.Last(&user)
result := db.First(&user)
result.RowsAffected // 返回找到的记录数
result.Error // returns error
// 检查 ErrRecordNotFound 错误
errors.Is(result.Error, gorm.ErrRecordNotFound)
users := make([]*User, 0)
// SELECT * FROM users WHERE name <> 'jinzhu';
db.Where("name <> ?", "jinzhu").Find(&users)
type APIUser struct {
ID uint
Name string
}
// SELECT `id`, `name` FROM `users` LIMIT 10;
db.Model(&User{}).Limit(10).Find(&APIUser{})
|
高级查询
1
2
3
4
5
6
7
8
9
10
11
12
13
|
// SELECT * FROM users ORDER BY age desc, name;
db.Order("age desc, name").Find(&users)
// SELECT * FROM users OFFSET 5 LIMIT 10;
db.Limit(10).Offset(5).Find(&users)
// Distinct
db.Distinct("name", "age").Order("name, age desc").Find(&results)
var count int64
// SELECT count(1) FROM users WHERE name = 'jinzhu'; (count)
db.Model(&User{}).Where("name = ?", "jinzhu").Count(&count)
|
原生SQL
1
2
3
4
5
6
7
8
9
10
11
12
13
|
type Result struct {
ID int
Name string
Age int
}
var result Result
db.Raw("SELECT id, name, age FROM users WHERE name = ?", 3).Scan(&result)
db.Exec("DROP TABLE users")
db.Exec("UPDATE orders SET shipped_at=? WHERE id IN ?", time.Now(), []int64{1,2,3})
|
钩子
1
2
3
4
5
6
7
8
9
|
// 插入记录前执行 BeforeCreate
func (u *User) BeforeCreate(tx *gorm.DB) (err error) {
u.UUID = uuid.New()
if u.Name == "admin" {
return errors.New("invalid name")
}
return
}
|
第二十三讲 数据流服务 authz-server 设计
访问控制策略库 ladon
策略样例
1
2
3
4
5
6
7
8
9
10
11
12
13
14
15
16
17
18
|
{
"description": "One policy to rule them all.",
"subjects": ["users:<peter|ken>", "users:maria", "groups:admins"],
"actions" : ["delete", "<create|update>"],
"effect": "allow",
"resources": [
"resources:articles:<.*>",
"resources:printer"
],
"conditions": {
"remoteIP": {
"type": "CIDRCondition",
"options": {
"cidr": "192.168.0.1/16"
}
}
}
}
|
一般策略包含6个元素
- 主题 subject:授权主体,必须唯一
- 操作 action
- 效力 effect:表示结果是允许 allow 还是拒绝 deny
- 资源 resource:操作的对象
- 约束条件 condition:如IP、日期等
- 描述 description:策略说明
假如有一个如下请求
1
2
3
4
5
6
7
8
9
|
{
"subject": "users:peter",
"action" : "delete",
"resource": "resources:articles:ladon-introduction",
"context": {
"remoteIP": "192.168.0.5"
}
}
|
那么操作是允许的
1
2
3
|
{
"allowed": true
}
|
authz-server 代码实现
启动流程
API请求处理流程
代码架构
缓存更新
第二十四讲 数据采集
通常一个大型应用为了后期排障和运营分析,会收集一些请求日志
功能设计
数据采集系统通常分为两部分:数据上报、数据处理
为了提高异步数据上报的吞吐量,可以先将数据缓存在内存中,并使用多个worker去
消费内存中的数据
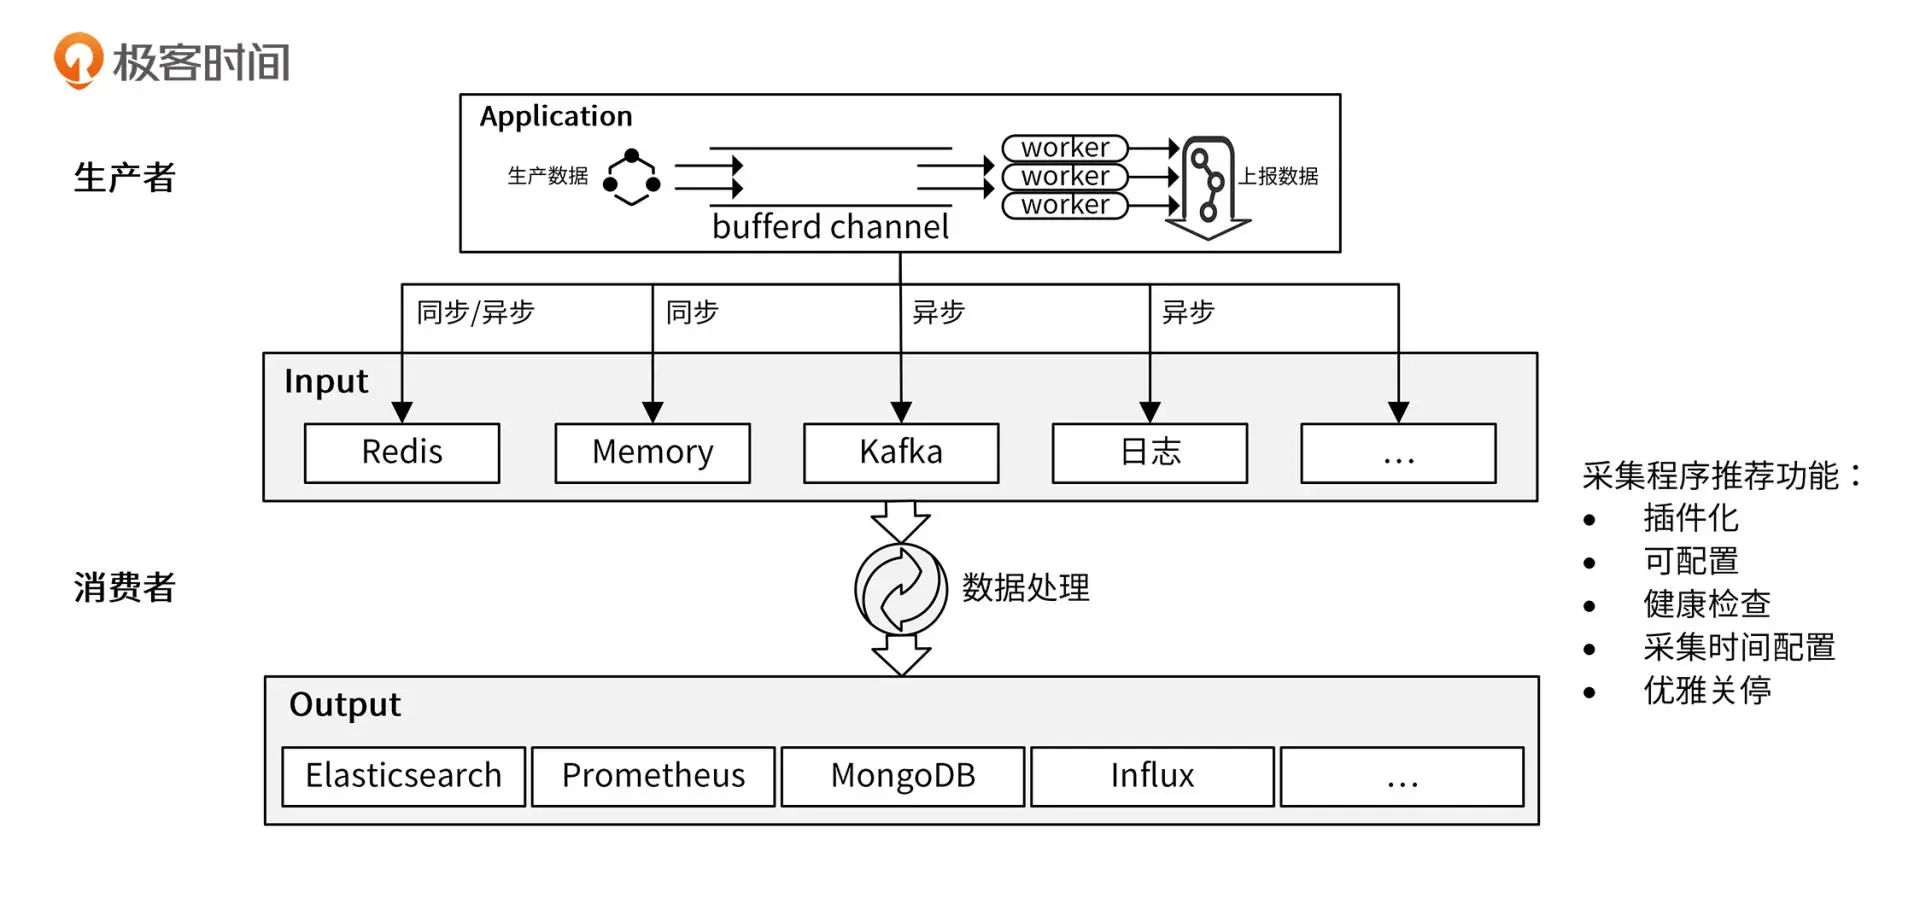
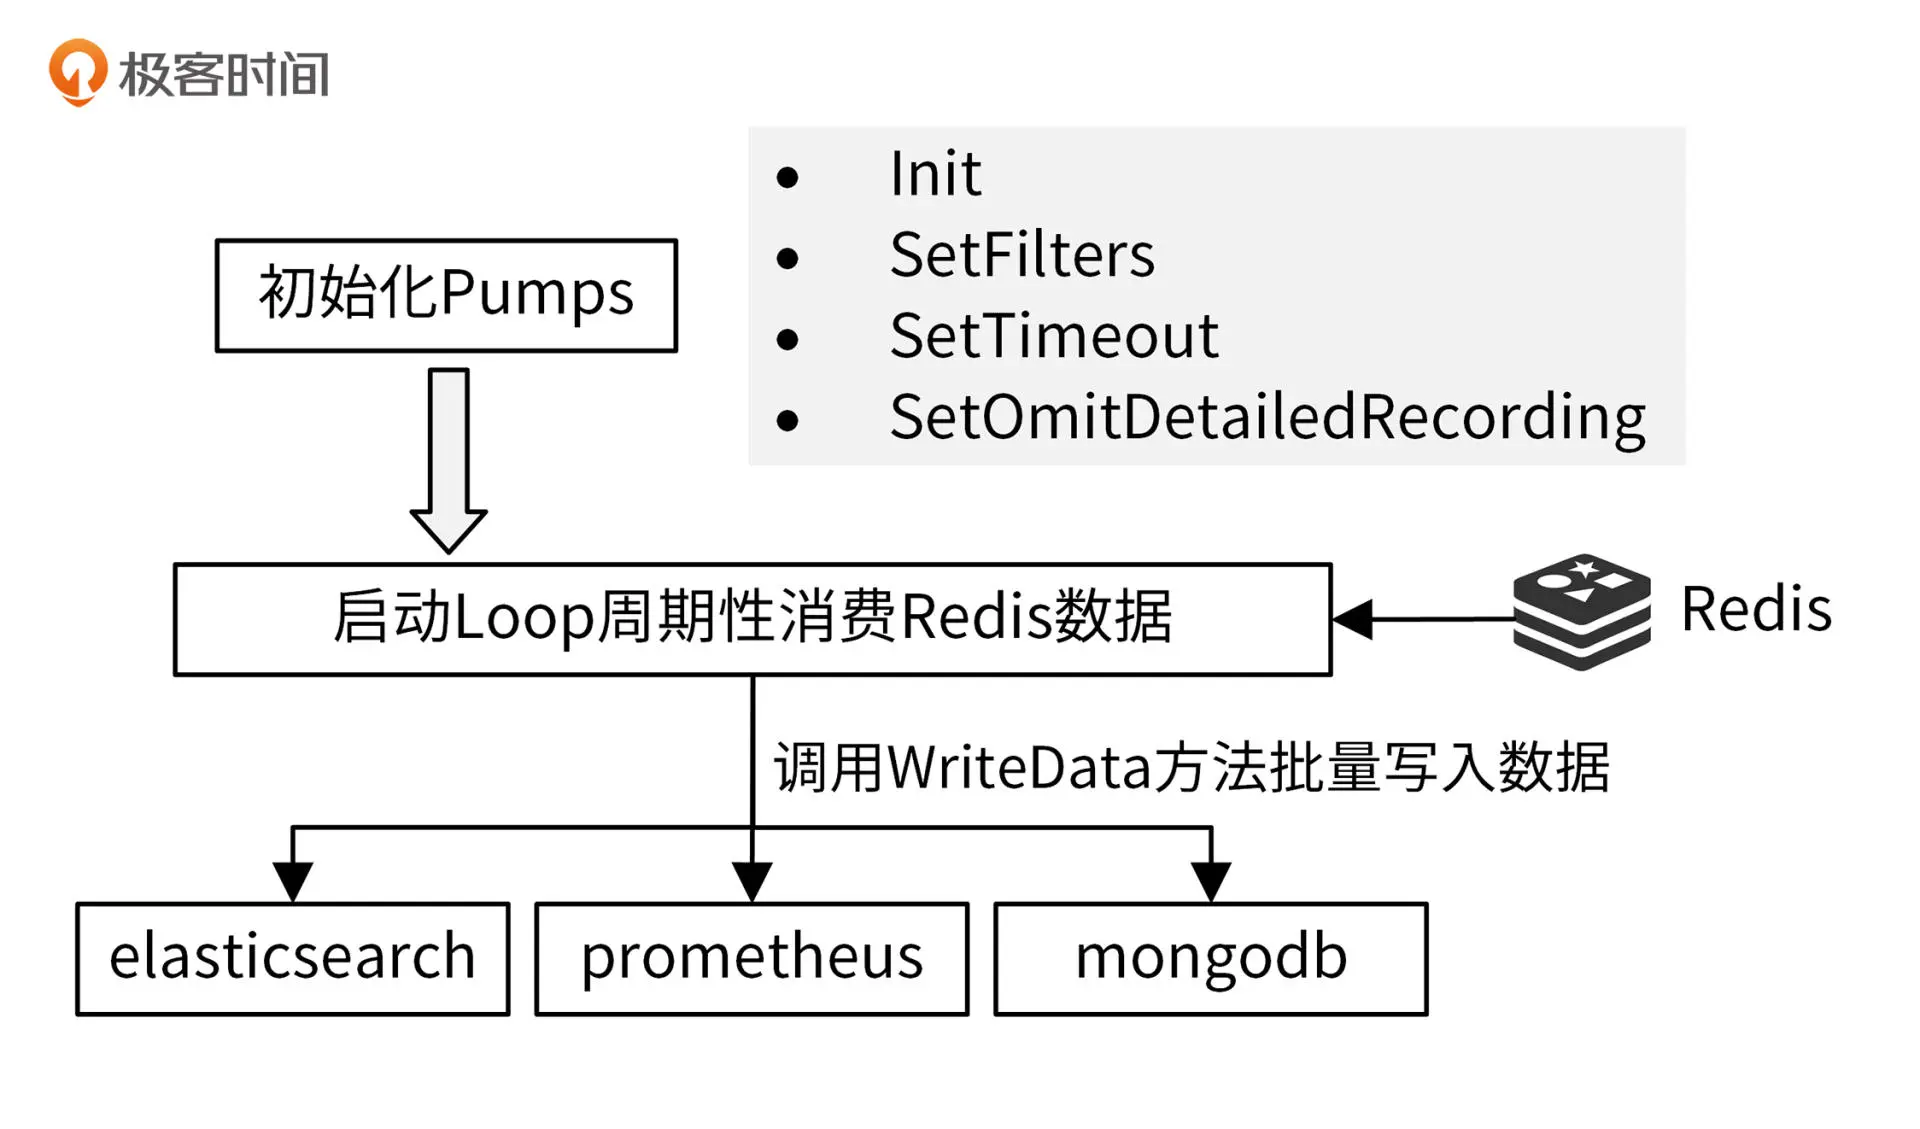
功能实现
iam中 authz-server实现了数据上报功能,pump服务实现数据采集功能
数据上报
authz-sever实现要点
- 上报功能开启、批量上报数量、时间间隔都可以配置
- 多个 worker共同消费一个chan 提高消费能力
- 优雅关停,确保停止时缓存的数据也会上报
- 使用msgpack序列化消息,msgpack比json更快更小
数据采集
pump服务消费Redis中的消费数据,然后保存在MongoDB中
第二十五讲 公有云SDK设计
目录结构
1
2
3
4
5
6
7
8
9
10
11
12
13
14
15
16
|
├── examples # 示例代码存放目录
│ └── authz.go
├── README.md # SDK使用文档
├── sdk # 公共包,封装了SDK配置、API请求、认证等代码
│ ├── client.go
│ ├── config.go
│ ├── credential.go
│ └── ...
└── services # API封装
├── common
│ └── model
├── iam # iam服务的API接口
│ ├── authz.go
│ ├── client.go
│ └── ...
└── tms # tms服务的API接口
|
设计方法
Client构造SDK客户端,请求Builder和Signer来构建请求参数,之后
请求Request模块发送请求
第二十六讲 IAM SDK设计
设计风格参考k8s的设计方式,大量使用interface特性,将接口定义和实现解耦;
多版本共存;接口调用曾经和资源层级相匹配
设计思路
分层设计,有项目、应用和服务三个级别的接口
 1
 2
 3
 4
 5
 6
 7
 8
 9
10
11
12
13
14
15
16
17
18
19
20
21
22
23
24
25
26
27
28
29
30
31
32
33
34
35
|
// 项目级别的接口
type Interface interface {
Iam() iam.IamInterface
Tms() tms.TmsInterface
}
// 应用级别的接口
type IamInterface interface {
APIV1() apiv1.APIV1Interface
AuthzV1() authzv1.AuthzV1Interface
}
// 服务级别的接口
type APIV1Interface interface {
RESTClient() rest.Interface
SecretsGetter
UsersGetter
PoliciesGetter
}
// 资源级别的客户端
type SecretsGetter interface {
Secrets() SecretInterface
}
// 资源的接口定义
type SecretInterface interface {
Create(ctx context.Context, secret *v1.Secret, opts metav1.CreateOptions) (*v1.Secret, error)
Update(ctx context.Context, secret *v1.Secret, opts metav1.UpdateOptions) (*v1.Secret, error)
Delete(ctx context.Context, name string, opts metav1.DeleteOptions) error
DeleteCollection(ctx context.Context, opts metav1.DeleteOptions, listOpts metav1.ListOptions) error
Get(ctx context.Context, name string, opts metav1.GetOptions) (*v1.Secret, error)
List(ctx context.Context, opts metav1.ListOptions) (*v1.SecretList, error)
SecretExpansion
}
|
使用实例
可以根据需求创建不同级别的客户端
项目级客户端
1
2
3
4
|
config, err := clientcmd.BuildConfigFromFlags("", "/root/.iam/config")
clientset, err := marmotedu.NewForConfig(config)
rsp, err := clientset.Iam().AuthzV1().Authz().Authorize()
|
应用级客户端
1
2
3
4
5
|
config, err := clientcmd.BuildConfigFromFlags("", "/root/.iam/config")
iamclient,, err := iam.NewForConfig(config)
rsp, err := iamclient.AuthzV1().Authz().Authorize()
|
服务级客户端
1
2
3
4
|
config, err := clientcmd.BuildConfigFromFlags("", "/root/.iam/config")
client, err := v1.NewForConfig(config)
rsp, err := client.Authz().Authorize()
|
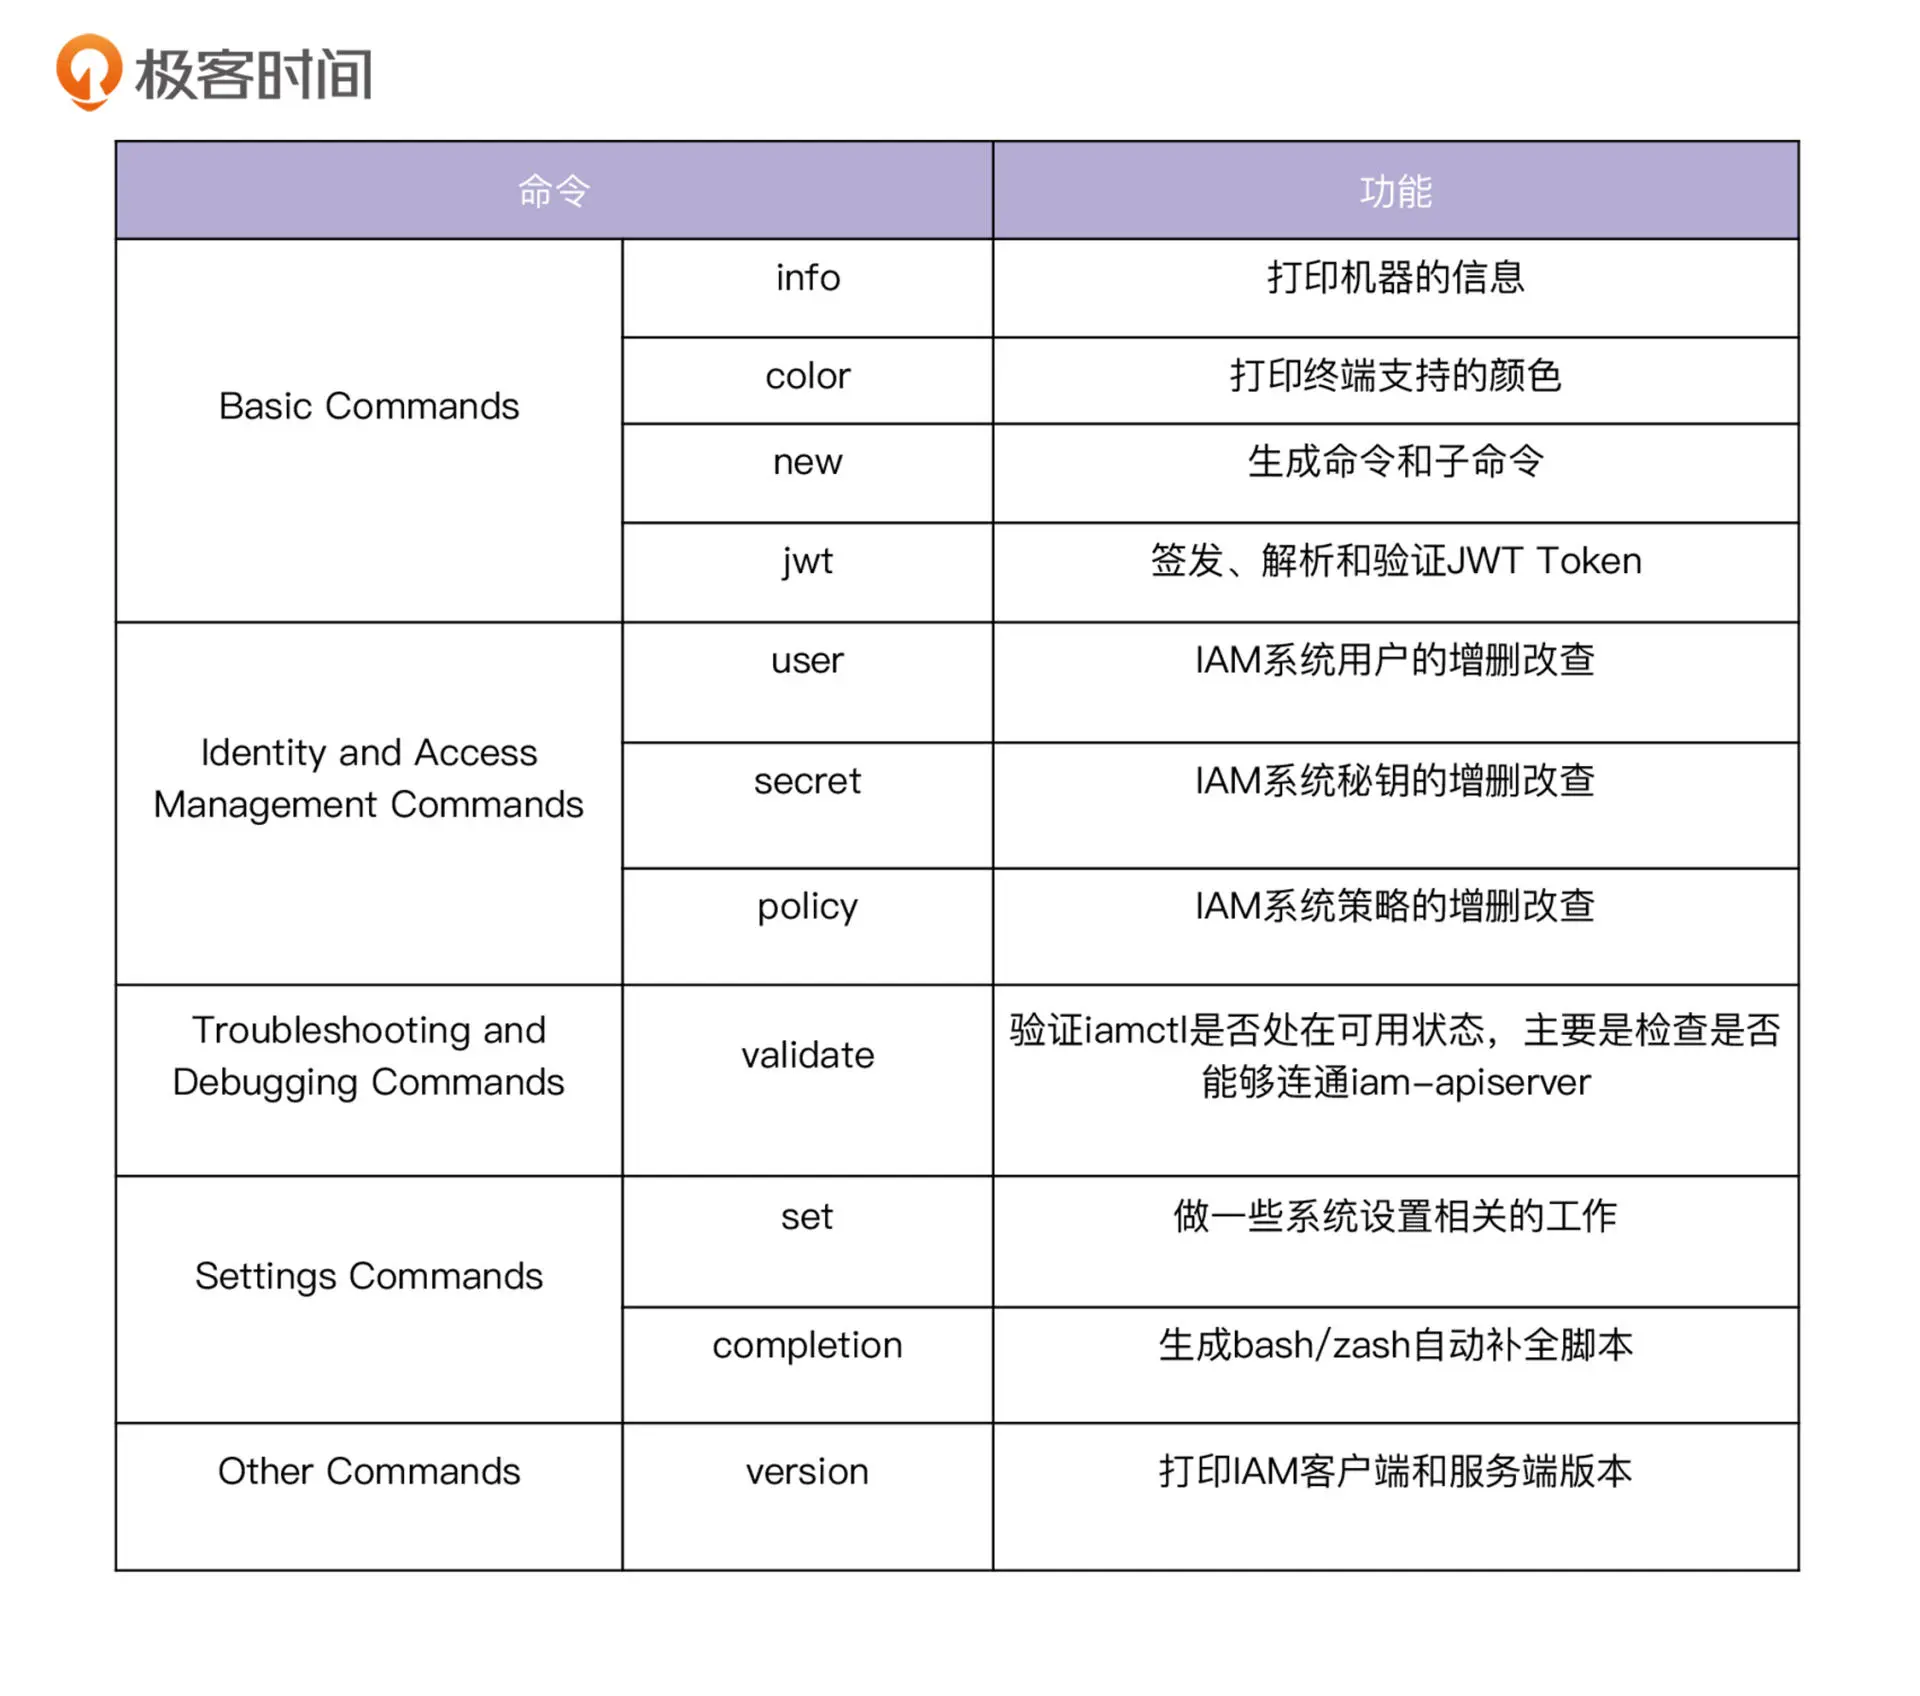
第二十七讲 IAM 命令行工具设计
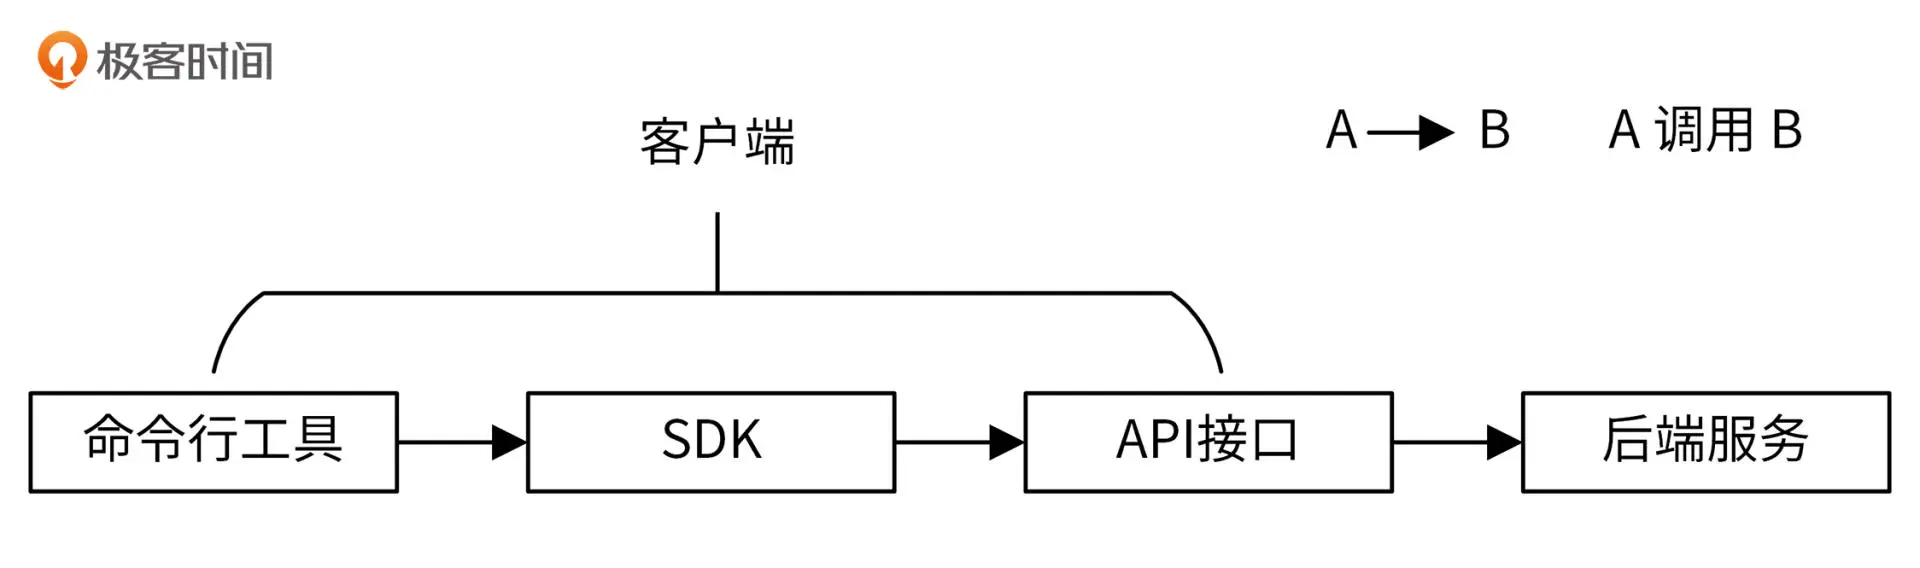
大型系统客户端的特点
- 支持命令和子命令
- 支持特殊命令如version、completion(bash补全)
- 支持全局选项
- 支持
-h/--help(帮助信息)
iamctl核心实现
第二十八讲 如何编写单元测试和性能测试用例
单元测试
示例
1
2
3
4
5
6
7
8
9
10
11
12
13
14
15
16
17
|
func TestAbs(t *testing.T) {
tests := []struct {
x float64
want float64
}{
{-0.3, 0.3},
{-2, 2},
{-3.1, 3.1},
{5, 5},
}
for _, tt := range tests {
if got := Abs(tt.x); got != tt.want {
t.Errorf("Abs() = %f, want %v", got, tt.want)
}
}
}
|
可以使用 assert库封装好的Equal、Less等 判断函数
可以使用 gotests自动生成测试代码,这样只用填写测试参数就可以了
性能测试
性能测试函数以Benchmark开头,参数类型为*testing.B,其中循环次数N会在运行时动态 吊装,以便可靠的计时
go test需要添加 -bench <pattern>参数才会执行性能测试
第二十九讲 IAM测试介绍
示例测试
示例测试以Example开头, 执行go test命令时,会比较标出输出和注释的内容
1
2
3
4
5
|
func ExmapleMax() {
fmt.Println(Max(1, 2))
// Output:
// 2
}
|
TestMain 函数
TestMain是一个特使的函数,可以在测试前后做相应的准备和清理工作,中间调用m.Run()函数才会执行普通的 测试函数
1
2
3
4
5
|
func TestMain(m *testing.M) {
fmt.Println("do some setup")
m.Run()
fmt.Println("do some setdown")
}
|
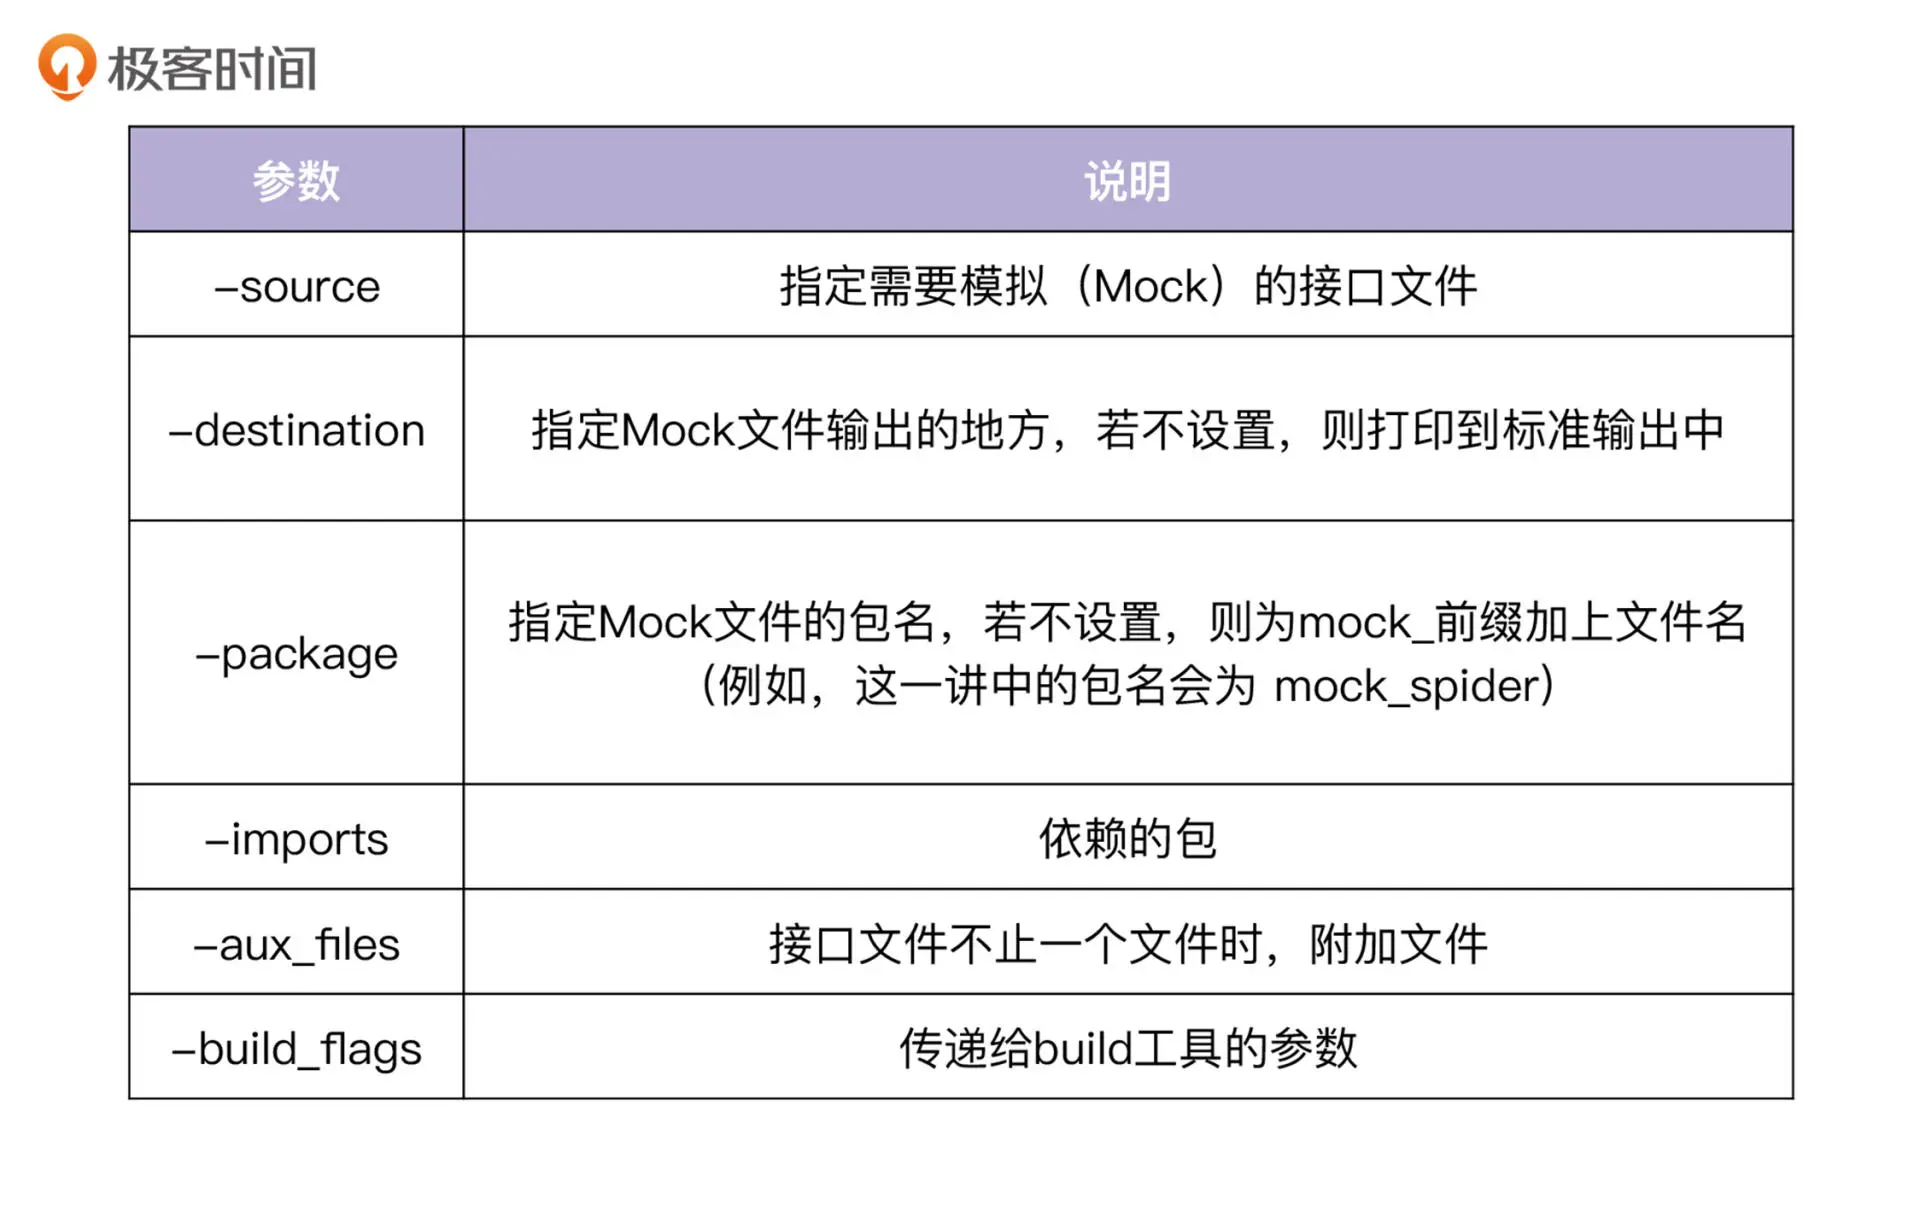
Mock测试
使用mockgen生成Mock代码
参数说明
生成方式
- 源码模式
1
|
$ mockgen -destination spider/mock/mock_spider.go -package spider -source spider/spider.go
|
- 反射模式
1
|
$ mockgen -destination spider/mock/mock_spider.go -package spider github.com/marmotedu/gopractise-demo/gomock/spider Spider```
|
- 注释
在文件代码中添加注释
1
|
//go:generate mockgen -destination mock_spider.go -package spider github.com/cz-it/blog/blog/Go/testing/gomock/example/spider Spider
|
然后执行以下面了就可自动生成Mock代码
编写测试用例
1
2
3
4
5
6
7
8
9
10
|
// 1. 创建Mock控制器
ctrl := gomock.NewController(t)
defer ctrl.Finish()
// 2. 创建Mock对象
mockSpider := spider.NewMockSpider(ctrl)
want := "1.2.1"
// 3. 指定方法的入参和返回值
mockSpider.EXPECT().GetBody().Return(want)
|
参数匹配
- gomock.Any(),可以用来表示任意的入参。
- gomock.Eq(value),用来表示与 value 等价的值。
- gomock.Not(value),用来表示非 value 以外的值。
- gomock.Nil(),用来表示 None 值
Call对象约束
1
2
3
4
5
6
7
8
|
func (c *Call) After(preReq *Call) *Call // After声明调用在preReq完成后执行
func (c *Call) AnyTimes() *Call // 允许调用次数为 0 次或更多次
func (c *Call) Do(f interface{}) *Call // 声明在匹配时要运行的操作
func (c *Call) MaxTimes(n int) *Call // 设置最大的调用次数为 n 次
func (c *Call) MinTimes(n int) *Call // 设置最小的调用次数为 n 次
func (c *Call) Return(rets ...interface{}) *Call // // 声明模拟函数调用返回的值
func (c *Call) SetArg(n int, value interface{}) *Call // 声明使用指针设置第 n 个参数的值
func (c *Call) Times(n int) *Call // 设置调用次数为 n 次
|
Fake测试
对比比较复杂的接口,可以实现一个假的实例
何时编写和执行单元测试
推荐边写代码边写测试
测试覆盖率
1
2
3
4
5
6
7
8
9
10
|
// 会生成一个converrate.out的文件
$ go test -coverprofile=coverage.out
// 分析文件
$ go tool cover -func=coverage.out
// 转成html文件
$ go tool cover -html=coverage.out -o coverage.html
|
IAM如何运行测试
- make test
1
2
3
4
5
6
7
8
9
|
.PHONY: go.test
go.test: tools.verify.go-junit-report
@echo "===========> Run unit test"
@set -o pipefail;$(GO) test -race -cover -coverprofile=$(OUTPUT_DIR)/coverage.out \\
-timeout=10m -short -v `go list ./...|\
egrep -v $(subst $(SPACE),'|',$(sort $(EXCLUDE_TESTS)))` 2>&1 | \\
tee >(go-junit-report --set-exit-code >$(OUTPUT_DIR)/report.xml)
@sed -i '/mock_.*.go/d' $(OUTPUT_DIR)/coverage.out # remove mock_.*.go files from test coverage
@$(GO) tool cover -html=$(OUTPUT_DIR)/coverage.out -o $(OUTPUT_DIR)/coverage.html
|
测试中设置了超时时间、竞态检查、代码覆盖率检查、过滤Mock等不需要写测试的目录
- make cover
1
2
3
4
|
.PHONY: go.test.cover
go.test.cover: go.test
@$(GO) tool cover -func=$(OUTPUT_DIR)/coverage.out | \\
awk -v target=$(COVERAGE) -f $(ROOT_DIR)/scripts/coverage.awk
|
第三十讲 如何分析Go语言代码性能
生成性能数据文件
命令行生成
1
|
go test -bench=".*" -cpuprofile cpu.profile -memprofile mem.profile
|
代码生成
用代码来生成性能数据文件
 1
 2
 3
 4
 5
 6
 7
 8
 9
10
11
12
13
14
15
16
17
18
19
20
21
22
23
24
|
package main
import (
"os"
"runtime/pprof"
)
func main() {
cpuOut, _ := os.Create("cpu.out")
defer cpuOut.Close()
pprof.StartCPUProfile(cpuOut)
defer pprof.StopCPUProfile()
memOut, _ := os.Create("mem.out")
defer memOut.Close()
defer pprof.WriteHeapProfile(memOut)
Sum(3, 5)
}
func Sum(a, b int) int {
return a + b
}
|
net/http/pprof包生成
1
2
3
4
5
6
7
8
9
10
11
12
13
14
15
16
17
|
func Register(r *gin.Engine, prefixOptions ...string) {
prefix := getPrefix(prefixOptions...)
prefixRouter := r.Group(prefix)
{
...
prefixRouter.GET("/profile", pprofHandler(pprof.Profile))
...
}
}
func pprofHandler(h http.HandlerFunc) gin.HandlerFunc {
handler := http.HandlerFunc(h)
return func(c *gin.Context) {
handler.ServeHTTP(c.Writer, c.Request)
}
}
|
可以通过web访问对应页面查看
也可以将对应数据生成数据文件
1
|
curl http://127.0.0.1:8080/debug/pprof/heap -o mem.profile
|
性能分析
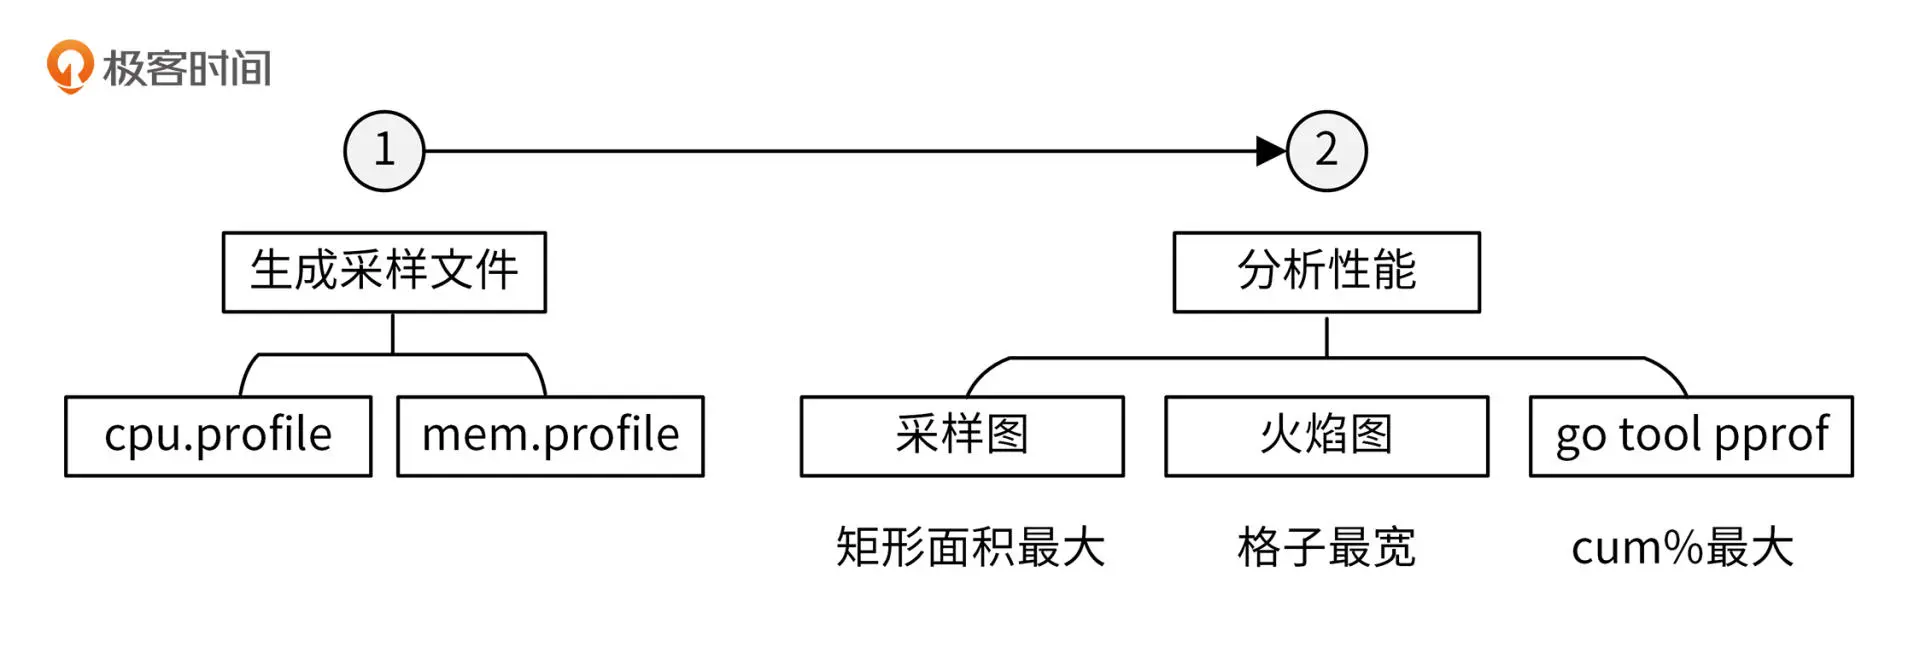
CPU性能分析
- 分析采样图
1
|
go tool pprof -svg cpu.profile > cpu.svg # svg 格式
|
- 分析火焰图
1
|
go tool pprof -http="0.0.0.0:8081" v1.test cpu.profile
|
- 交互模式查看详细数据
1
|
go tool pprof v1.test cpu.profile
|
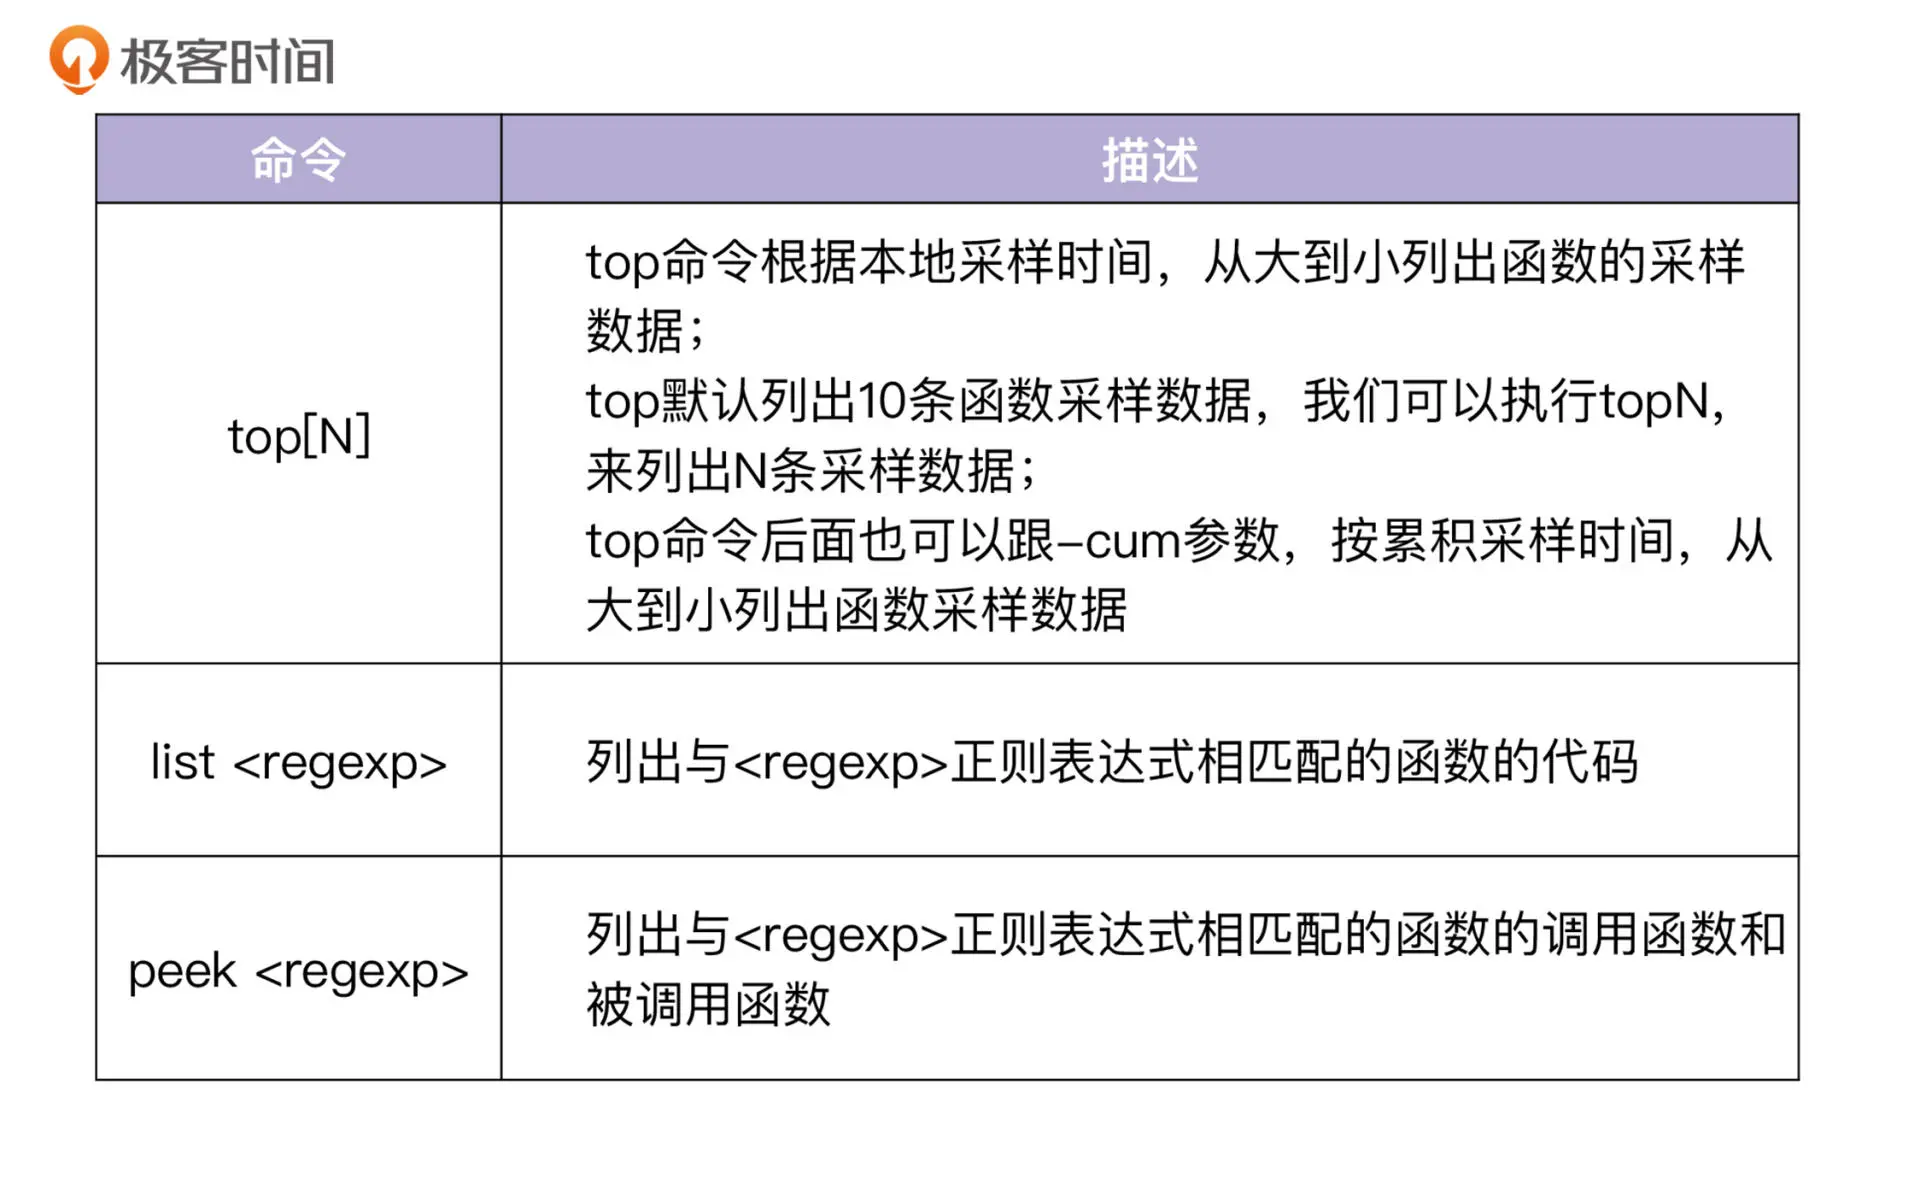
常用交互命令有三个:top、list、peek
内存性能分析
内存分析方式和CPU类似
第三十一讲 APIServer性能测试和调优
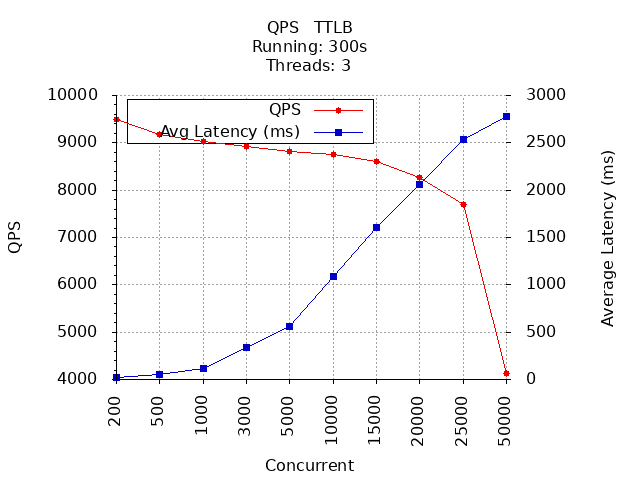
API性能测试指标
衡量API性能的指标有三个:
- 并发数(Concurrent):同时请求同一个API的用户个数
- 请求响应时间(TTLB Time to last byte):从客户端发起请求到收到服务端响应
- 每秒查询数(QPS):QPS = 并发数 / 平均请求响应时间
但测试一个接口时 QPS = TPS,测N个接口则 QPS = N * TPS
API性能测试方法
这里采用 wrk
1
|
wrk -t144 -c30000 -d30s -T30s --latency http://localhost:8080/healthz
|
集成脚本
1
|
scripts/wrktest.sh http://10.0.4.57:8080/healthz
|
结果
和net/http服务对比
1
2
3
4
5
6
7
8
9
|
# start test server
# go run tools/httptest/main.go
# client test
scripts/wrktest.sh -n http http://10.0.4.57:6667/healthz
# diff
scripts/wrktest.sh diff _output/wrk/apiserver.dat _output/wrk/http.dat
|
对比结果

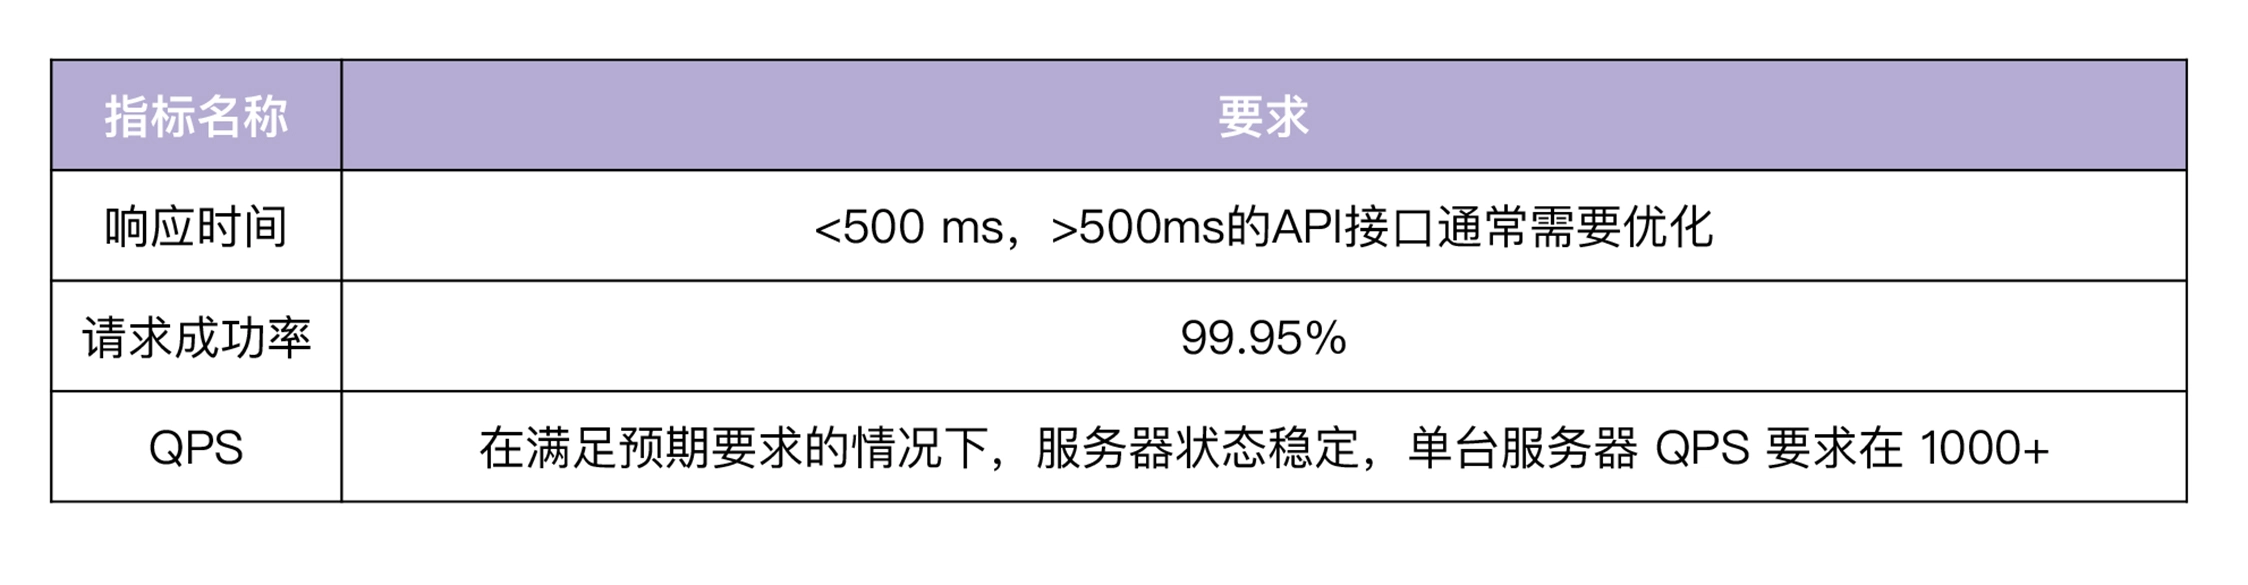
API接口性能标准参考
性能测试注意事项
Web框架性能
对Web框架测试选用的接口要足够简单
1
2
3
|
s.GET("/healthz", func(c *gin.Context) {
    core.WriteResponse(c, nil, map[string]string{"status": "ok"})
})
|
API框架性能
针对写接口,可借助单元测试来测试性能
对于读接口使用wrk这类压力测试工具来测试,通常读接口更可能遇到性能问题
测试环境
有单独的环境,保证每次都在同一个测试环境测试
参考